

This one says, "Not ready yet."I am sure your pictures do tell a lesson
Navigation
Install the app
How to install the app on iOS
How To Use Progressive Web App aka PWA On 420 Magazine Forum
Note: This feature may not be available in some browsers.
More options
You are using an out of date browser. It may not display this or other websites correctly.
You should upgrade or use an alternative browser.
You should upgrade or use an alternative browser.
InTheShed Grows Inside & Out: Jump In Any Time
- Thread starter
- #33,242
Always good to get clarity on plant positioning! I've got the loose flowers that came off during the trim sitting on top of the file cabinet, so they'll be the early testers. I'll let you know what I hear.Glad we determined that about your Smoo-shed Shedster and I’m looking forward to hearing from the Crews smoke report. Let me guess, it gets them high. Sound about right? Lmao CL.
I'm done with that branch now, though on previous plants I would have taken that whole branch off! It's a bit of a guessing game to know how far up the branch to trim, but I stop plucking when it looks like what's left might all join to make a solid top. Everything lower than that goes.I was going to ask you about exactly this. So the picture with the circled bud you took the lowest of….are you done on that branch now? I was wondering exactly how big up the branches you pinch? Like, you could pinch until only what will grow into one huge bud is left, or less. Hard to tell exactly how high you go. Also, at what point are you done? How much flower time is left when you say okay this is it? Sorry for all the questions, and thanks! Amazing plants as always.
Naturally! And luckily I wouldn't have had to go far, at least for the last one:And naturally you’d unveil that puppy in whatever city or town has the next Biggest Pizza in the World contest! Lol.
"The team, made up of Pizza Hut workers and friends of the YouTuber, worked around the clock for 48 hours in the Los Angeles Convention Center. They used rectangular slices of dough, with sauce, cheese and pepperoni added on top. A cooking device hovered over the pizza to cook it. In all, there were 68,000 slices, and all the pizza was donated to Los Angeles charities."
Source
Thanks con!Congrates on the harvest Shed those Buds look awesome
For the pizza or the buds?

")
Thank you WH, and I hope you're not laboring today! With these new joint rollers everything seems long and skinny these days.Hope your having a great Labor Day weekend.
Congrats with the awesome 5 Killer Cookies harvest excellent haul . I hadn’t seen any papers like we use to get at the smoke shops to make a Cheech & Chong joint .

Thanks Stardawg! I think I'm impressed with this one too.Just WOW! Congrats on the harvest!

If I only knew what you were talking about...but thanks Age!That picture right there just taught me a lesson! Thanks Shed!
I do what I can.I find a lot of Sheds pictures teach a lesson.
")
Glad to help.My photo's teach lessons too, just not the same kind... I love when I look at a picture or two and have an epiphany!

- Thread starter
- #33,243
How about a 5 Killer Cookies Rootopsy Update!
I'll show the pictures and let y'all draw your own conclusions since this is my first experience with bottom-watered plants, but let's dive in starting with the perlite roots when I finally managed to get the two buckets separated:
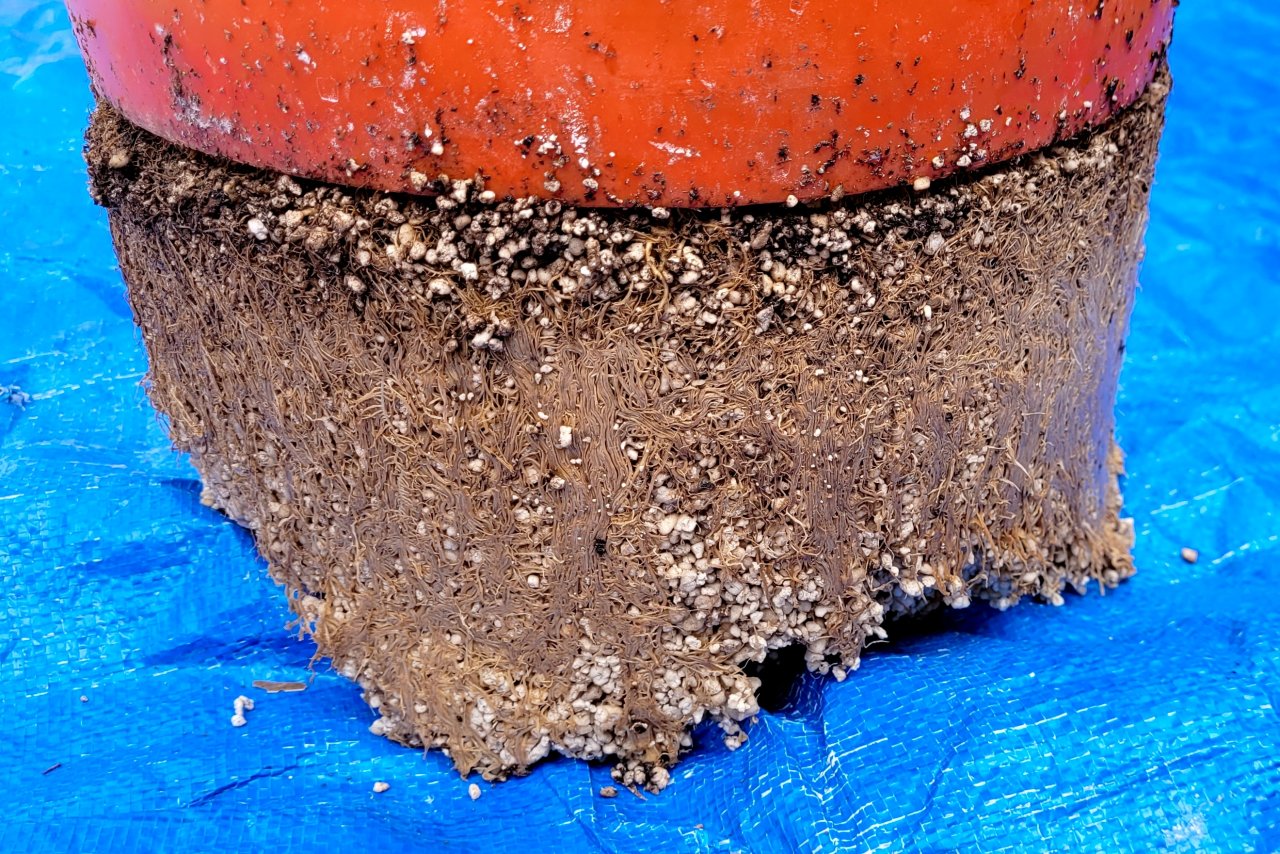
It was solidly packed and smelled a bit like mildew, but that might be because I had the overflow hole covered for the last four days or so.
Here is what the perlite roots looked like when I scraped off the outside layer:
There was about ½" of perlite that didn't have roots left at the bottom of the bucket:
And here is the very bottom of those roots:
I had to use a long flat piece of metal all around the thesides circumference of the top bucket to be able to pull it out whole:
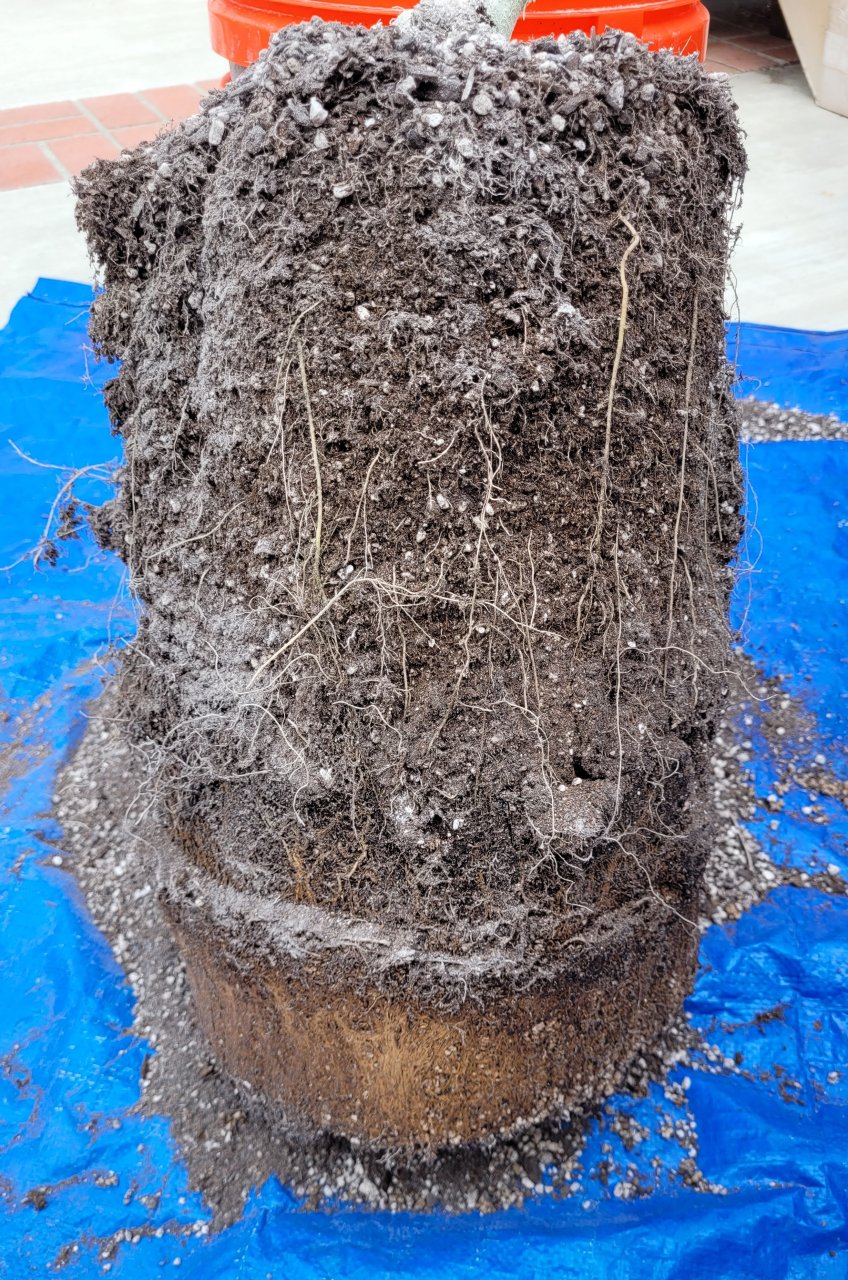
The white dust down the side is DE that was on top and got pushed down as I worked the metal down around the outside.
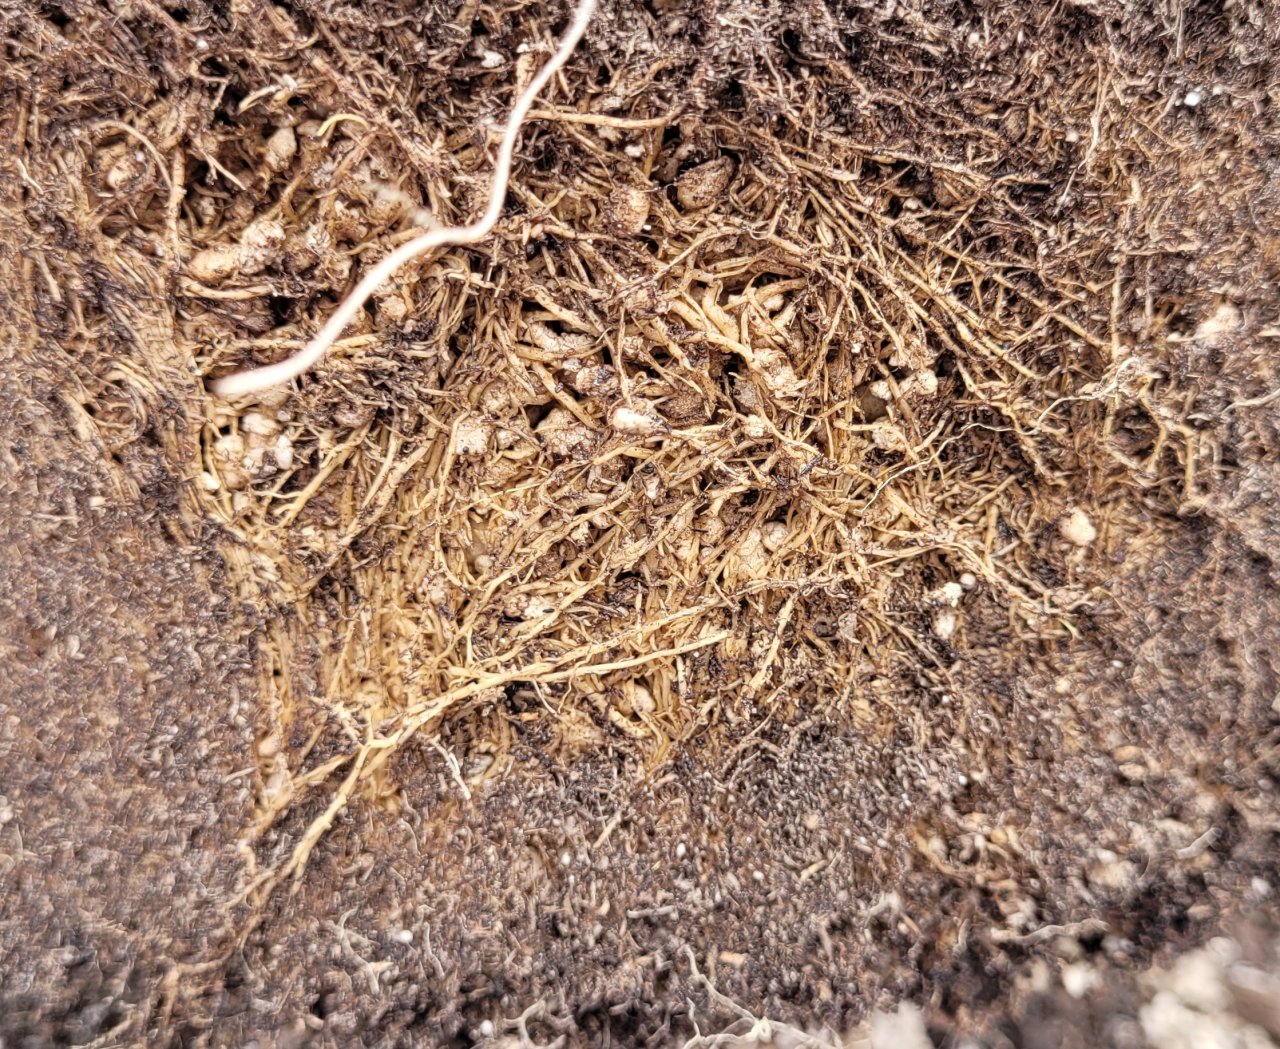
I brushed off some of the dirt above the perlite to see if there was any moisture, and here's what I found:

Keep in mind that (as I mentioned) I had the overflow hole covered for the most of the last week, so that might have allowed the moisture to make contact with the soil and begin to wick upwards. It's possible that the reason the soil was dry all through the grow after upcan to the 5 gallon buckets was because the air gap was taller than the perlite could wick. I have no idea!
Moving on, I broke up more of the soil to see how the roots looked in there:
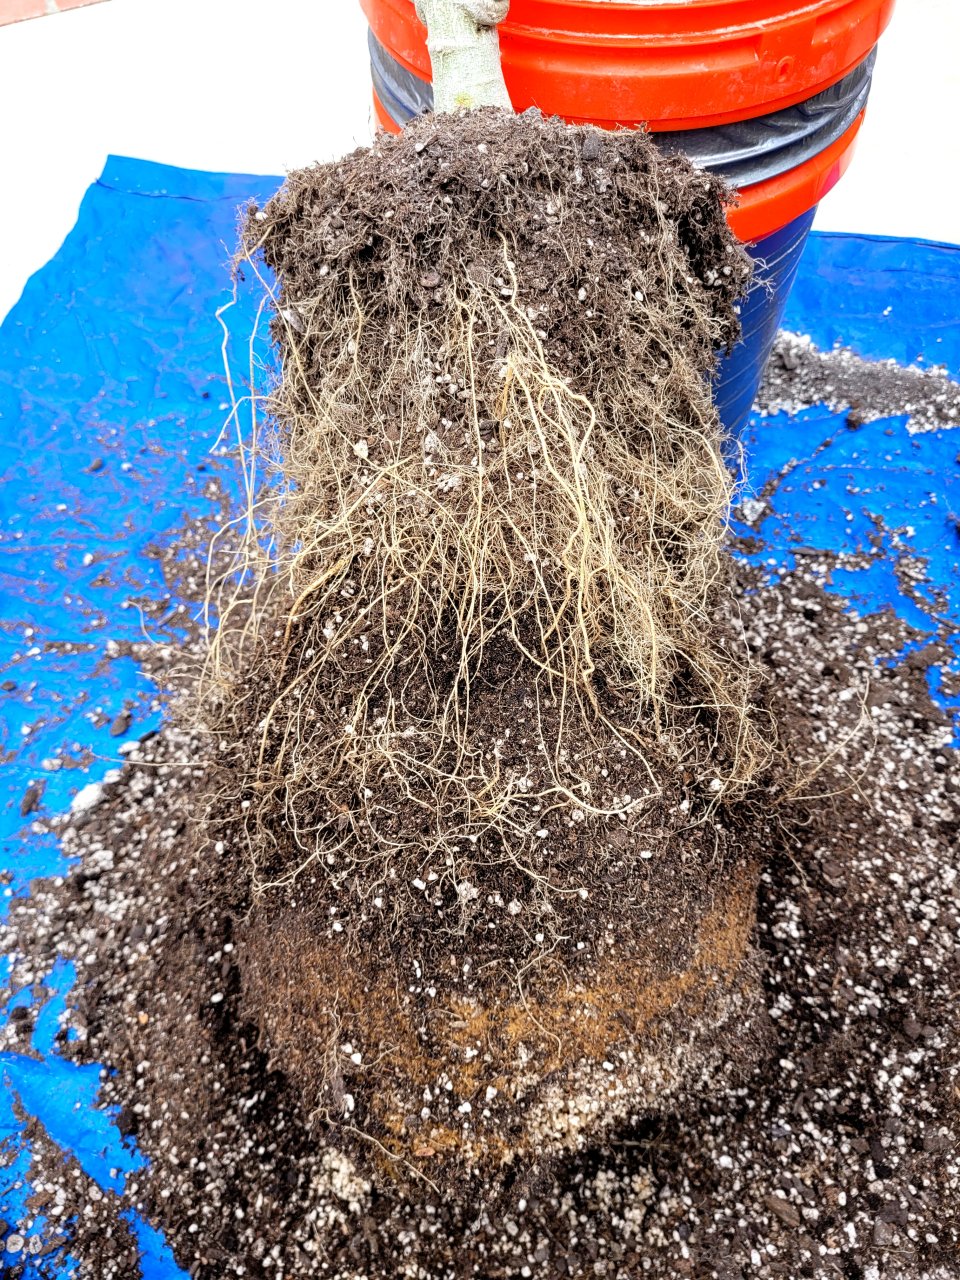
There are a good number of roots, but there would have to be to connect to the ones in the res. I don't think they were actually taking up water or nutrients because it was so dry in that zone, and it really looks like those roots just head down to the perlite zone. This plant actually seemed to be a hempy grow under a layer of dry soil. I don't think I can really call it a SWICK.
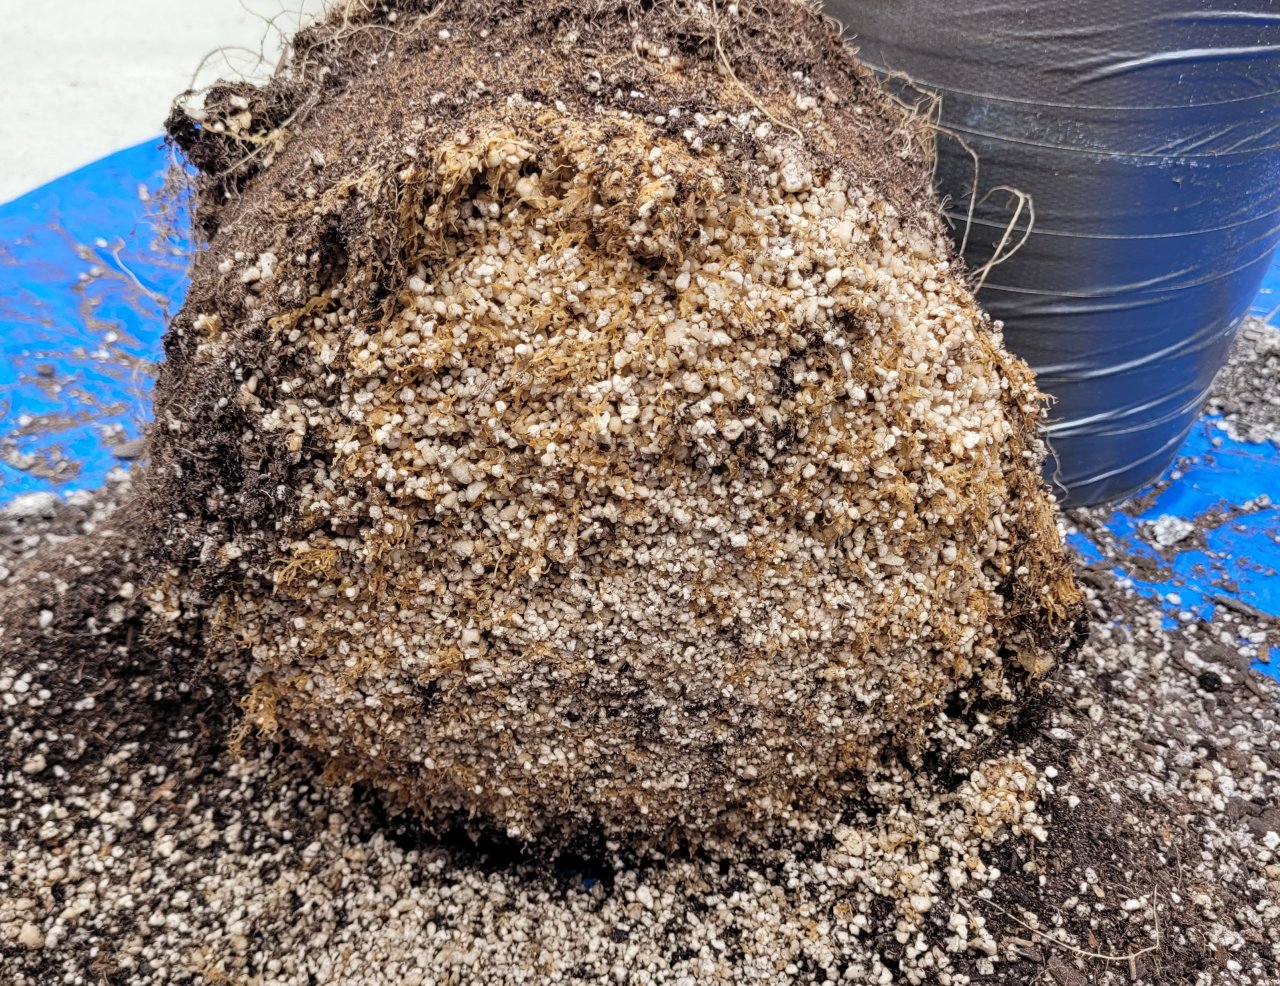
I took the rootball over to where one of my non-fruiting olive trees is planted and hosed it off with the "jet" setting to try to get as much of the soil and perlite off as I could. Here is where I stopped:
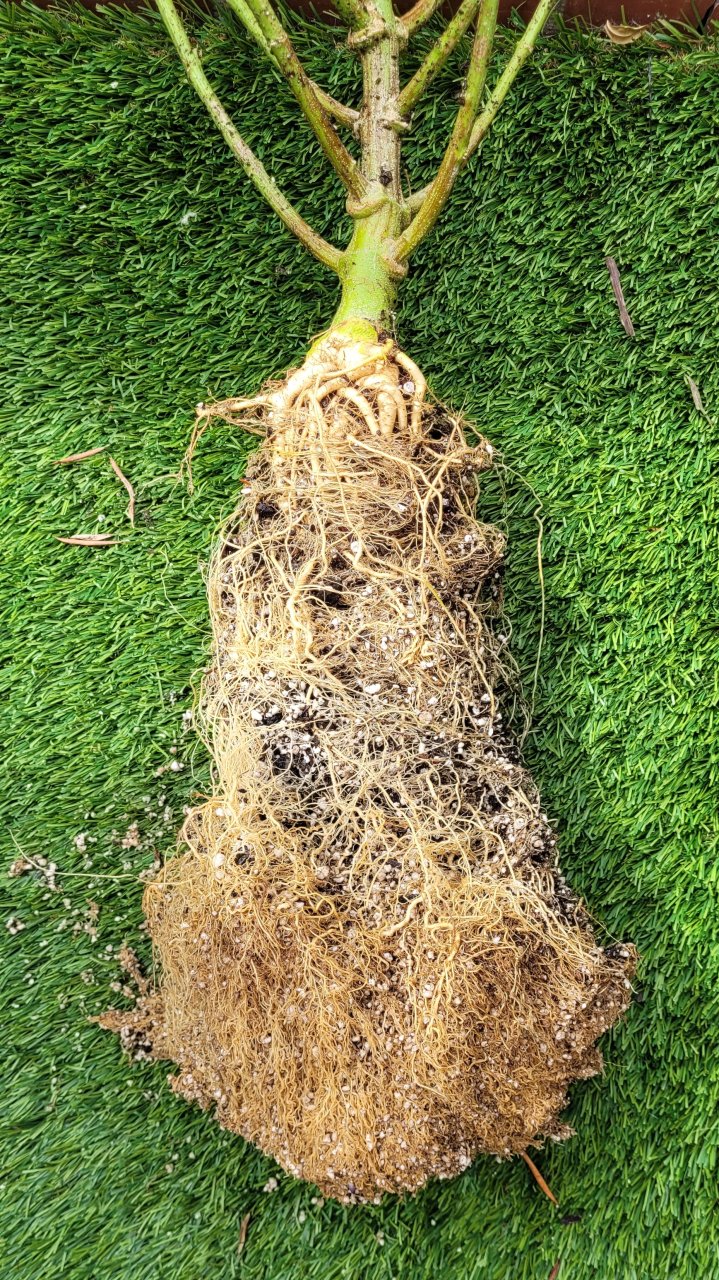
It's sitting out to dry and next weekend I'll knock it around to get the rest off.
At that point I took out my pruning saw and took off the trunk. It was about 2" at the very base:
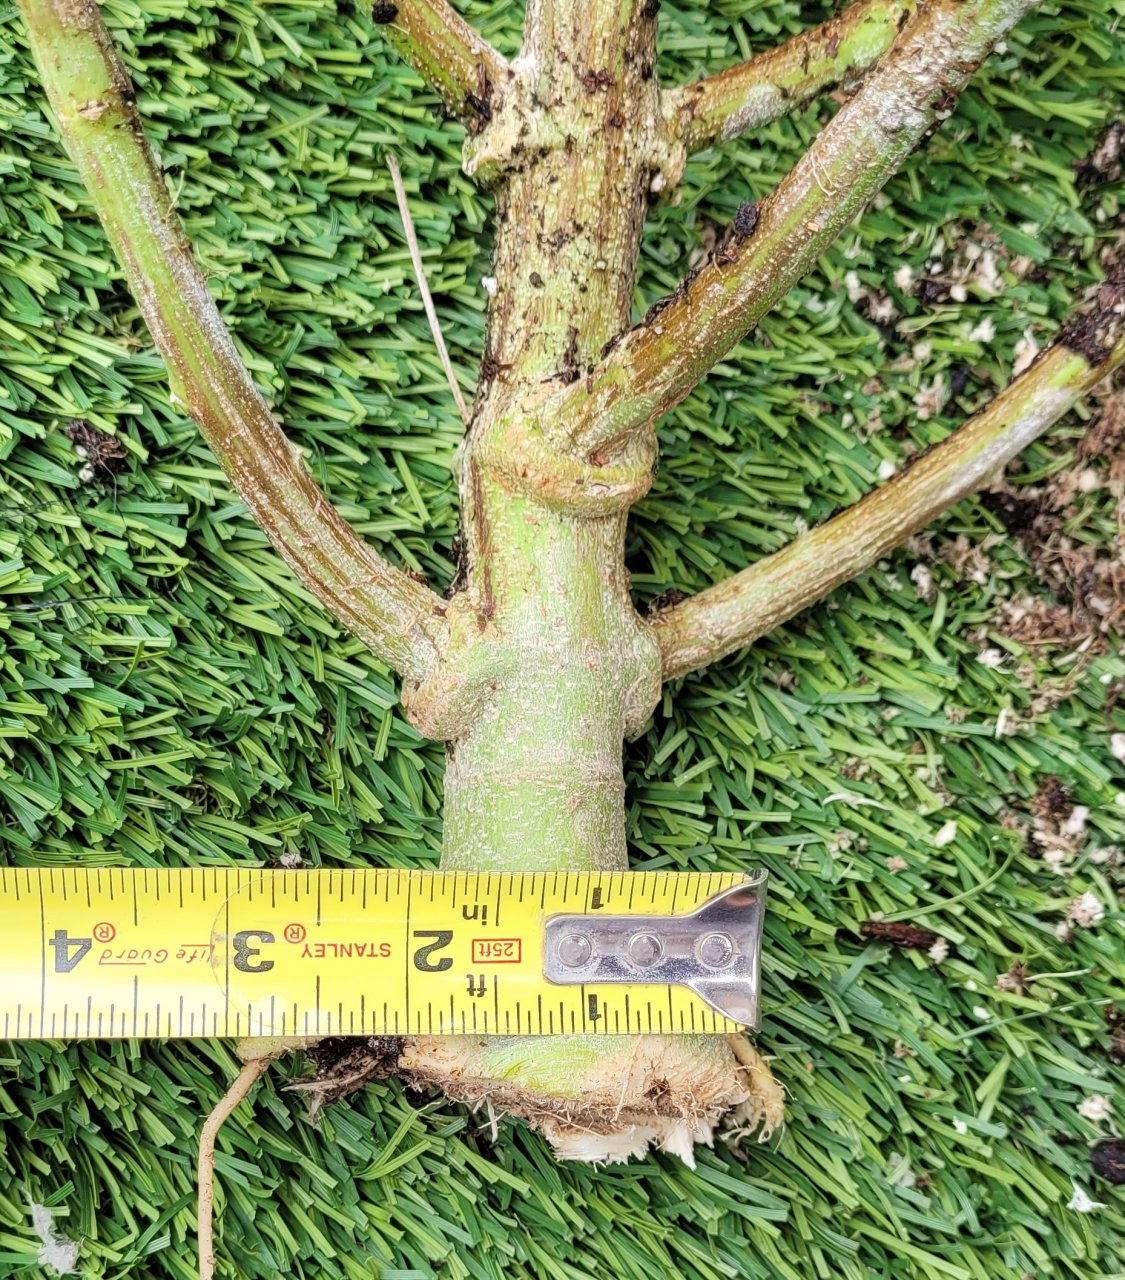
But less than 1.25" just above that:
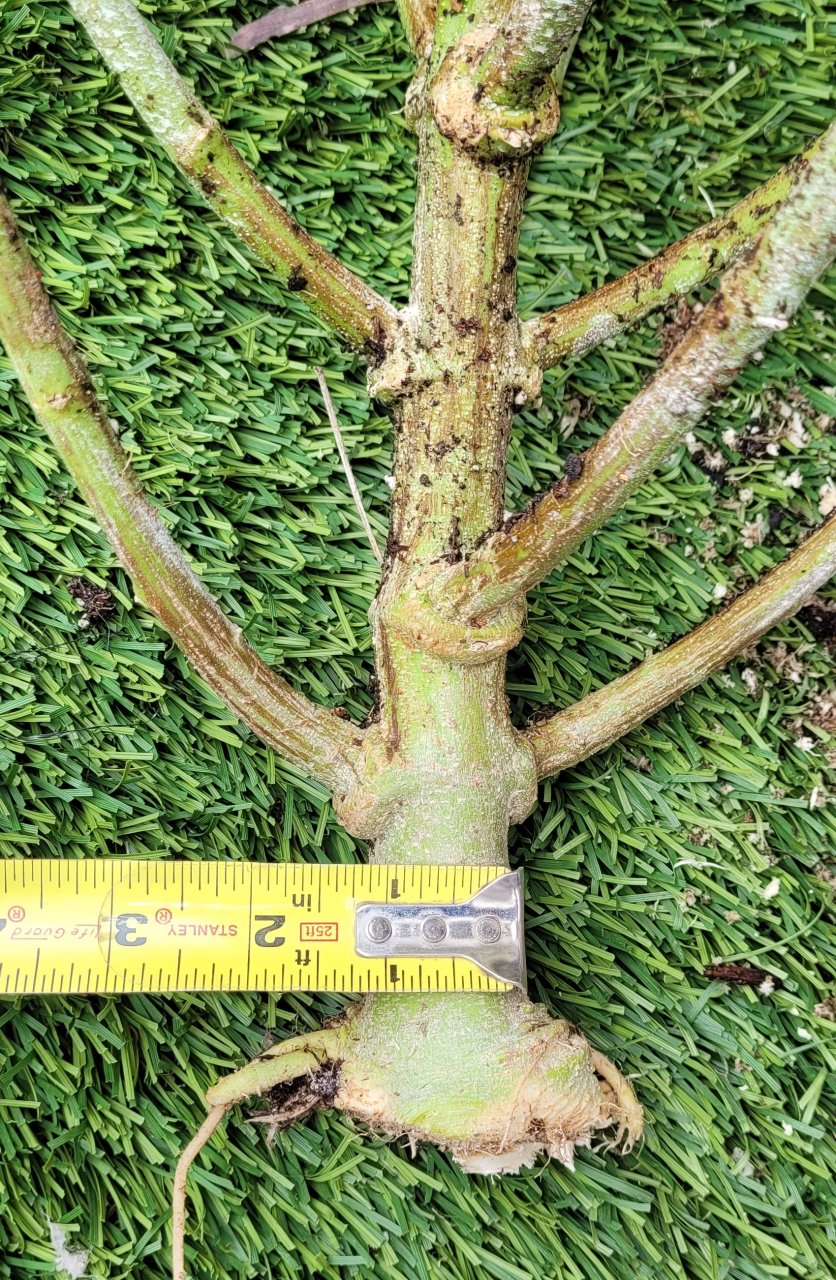
I have pulled over 10oz off a plant with a narrow trunk, so I don't correlate harvest weight with stem diameter, but some folks do!
Finally, since I had the tape measure out, here is the total height of the trunk:

And that's the rootopsy of theSWICK hempy whatever you wanna call it 5 Killer Cookies grow! Feel free to post your thoughts and ask any follow up questions you might have. If I tried this again there would be some major modifications, including a much shorter airgap and a much shorter veg time. I'd be fine with a plant half this size.
Phewf!
I'll show the pictures and let y'all draw your own conclusions since this is my first experience with bottom-watered plants, but let's dive in starting with the perlite roots when I finally managed to get the two buckets separated:
It was solidly packed and smelled a bit like mildew, but that might be because I had the overflow hole covered for the last four days or so.
Here is what the perlite roots looked like when I scraped off the outside layer:
There was about ½" of perlite that didn't have roots left at the bottom of the bucket:
And here is the very bottom of those roots:
I had to use a long flat piece of metal all around the the
The white dust down the side is DE that was on top and got pushed down as I worked the metal down around the outside.
I brushed off some of the dirt above the perlite to see if there was any moisture, and here's what I found:
Keep in mind that (as I mentioned) I had the overflow hole covered for the most of the last week, so that might have allowed the moisture to make contact with the soil and begin to wick upwards. It's possible that the reason the soil was dry all through the grow after upcan to the 5 gallon buckets was because the air gap was taller than the perlite could wick. I have no idea!
Moving on, I broke up more of the soil to see how the roots looked in there:
There are a good number of roots, but there would have to be to connect to the ones in the res. I don't think they were actually taking up water or nutrients because it was so dry in that zone, and it really looks like those roots just head down to the perlite zone. This plant actually seemed to be a hempy grow under a layer of dry soil. I don't think I can really call it a SWICK.
I took the rootball over to where one of my non-fruiting olive trees is planted and hosed it off with the "jet" setting to try to get as much of the soil and perlite off as I could. Here is where I stopped:
It's sitting out to dry and next weekend I'll knock it around to get the rest off.
At that point I took out my pruning saw and took off the trunk. It was about 2" at the very base:
But less than 1.25" just above that:
I have pulled over 10oz off a plant with a narrow trunk, so I don't correlate harvest weight with stem diameter, but some folks do!
Finally, since I had the tape measure out, here is the total height of the trunk:
And that's the rootopsy of the
Phewf!
Would a high absorption wicking cord help in something like this?
It would to allow moisture to get up into the top layer more easily.
Interesting build though.
I've been thinking about doing a SIP, just for the hell of it.
It would to allow moisture to get up into the top layer more easily.
Interesting build though.
I've been thinking about doing a SIP, just for the hell of it.
- Thread starter
- #33,245
There are a few different ways to build a SWICK and that's one of them! There seems to be a lot of trial and error in SWICKs to figure out the wicking rate so as not to over-saturate the soil (there's one problem I avoided!), whether using rope wicks into the soil itself, cloth pots sitting on a wicking pad, or cloth pots sitting on a bed of perlite.Would a high absorption wicking cord help in something like this?
It would to allow moisture to get up into the top layer more easily.
Interesting build though.
I've been thinking about doing a SIP, just for the hell of it.
All of them probably wick better than mine did.
Sheds always teachin! I was talkin to a guy about rooting cactus cuttings and he mentioned doing something similar to what you did there. Looks like those big roots get down to the moisture area and then the fingers branch out from there. Can I infer that at whatever lever I've got the majority of my moisture going into the soil is where I'll find the bulk of the smaller and more numerous roots?
When I left outta town I fed those two girls and then a coupla gallons in the overflow area. They were almost dead when I got home, gave'm each a gallon of water and they bounced right back. In the past I've filled the overflow with water and been amazed at how quickly the waters gone, usually within an hour.
When I left outta town I fed those two girls and then a coupla gallons in the overflow area. They were almost dead when I got home, gave'm each a gallon of water and they bounced right back. In the past I've filled the overflow with water and been amazed at how quickly the waters gone, usually within an hour.
smokesbetter
Well-Known Member
I know i have never seen roots this big at where the white one come off the trunk ! I guess there major tap roots ? Thanks for the way you showed where the whole root ball was wet /dry /ect. Either way I think it was a success making a plant as big and full as it was ! (( I have More growth will show later let this settle down first . )) Good Job on the rootopsis. Shed
Nice roots! It's good to understand them! That SIP plant I grew in the 3 x 3/ EarthBox had almost no air gap when I finally checked out why I couldn't fit the scope camera through the hole to get it in the rez. That was at high tide of course. I was surprised. 1/4 inch at high tide I'd say.How about a 5 Killer Cookies Rootopsy Update!
I'll show the pictures and let y'all draw your own conclusions since this is my first experience with bottom-watered plants, but let's dive in starting with the perlite roots when I finally managed to get the two buckets separated:
It was solidly packed and smelled a bit like mildew, but that might be because I had the overflow hole covered for the last four days or so.
Here is what the perlite roots looked like when I scraped off the outside layer:
There was about ½" of perlite that didn't have roots left at the bottom of the bucket:
And here is the very bottom of those roots:
I had to use a long flat piece of metal all around the thesidescircumference of the top bucket to be able to pull it out whole:
The white dust down the side is DE that was on top and got pushed down as I worked the metal down around the outside.
I brushed off some of the dirt above the perlite to see if there was any moisture, and here's what I found:
Keep in mind that (as I mentioned) I had the overflow hole covered for the most of the last week, so that might have allowed the moisture to make contact with the soil and begin to wick upwards. It's possible that the reason the soil was dry all through the grow after upcan to the 5 gallon buckets was because the air gap was taller than the perlite could wick. I have no idea!
Moving on, I broke up more of the soil to see how the roots looked in there:
There are a good number of roots, but there would have to be to connect to the ones in the res. I don't think they were actually taking up water or nutrients because it was so dry in that zone, and it really looks like those roots just head down to the perlite zone. This plant actually seemed to be a hempy grow under a layer of dry soil. I don't think I can really call it a SWICK.
I took the rootball over to where one of my non-fruiting olive trees is planted and hosed it off with the "jet" setting to try to get as much of the soil and perlite off as I could. Here is where I stopped:
It's sitting out to dry and next weekend I'll knock it around to get the rest off.
At that point I took out my pruning saw and took off the trunk. It was about 2" at the very base:
But less than 1.25" just above that:
I have pulled over 10oz off a plant with a narrow trunk, so I don't correlate harvest weight with stem diameter, but some folks do!
Finally, since I had the tape measure out, here is the total height of the trunk:
And that's the rootopsy of theSWICKhempywhatever you wanna call it 5 Killer Cookies grow! Feel free to post your thoughts and ask any follow up questions you might have. If I tried this again there would be some major modifications, including a much shorter airgap and a much shorter veg time. I'd be fine with a plant half this size.
Phewf!
On the other hand. The factory auto watered SIP's are a bit lower in water level. About 3/8ths of an inch to the side hole.
Do you notice any appreciable difference in how these plants compared to the one with less air gap?On the other hand. The factory auto watered SIP's are a bit lower in water level. About 3/8ths of an inch to the side hole.
Other than me being able to work lst on them casually they seem the same. Same adding cal/mag to the rez and healthy. That stiffness may have been the plant I think.Do you notice any appreciable difference in how these plants compared to the one with less air gap?
Congrats on the 5KC harvest Shed! That was a massive plant for a five gallon bucket! 
- Thread starter
- #33,252
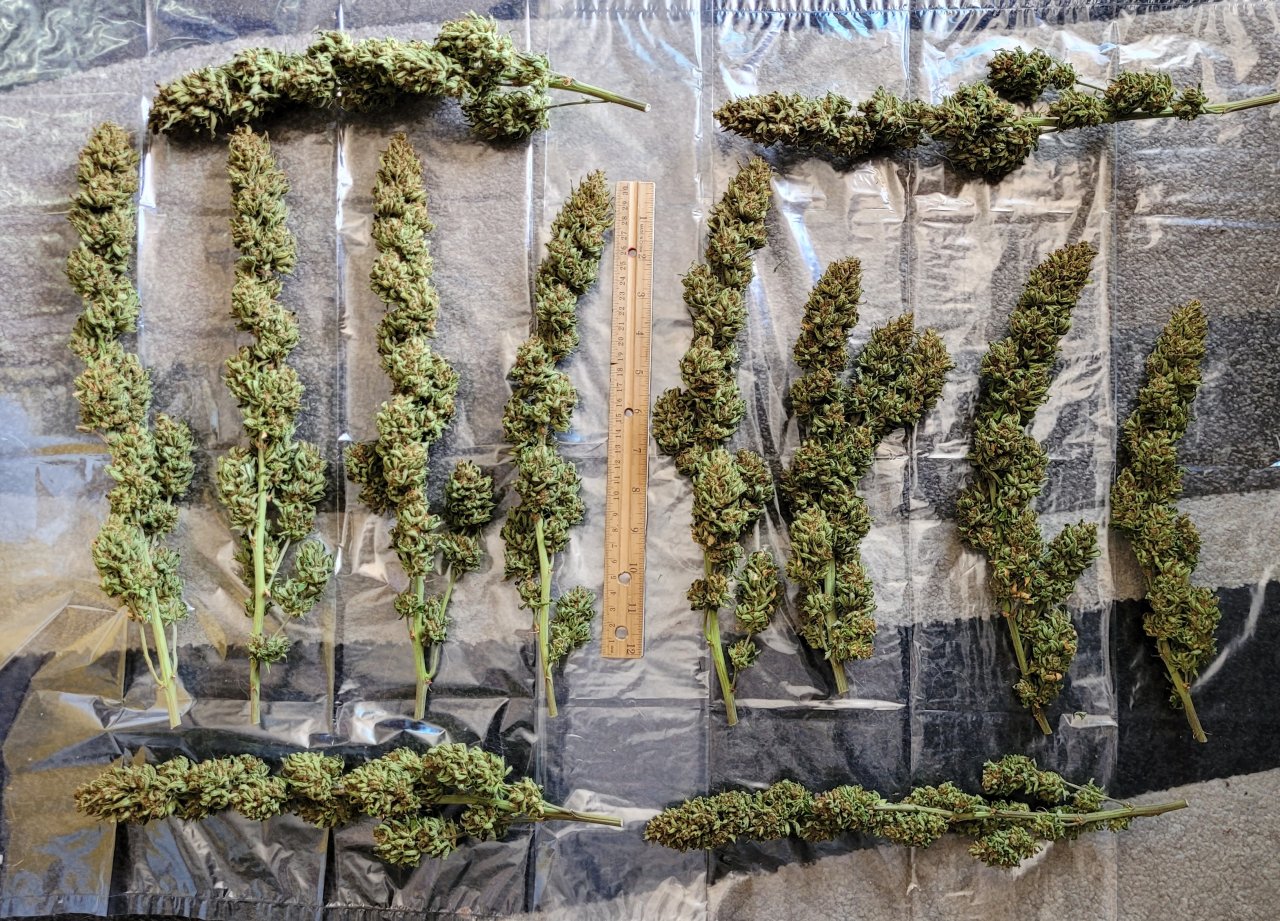
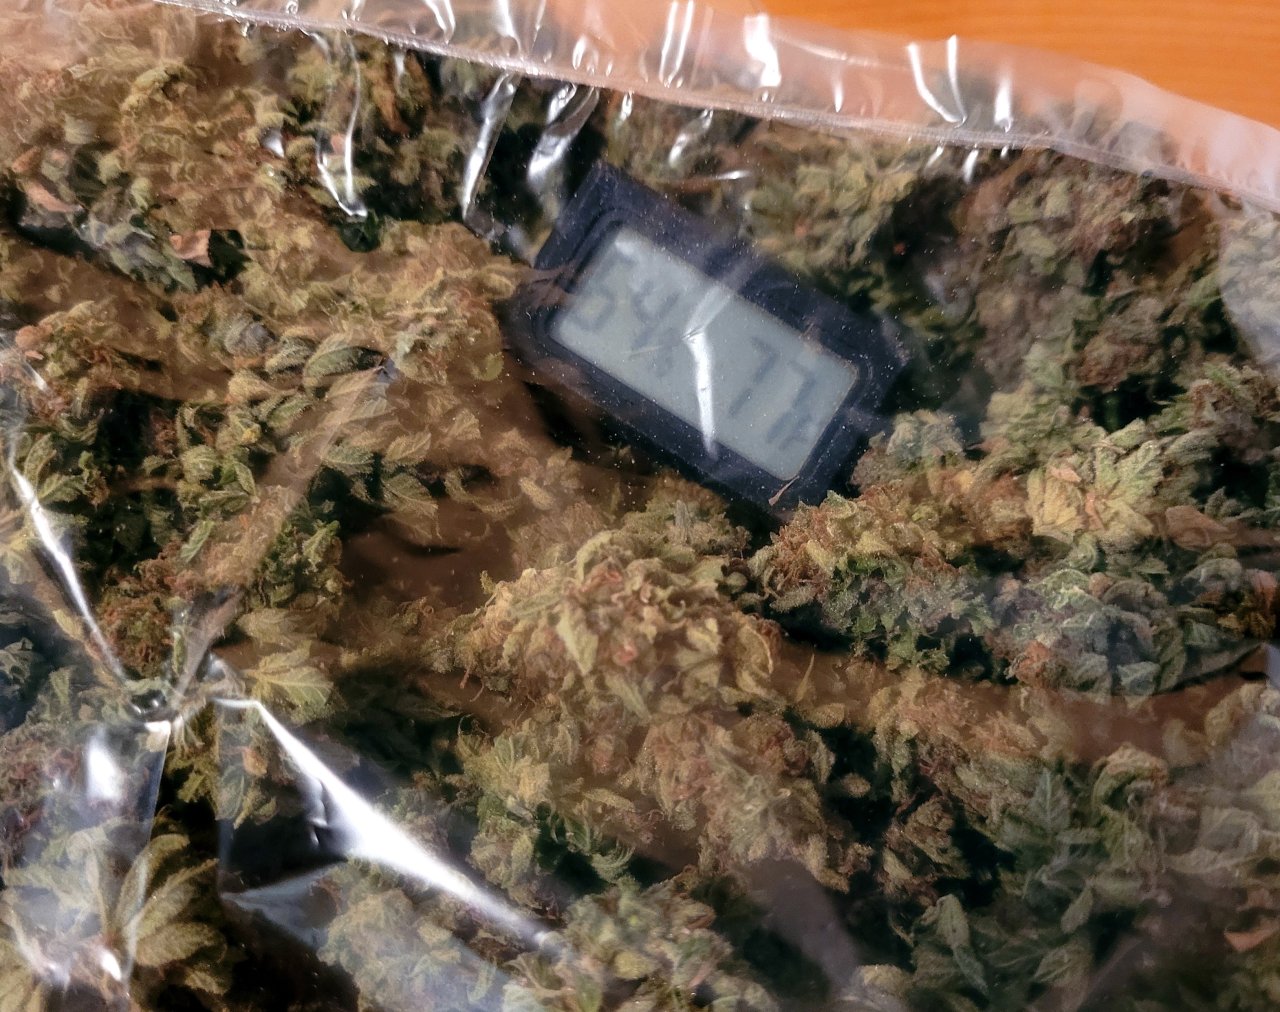
Wee hours of Sunday update! Saturday was 7 days since I chopped the 5 Killer Cookies, so it was time to cut them off the branches and get them in bags. The RH has been ideal in my house with a high of 71% and a low of 59%, so I wasn't worried about over-drying them this time.
Here are most of the tops:
And here is a close-up that double bud I mentioned in the early days of flower:
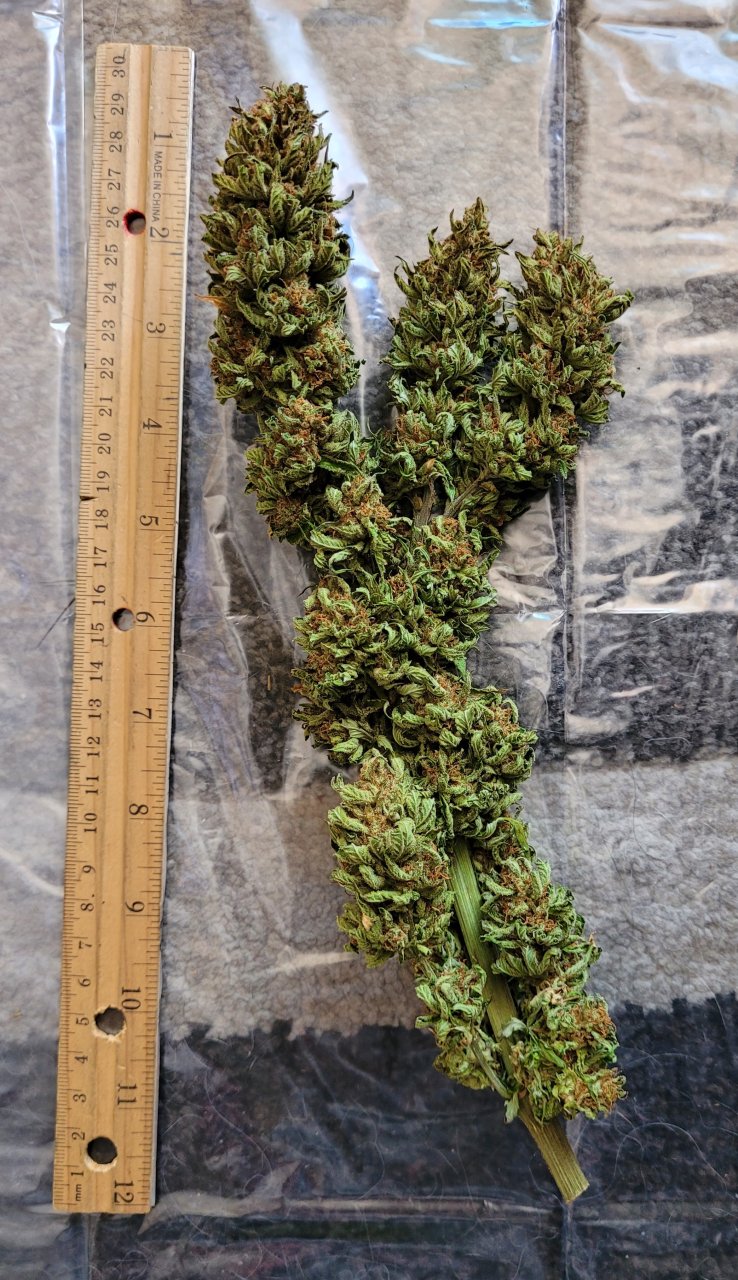 I didn't need to put a stick in to separate them after all!
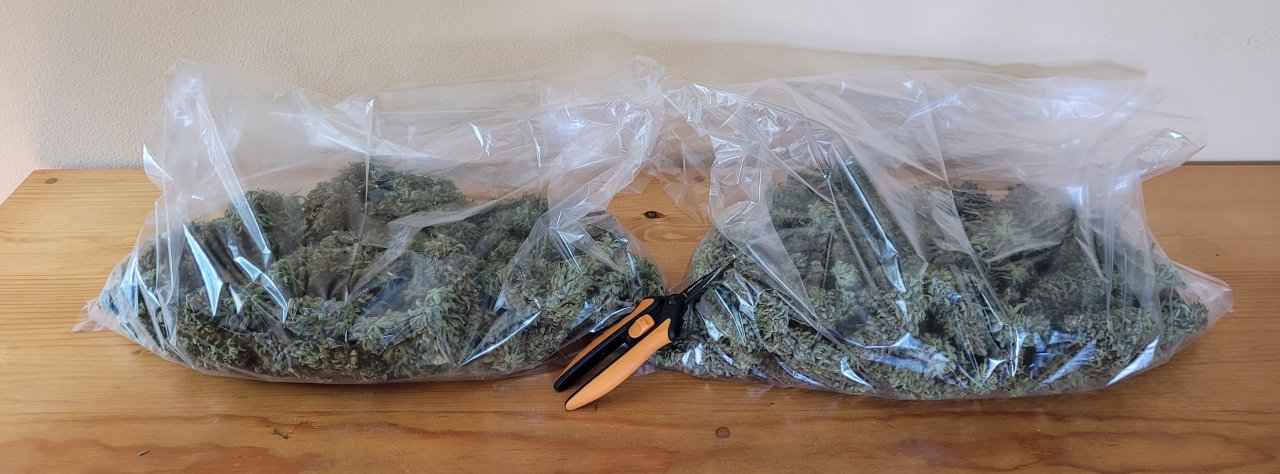
No idea where my turkey bags have gone so I to buy new ones and they're much bigger than my last ones, so I fit the whole harvest in two bags:
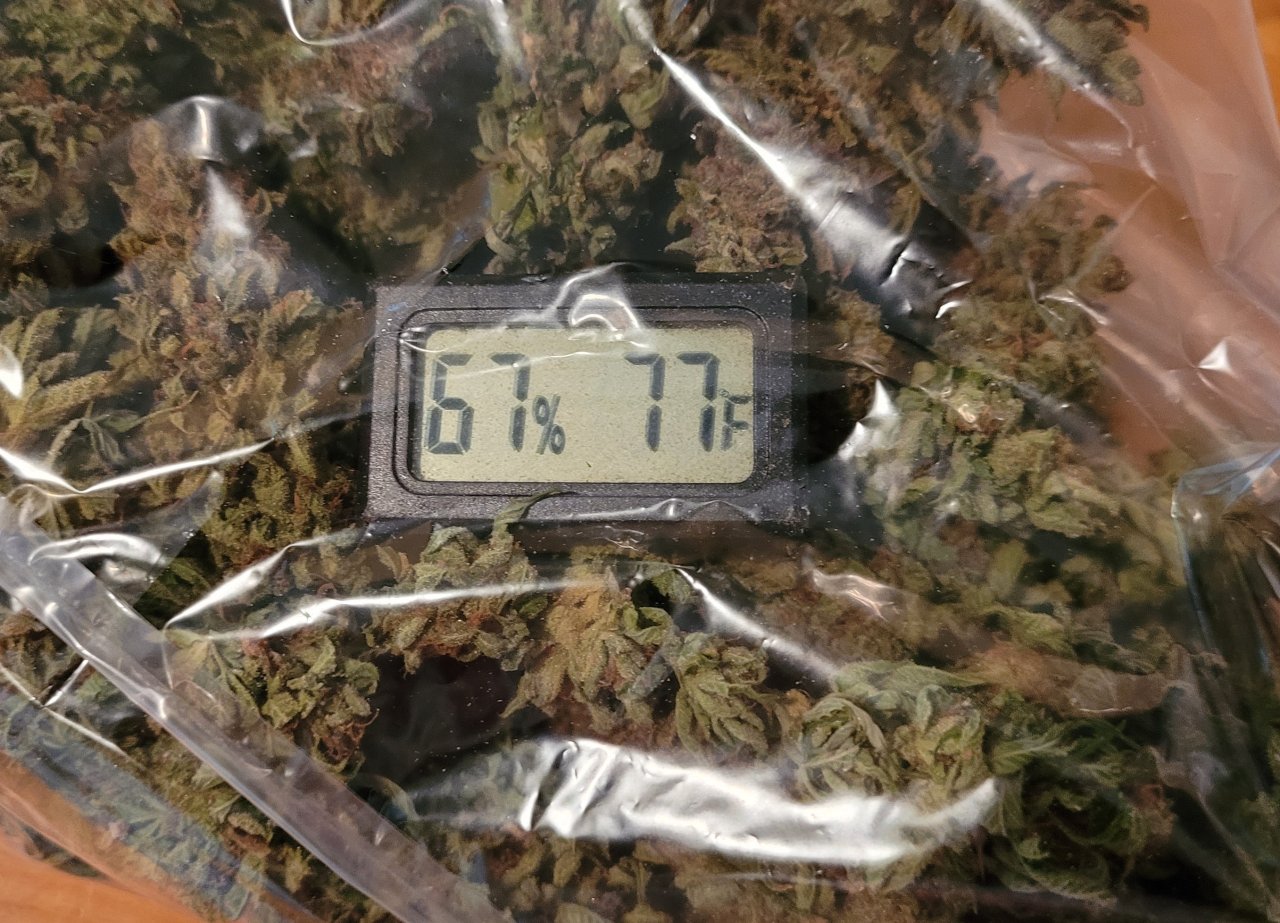
A few hours later the RH had stabilized to some pretty good numbers:
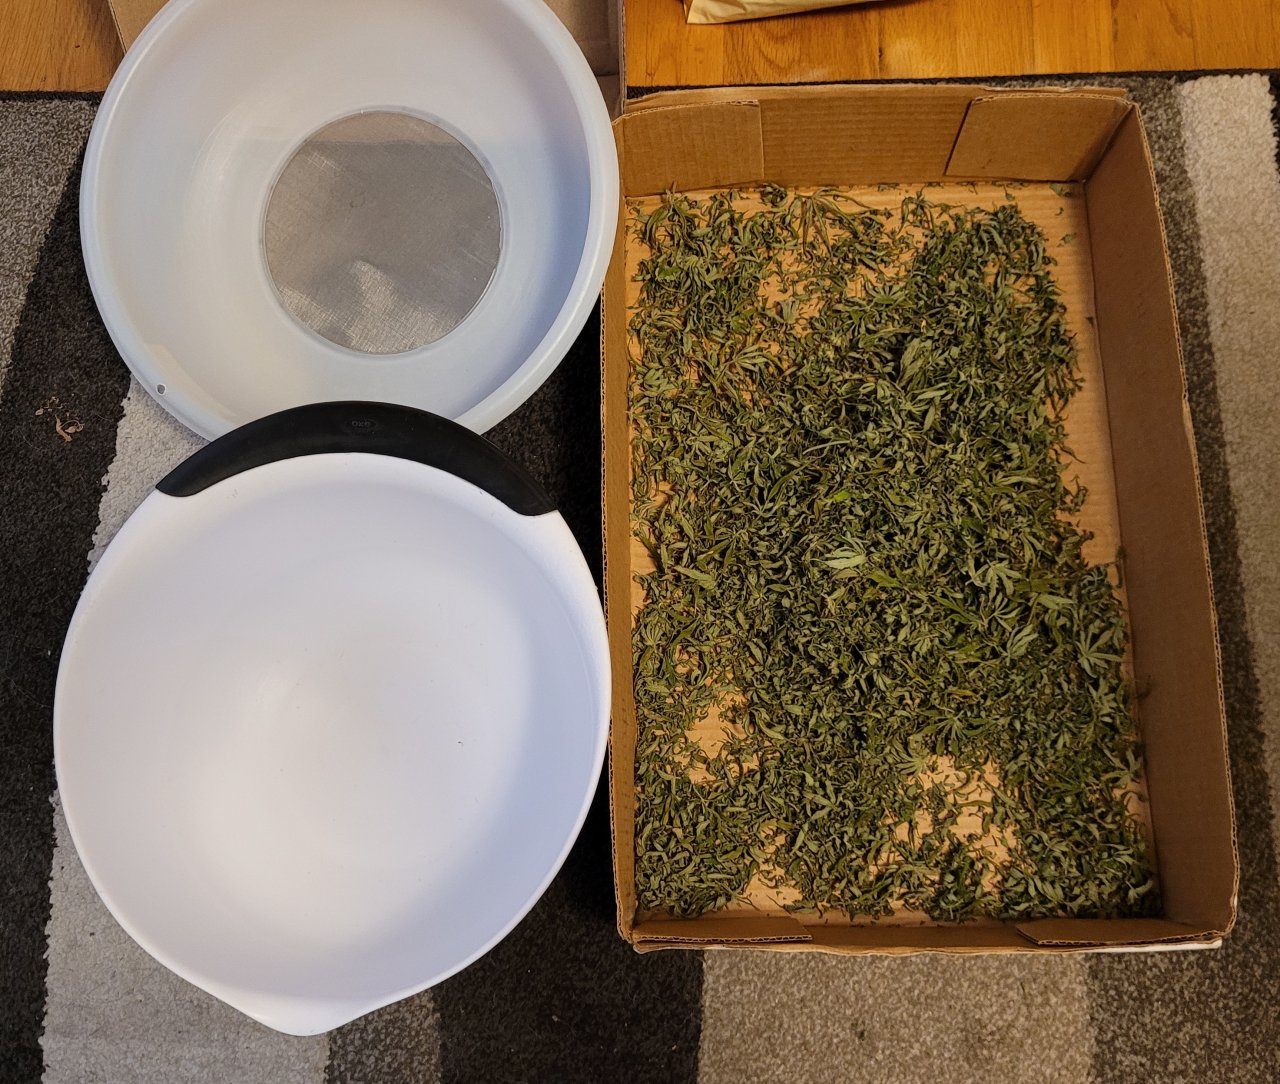
No matter what the total weight ends up being, it's a heck of a lot easier (and with much more bud/oxygen exposure) using these versus however many jars this would take:

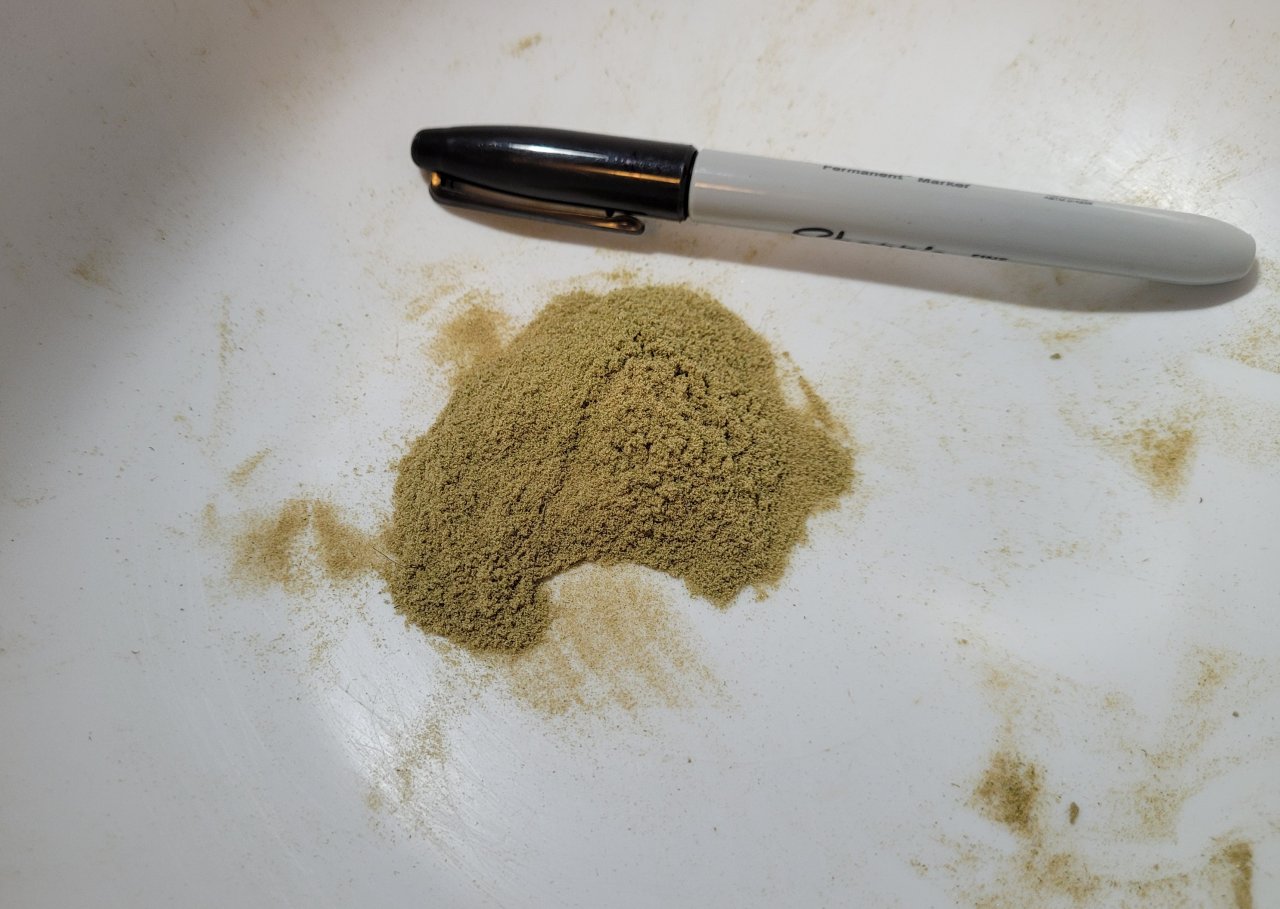
And for the first time I decided to take my trim and kief it, using an 80 mesh screen:
I did it in about 5 or 6 batches and rubbed it back and forth over the screen after breaking it up with my fingers. Here's what it looked like in the bowl (sharpie for reference!):
And here it is in a small jar I had on hand:
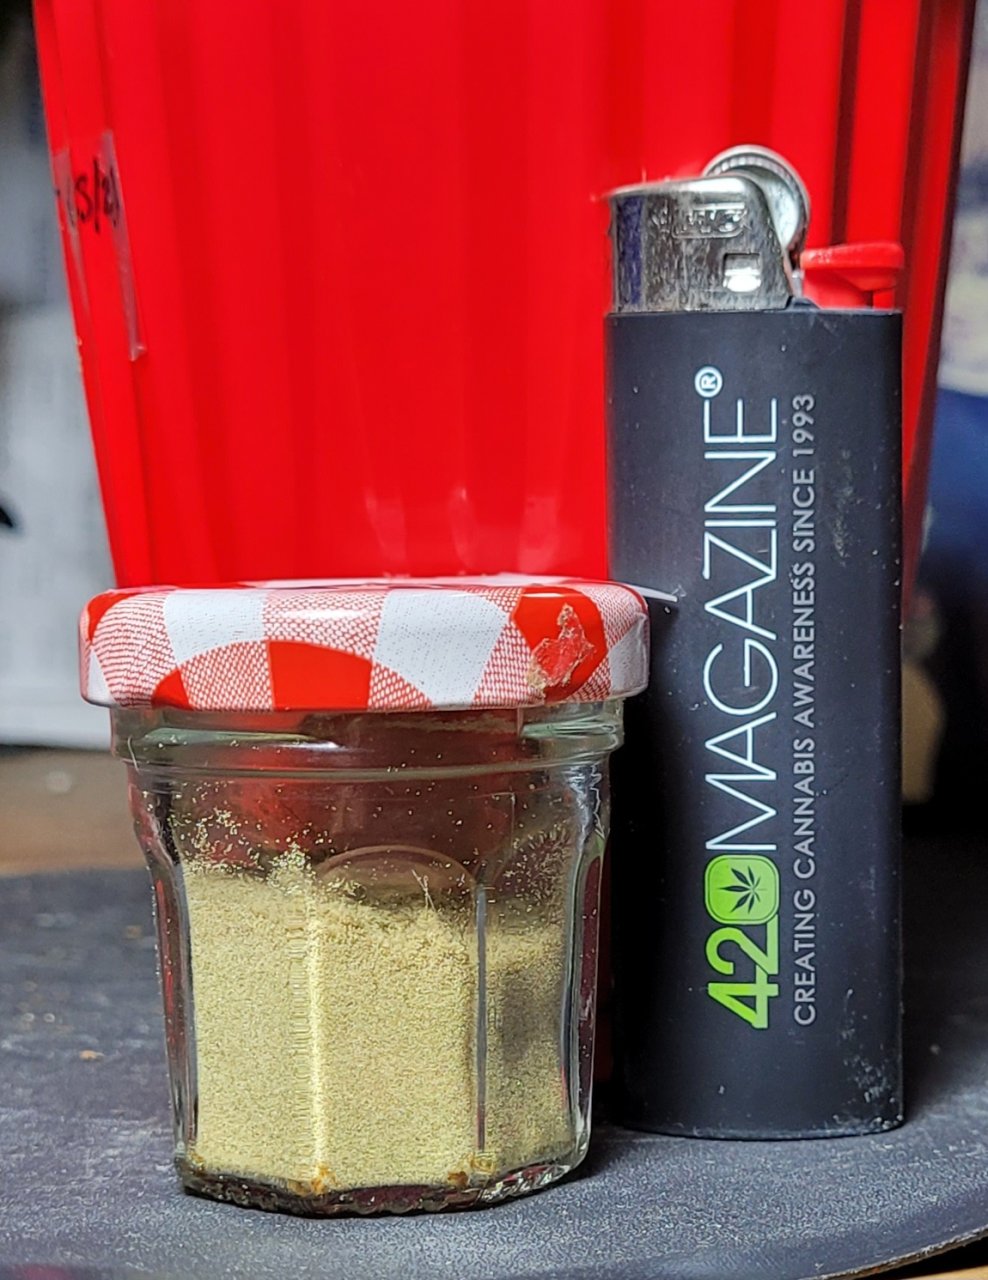
I didn't get a weight, should I bother?
That's it for me! I gotta get some sleep, so I hope your football team wins later today.
Quotes:
If you were planting in the ground where the top dries out faster and the lower roots stay damp, then you would probably see more roots down in the moisture zone. I don't know if Otter does a rootopsy on his canna-trees, but it he does dig them up, he could answer that question!


Here are most of the tops:
And here is a close-up that double bud I mentioned in the early days of flower:
No idea where my turkey bags have gone so I to buy new ones and they're much bigger than my last ones, so I fit the whole harvest in two bags:
A few hours later the RH had stabilized to some pretty good numbers:
No matter what the total weight ends up being, it's a heck of a lot easier (and with much more bud/oxygen exposure) using these versus however many jars this would take:
And for the first time I decided to take my trim and kief it, using an 80 mesh screen:
I did it in about 5 or 6 batches and rubbed it back and forth over the screen after breaking it up with my fingers. Here's what it looked like in the bowl (sharpie for reference!):
And here it is in a small jar I had on hand:
I didn't get a weight, should I bother?
That's it for me! I gotta get some sleep, so I hope your football team wins later today.
Quotes:
You can infer whatever you like! I am no expert in bottom watering plants, and my-top watered plants in cloth pots have roots evenly distributed through the soil.Can I infer that at whatever lever I've got the majority of my moisture going into the soil is where I'll find the bulk of the smaller and more numerous roots?
If you were planting in the ground where the top dries out faster and the lower roots stay damp, then you would probably see more roots down in the moisture zone. I don't know if Otter does a rootopsy on his canna-trees, but it he does dig them up, he could answer that question!
Those top roots seem to be a direct result of bottom watering from the get-go. Thanks sb!I know i have never seen roots this big at where the white one come off the trunk ! I guess there major tap roots ? Thanks for the way you showed where the whole root ball was wet /dry /ect. Either way I think it was a success making a plant as big and full as it was ! (( I have More growth will show later let this settle down first . )) Good Job on the rootopsis. Shed
Oh that's interesting!Nice roots! It's good to understand them! That SIP plant I grew in the 3 x 3/ EarthBox had almost no air gap when I finally checked out why I couldn't fit the scope camera through the hole to get it in the rez. That was at high tide of course. I was surprised. 1/4 inch at high tide I'd say.
On the other hand. The factory auto watered SIP's are a bit lower in water level. About 3/8ths of an inch to the side hole.
Probably the same because your water was actually wicking up from the res, as opposed to mine...Other than me being able to work lst on them casually they seem the same. Same adding cal/mag to the rez and healthy. That stiffness may have been the plant I think.
Thank you Boo! I'm sure the reason it was that big was the fact that it was basically a hydro grow, and they get huge fast. :zoom:Congrats on the 5KC harvest Shed! That was a massive plant for a five gallon bucket!
Its a lobster bud! And looks quite like ZoidbergAnd here is a close-up that double bud I mentioned in the early days of flower:
The lobster (EDIT, kids got lobsters on the brain) turkey bags do you seal them? They have Bovidas or equivalent silica type pouches in them?
"And Boy Does It Wick Away Moisture! Gallons And Gallons Of It!"
Hi Agemon, here's what I found on my first and only finished one so far. Enjoy! So yes I think you were right there.Can I infer that at whatever lever I've got the majority of my moisture going into the soil is where I'll find the bulk of the smaller and more numerous roots?

smokesbetter
Well-Known Member
Nice Big Buds , on a stick LOL No they look really good and the new T-bags are working out too , Glad your using the shake and looks to have paid off pretty good . Does ur family smoke the kief ?
those buds look great, nothing wrong with a 12'' bud Lol,Wee hours of Sunday update! Saturday was 7 days since I chopped the 5 Killer Cookies, so it was time to cut them off the branches and get them in bags. The RH has been ideal in my house with a high of 71% and a low of 59%, so I wasn't worried about over-drying them this time.
Here are most of the tops:
And here is a close-up that double bud I mentioned in the early days of flower:
I didn't need to put a stick in to separate them after all!
No idea where my turkey bags have gone so I to buy new ones and they're much bigger than my last ones, so I fit the whole harvest in two bags:
A few hours later the RH had stabilized to some pretty good numbers:
No matter what the total weight ends up being, it's a heck of a lot easier (and with much more bud/oxygen exposure) using these versus however many jars this would take:
And for the first time I decided to take my trim and kief it, using an 80 mesh screen:
I did it in about 5 or 6 batches and rubbed it back and forth over the screen after breaking it up with my fingers. Here's what it looked like in the bowl (sharpie for reference!):
And here it is in a small jar I had on hand:
I didn't get a weight, should I bother?
That's it for me! I gotta get some sleep, so I hope your football team wins later today.
Quotes:
You can infer whatever you like! I am no expert in bottom watering plants, and my-top watered plants in cloth pots have roots evenly distributed through the soil.
If you were planting in the ground where the top dries out faster and the lower roots stay damp, then you would probably see more roots down in the moisture zone. I don't know if Otter does a rootopsy on his canna-trees, but it he does dig them up, he could answer that question!
Those top roots seem to be a direct result of bottom watering from the get-go. Thanks sb!
Oh that's interesting!
Probably the same because your water was actually wicking up from the res, as opposed to mine...
Thank you Boo! I'm sure the reason it was that big was the fact that it was basically a hydro grow, and they get huge fast. :zoom:
- Thread starter
- #33,258
Had to look that one up!Its a lobster bud! And looks quite like Zoidberg
They get sealed in between burping but the bags are only for the burping stage. They're not airtight like jars so I don't use them for curing.The lobster (EDIT, kids got lobsters on the brain) turkey bags do you seal them?
Another nice thing about the bags is you can lay them flat and get almost every flower fresh air!
Humidity packs are only for long term stability in storage, not for lowering or raising the RH of the flowers. They're very limited in their ability to move the needle and whatever they can do, they do it very slowly. Don't rely on them to suck the moisture from damp flowers or you will end up like folks I've seen here do that...with moldy flowers!They have Bovidas or equivalent silica type pouches in them?
Thanks Otter!Hi Agemon, here's what I found on my first and only finished one so far. Enjoy! So yes I think you were right there.

Thank you sb! My family smokes anything that will get them high:Nice Big Buds , on a stick LOL No they look really good and the new T-bags are working out too , Glad your using the shake and looks to have paid off pretty good . Does ur family smoke the kief ?
They will put it in a bow-l.
They will put it in a joi-oint.
Any way they like to smoke it,
You can bet they're gonna toke it.
Thanks con! "Nothing wrong with..." always reminds me of the intro to a Chuck Berry ditty!those buds look great, nothing wrong with a 12'' bud Lol,
Maybe I'll save my trim and see about screening some keif out of it. Was looking through the garage fridge the other day and found about 8 jars with varying sizes bubble hash balls. I do have a jar of keif around here somewhere now that I think about it.
- Thread starter
- #33,260
8 jars of bubble hash sounds like a rather large stash! But then I recall seeing a pic of everything you had in jars at the end of your last big grow and that was quite a sight.Maybe I'll save my trim and see about screening some keif out of it. Was looking through the garage fridge the other day and found about 8 jars with varying sizes bubble hash balls.
BTW we still have a few jars of BeBo* flower left from that enormous clone way back when. Great night time meds!
I was pretty surprised by what I got off that trim, so now I need to go dig up the trim I saved from the Amnesia Lemon Kush (I think?) and do the same thing. I feel like I have two jars floating around somewhere. Maybe it's at your house!I do have a jar of keif around here somewhere now that I think about it.
*Berry Bomb