

Good job Shed!
Navigation
Install the app
How to install the app on iOS
How To Use Progressive Web App aka PWA On 420 Magazine Forum
Note: This feature may not be available in some browsers.
More options
You are using an out of date browser. It may not display this or other websites correctly.
You should upgrade or use an alternative browser.
You should upgrade or use an alternative browser.
InTheShed Grows Inside & Out: Jump In Any Time
could have used some braided wire
1 f strip< 144 diodes X 38 lm = 5.472 lm X 13 = blasting 71,136 lm take that Quantum light 210 lm per watt
CraZysWeeD
Well-Known Member
Haha. I love the taped pliers. ") That's the downside of using solid copper wiring. I almost busted my chilleds before giving up on solid wiring.
That's the downside of using solid copper wiring. I almost busted my chilleds before giving up on solid wiring.
Hope you will enjoy that monster of a light. We will in your updates to come.
That's the downside of using solid copper wiring. I almost busted my chilleds before giving up on solid wiring. Hope you will enjoy that monster of a light. We will in your updates to come.
Glad y'all like it!
Before the enormous pic drop of the build, I want to thank a few people. First @Graytail for all the recommendations and calculations, for sticking with me every time I went "wha?," for actually going online and finding the exact model numbers for the driver and the strips once he figured out what I was trying to do, and for helping me when I got lost on the wiring yesterday. Next up is @PurpleGunRack for giving great info and links when I said I thought it was time to build me a strip LED. Thanks to @CraZysWeeD for being a resource during the build as well, walking me through the wiring yesterday along with Gray. Also thanks to @SamSmith for understanding what I was trying to accomplish with my wattage calculations and getting me to the formula needed to stay in my lane. And last, to the unnamed member here who so lovingly offered to create the frame to my specs and ship it to me, pre-cut, pre-drilled, and with all the hardware I needed to get it assembled and then some (as you'll see in the pics below).
On to the build...
Let's start with what I bought since it's blurred out in the pics. I got 13 F series strips: SI-B8V261560WW and a MW driver HLG-320H-C1050A. The A series has a built-in potentiometer that allows me to dial in the wattage draw I want, and that built-in pot actually allows me to get a higher draw (if I wanted it) than the B series with an external pot wired in.
After I ordered the strips and driver, I received this package in the mail:

Neatly and safely packed, and included the U-channels, L brackets, nuts and bolts, the correctly sized allen wrench, wago connectors, 14 gauge solid core wire, a Scotchbrite pad for the channels, and a file in case something needed to be smoothed out (it didn't!). Phewf! Thanks again for that amazing gift.

Onto the rug to get this thing constructed:

I bought four 4" eye-bolts: the eyes for hanging it and the 4" to keep it off the floor when I have to drop it down:

All done with step 1:


Next step was applying the thermal heat tape from Amazon. To prep the channels I use the nicely supplied Scotchbrite pad and cleaned up the aluminum so the tape would stick well. Wiped it down with a wet washcloth a few times and then dried it...good to go!

Since the channels were left long I had a 1.25" gap on either side so I marked off the boundaries of the tape and stuck it down. It was easy:

Next up was sticking the strips to the tape, which was even easier (you'll see them in the completed build pic). I made sure they all pointed the same way in case it mattered.
Moving on to the electrical...
I used a computer power cable since power supplies are well over 400 watts.

Here are the driver connection cables. You will note that there is no option for a ground on the DC side of the driver.

Got the driver all wago'd up:

I cut and stripped 24 wire strips thinking I had to run the connections up one side and down the other...I was wrong!

This is where I ran into problems. I ran the connections up one side and then couldn't sort out how to connect the last strip back to the second from last strip back down the other side. After consulting the internet, Crazy, and Graytail, it turned out that I was only supposed to run ONE connection from strip to strip. And contrary to wiring diagrams on the internet, I needed to run them all down the same side and not alternate the connections from left to right.
So, pulling the wires out is not easy as there is no real loosen method on the connectors. There is a little tab you can push in but it doesn't do anything. And while I was pulling out the unneeded connections, this happened:

Oh well, I figured I just wouldn't use that side ever so it didn't matter. Then I got it all working and discovered this:

Oops! All that hard work and well-earned cash and I've lost 8 LEDs! That just will not do. Solder to the rescue

It ain't neat:

But it did work!

And then yet another encounter with one of those damn fragile connectors. It split while was just adjusting the wire!

Epoxy to the rescue, but I couldn't get a clamp in that tiny space:
Vice-grip lifehack! (Couldn't be bothered to dig out the actual vice grip, but yes, I do own one!):

So it's all wired and working and time to get it ready to hang. Just in case you can't figure out the wiring, it's driver red to first board +, then - to + down the side, and - on the last board to driver black:

I cleared out room in the shed so I could lay it on the floor and attached a rope from eye hook to eye hook on each side:

And then ran a rope between the two through 2 eye hooks in the roof joists (yes @nobodyhere, it is adjustable):

I hung the driver from a nail:

Let there be light!

And I got out through the entire operation without and shocks and got one cut on my hand from the edge of the frame when one of those connectors finally let go of the wire!
It hangs about 2' over the canopy now, and I had it at 180 watts last night. I'll bump it to 200 tonight but leave the height alone.
Thanks again to those listed above and to all of you who encouraged, cheered, and offered advice along the way to getting this built.
Back to familial obiligations (beach bonfire tonight), so I will catch up with your weekends as soon as I can.


Awesome build and breakdown Shed! I may look into a larger version of this for myself next year! Hmm amazing and well done!
enjoy your beach fire!
Master Of None
Well-Known Member
Very nice light Shed. Thank you for the quality tutorial / instructions... 

Superb. Really

Really awesome score getting the frame cut and drilled and sent like a kit! Honestly that was the part that me the longest and was the most taxing ... so you did well there and whoever it was that did that for you, KUDOS.
dynamo1
Well-Known Member
Braided wire doesn't work in those connectors on the board.could have used some braided wire
not for the connectors ,for the repair to the circuit board instead of that big blob of solderBraided wire doesn't work in those connectors on the board.
What did you pay for the F strips & where did you get themI got 13 F series strips: SI-B8V261560WW
edit >> I come up with about $286 can. for the stripes & $126 can. for the driver
total $412 can. For those interested ,not sure if can post websites? much cheaper than a 4 panel quantum board
Heavenly Hybrid
Well-Known Member
I might get lost in all the new light talk (well done again Shed!) I was thinking about your neighbor and smell issue and I wondered if you had considered some sort of greenhouse, paired with an exhaust and carbon filter? I thought of doing that myself, but not sure if it would really contain the smell? I dunno, not sure if it’s practical, but I thought I’d run that idea by you. Hope your girls are basking in the new light!
moderngroroom
Well-Known Member
Good going buddy..all that work looks like it paid off for ya.. congrats!!!now sit back enjoy and watch em growGlad y'all like it!
Before the enormous pic drop of the build, I want to thank a few people. First @Graytail for all the recommendations and calculations, for sticking with me every time I went "wha?," for actually going online and finding the exact model numbers for the driver and the strips once he figured out what I was trying to do, and for helping me when I got lost on the wiring yesterday. Next up is @PurpleGunRack for giving great info and links when I said I thought it was time to build me a strip LED. Thanks to @CraZysWeeD for being a resource during the build as well, walking me through the wiring yesterday along with Gray. Also thanks to @SamSmith for understanding what I was trying to accomplish with my wattage calculations and getting me to the formula needed to stay in my lane. And last, to the unnamed member here who so lovingly offered to create the frame to my specs and ship it to me, pre-cut, pre-drilled, and with all the hardware I needed to get it assembled and then some (as you'll see in the pics below).
On to the build...
Let's start with what I bought since it's blurred out in the pics. I got 13 F series strips: SI-B8V261560WW and a MW driver HLG-320H-C1050A. The A series has a built-in potentiometer that allows me to dial in the wattage draw I want, and that built-in pot actually allows me to get a higher draw (if I wanted it) than the B series with an external pot wired in.
After I ordered the strips and driver, I received this package in the mail:
Neatly and safely packed, and included the U-channels, L brackets, nuts and bolts, the correctly sized allen wrench, wago connectors, 14 gauge solid core wire, a Scotchbrite pad for the channels, and a file in case something needed to be smoothed out (it didn't!). Phewf! Thanks again for that amazing gift.
Onto the rug to get this thing constructed:
I bought four 4" eye-bolts: the eyes for hanging it and the 4" to keep it off the floor when I have to drop it down:
All done with step 1:
Next step was applying the thermal heat tape from Amazon. To prep the channels I use the nicely supplied Scotchbrite pad and cleaned up the aluminum so the tape would stick well. Wiped it down with a wet washcloth a few times and then dried it...good to go!
Since the channels were left long I had a 1.25" gap on either side so I marked off the boundaries of the tape and stuck it down. It was easy:
Next up was sticking the strips to the tape, which was even easier (you'll see them in the completed build pic). I made sure they all pointed the same way in case it mattered.
Moving on to the electrical...
I used a computer power cable since power supplies are well over 400 watts.
Here are the driver connection cables. You will note that there is no option for a ground on the DC side of the driver.
Got the driver all wago'd up:
I cut and stripped 24 wire strips thinking I had to run the connections up one side and down the other...I was wrong!
This is where I ran into problems. I ran the connections up one side and then couldn't sort out how to connect the last strip back to the second from last strip back down the other side. After consulting the internet, Crazy, and Graytail, it turned out that I was only supposed to run ONE connection from strip to strip. And contrary to wiring diagrams on the internet, I needed to run them all down the same side and not alternate the connections from left to right.
So, pulling the wires out is not easy as there is no real loosen method on the connectors. There is a little tab you can push in but it doesn't do anything. And while I was pulling out the unneeded connections, this happened:
Oh well, I figured I just wouldn't use that side ever so it didn't matter. Then I got it all working and discovered this:
Oops! All that hard work and well-earned cash and I've lost 8 LEDs! That just will not do. Solder to the rescue
It ain't neat:
But it did work!
And then yet another encounter with one of those damn fragile connectors. It split while was just adjusting the wire!
Epoxy to the rescue, but I couldn't get a clamp in that tiny space:
Vice-grip lifehack! (Couldn't be bothered to dig out the actual vice grip, but yes, I do own one!):
So it's all wired and working and time to get it ready to hang. Just in case you can't figure out the wiring, it's driver red to first board +, then - to + down the side, and - on the last board to driver black:
I cleared out room in the shed so I could lay it on the floor and attached a rope from eye hook to eye hook on each side:
And then ran a rope between the two through 2 eye hooks in the roof joists (yes @nobodyhere, it is adjustable):
I hung the driver from a nail:
Let there be light!
And I got out through the entire operation without and shocks and got one cut on my hand from the edge of the frame when one of those connectors finally let go of the wire!
It hangs about 2' over the canopy now, and I had it at 180 watts last night. I'll bump it to 200 tonight but leave the height alone.
Thanks again to those listed above and to all of you who encouraged, cheered, and offered advice along the way to getting this built.
Back to familial obiligations (beach bonfire tonight), so I will catch up with your weekends as soon as I can.
...Congrats on the light build... ...cheerz...h00k...
 ...
...
...cheerz...h00k......nobodyhere
Well-Known Member
Very nice....
CraZysWeeD
Well-Known Member
I thought of doing that myself, but not sure if it would really contain the smell?
A carbon filter and a good fan will eliminate all smell. I live in an apartment building and without that I would never be able to grow like I do. It's more fantastic than our new high-tec lights!
Derbybud
Well-Known Member
Those plants in the shed will really like the extra light.

Heavenly Hybrid
Well-Known Member
Oh nice! I have one for my tent inside. I just wasn’t sure if it would work as well in a greenhouse. If I were to use it for myself, it would have to be 100% no smell.A carbon filter and a good fan will eliminate all smell. I live in an apartment building and without that I would never be able to grow like I do. It's more fantastic than our new high-tec lights!
And here we grow buddySorry gang, been busy today getting the light sorted. I hit a few snags and won't have time to put the whole build up in a post now (tonight or tomorrow), but I thought I would at least post this pic so you can see that it's done!The green wires block some of the LEDs at this angle but they don't block any light pointing straight down:
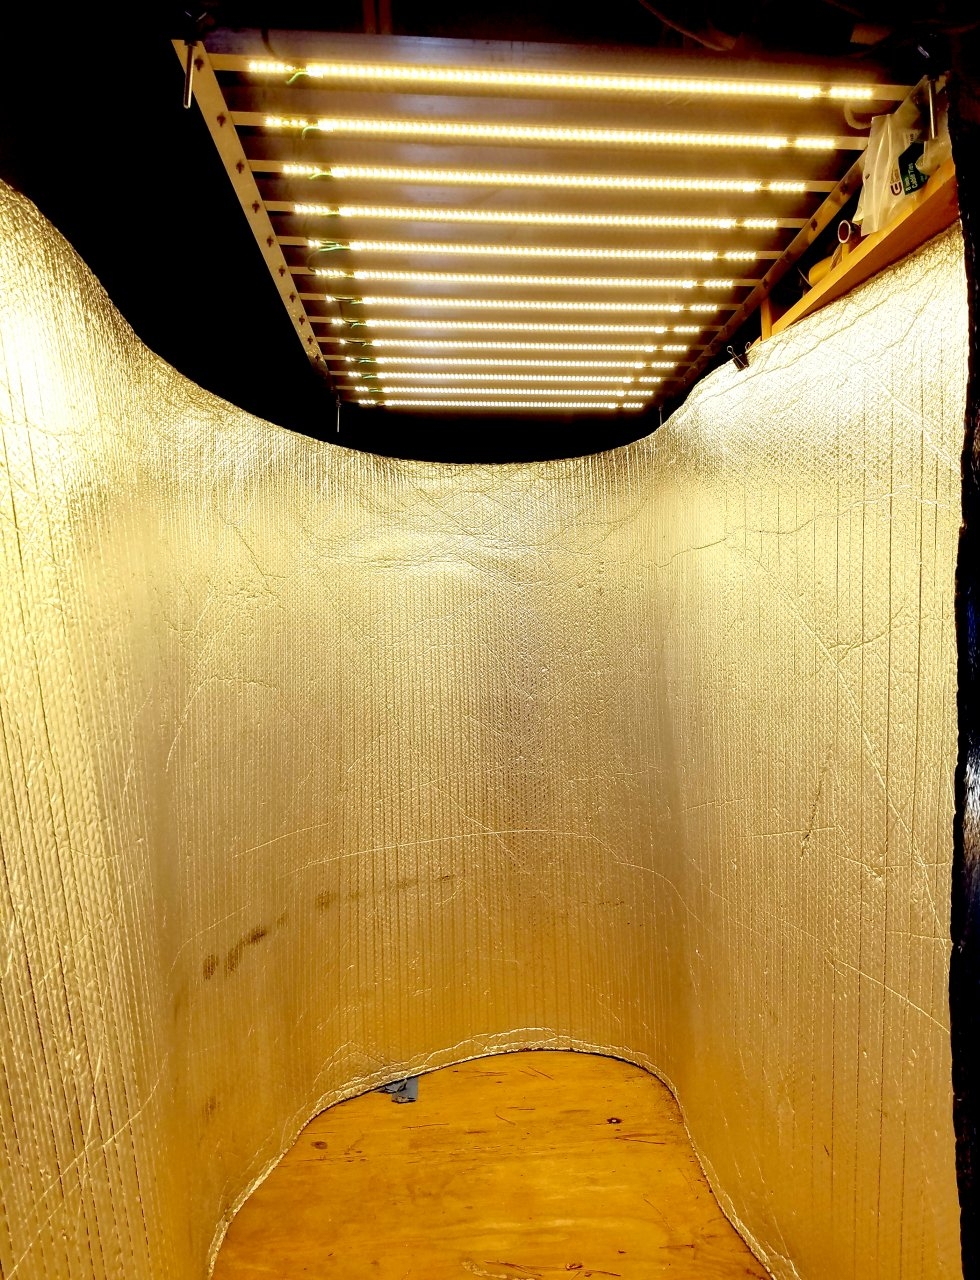
It pulls 123 watts at it's lowest setting (about where the MarsHydro 300 was) and 383 watts cranked. I'll probably start it around 180 watts tonight so the plants can get used to it and bump it each night after that until I get to around 250 watts.
Big thanks to @CraZysWeeD and @Graytail for helping me out with my stumbles today.
I hope you're all doing well but I gotta run.
Congrats on making it through and still be alive . Green is ground ?
Well you made it out with only a scratch Thank god !!Glad y'all like it!
Before the enormous pic drop of the build, I want to thank a few people. First @Graytail for all the recommendations and calculations, for sticking with me every time I went "wha?," for actually going online and finding the exact model numbers for the driver and the strips once he figured out what I was trying to do, and for helping me when I got lost on the wiring yesterday. Next up is @PurpleGunRack for giving great info and links when I said I thought it was time to build me a strip LED. Thanks to @CraZysWeeD for being a resource during the build as well, walking me through the wiring yesterday along with Gray. Also thanks to @SamSmith for understanding what I was trying to accomplish with my wattage calculations and getting me to the formula needed to stay in my lane. And last, to the unnamed member here who so lovingly offered to create the frame to my specs and ship it to me, pre-cut, pre-drilled, and with all the hardware I needed to get it assembled and then some (as you'll see in the pics below).
On to the build...
Let's start with what I bought since it's blurred out in the pics. I got 13 F series strips: SI-B8V261560WW and a MW driver HLG-320H-C1050A. The A series has a built-in potentiometer that allows me to dial in the wattage draw I want, and that built-in pot actually allows me to get a higher draw (if I wanted it) than the B series with an external pot wired in.
After I ordered the strips and driver, I received this package in the mail:
Neatly and safely packed, and included the U-channels, L brackets, nuts and bolts, the correctly sized allen wrench, wago connectors, 14 gauge solid core wire, a Scotchbrite pad for the channels, and a file in case something needed to be smoothed out (it didn't!). Phewf! Thanks again for that amazing gift.
Onto the rug to get this thing constructed:
I bought four 4" eye-bolts: the eyes for hanging it and the 4" to keep it off the floor when I have to drop it down:
All done with step 1:
Next step was applying the thermal heat tape from Amazon. To prep the channels I use the nicely supplied Scotchbrite pad and cleaned up the aluminum so the tape would stick well. Wiped it down with a wet washcloth a few times and then dried it...good to go!
Since the channels were left long I had a 1.25" gap on either side so I marked off the boundaries of the tape and stuck it down. It was easy:
Next up was sticking the strips to the tape, which was even easier (you'll see them in the completed build pic). I made sure they all pointed the same way in case it mattered.
Moving on to the electrical...
I used a computer power cable since power supplies are well over 400 watts.
Here are the driver connection cables. You will note that there is no option for a ground on the DC side of the driver.
Got the driver all wago'd up:
I cut and stripped 24 wire strips thinking I had to run the connections up one side and down the other...I was wrong!
This is where I ran into problems. I ran the connections up one side and then couldn't sort out how to connect the last strip back to the second from last strip back down the other side. After consulting the internet, Crazy, and Graytail, it turned out that I was only supposed to run ONE connection from strip to strip. And contrary to wiring diagrams on the internet, I needed to run them all down the same side and not alternate the connections from left to right.
So, pulling the wires out is not easy as there is no real loosen method on the connectors. There is a little tab you can push in but it doesn't do anything. And while I was pulling out the unneeded connections, this happened:
Oh well, I figured I just wouldn't use that side ever so it didn't matter. Then I got it all working and discovered this:
Oops! All that hard work and well-earned cash and I've lost 8 LEDs! That just will not do. Solder to the rescue
It ain't neat:
But it did work!
And then yet another encounter with one of those damn fragile connectors. It split while was just adjusting the wire!
Epoxy to the rescue, but I couldn't get a clamp in that tiny space:
Vice-grip lifehack! (Couldn't be bothered to dig out the actual vice grip, but yes, I do own one!):
So it's all wired and working and time to get it ready to hang. Just in case you can't figure out the wiring, it's driver red to first board +, then - to + down the side, and - on the last board to driver black:
I cleared out room in the shed so I could lay it on the floor and attached a rope from eye hook to eye hook on each side:
And then ran a rope between the two through 2 eye hooks in the roof joists (yes @nobodyhere, it is adjustable):
I hung the driver from a nail:
Let there be light!
And I got out through the entire operation without and shocks and got one cut on my hand from the edge of the frame when one of those connectors finally let go of the wire!
It hangs about 2' over the canopy now, and I had it at 180 watts last night. I'll bump it to 200 tonight but leave the height alone.
Thanks again to those listed above and to all of you who encouraged, cheered, and offered advice along the way to getting this built.
Back to familial obiligations (beach bonfire tonight), so I will catch up with your weekends as soon as I can.
That light buddy look at the coverage woot woot .
Now you wait to see what these buds are up against lol
- Thread starter
- #8,119
Don't catch up farside, start from here! Glad to have you backMusta got unsubscribed somehow. Check in and find I'm 40 pages behind.
.While we're talking about nice lamps, let me ask you a question regarding translocation that you've mentioned before. How does translocation relate to light penetration from our lamps? Is penetration as important as we make it out to be if translocation is moving nutrients around regardless of line-of-sight access to the light source?Pretty nice lamp there buddy. Gonna grow some ganja with that?
That! [emphasis mine]Whats wrong with Earl Grey...It's black tea with a little bit of Bergamot (orange peel) added in.
Thanks Amy. Most taxing for anyone building their own light, but even more taxing for you. I was given quite a gift having this cut and drilled for me with all the supplies.
Superb. Really
Really awesome score getting the frame cut and drilled and sent like a kit! Honestly that was the part that me the longest and was the most taxing ... so you did well there and whoever it was that did that for you, KUDOS.
I'd still have to solder down the braided wire, and the braided wire would have had to been soldered to touch 3 contact points in like half an inch. That would have been much more difficult than using plain solder for that span.not for the connectors ,for the repair to the circuit board instead of that big blob of solder
The whole order from Arrow came in around $300 US including tax.What did you pay for the F strips & where did you get them
edit >> I come up with about $286 can. for the stripes & $126 can. for the driver
total $412 can. For those interested ,not sure if can post websites? much cheaper than a 4 panel quantum board
A greenhouse would be nice but I have run out of room for structures of any type. Good thinking though!I might get lost in all the new light talk (well done again Shed!) I was thinking about your neighbor and smell issue and I wondered if you had considered some sort of greenhouse, paired with an exhaust and carbon filter? I thought of doing that myself, but not sure if it would really contain the smell? I dunno, not sure if it’s practical, but I thought I’d run that idea by you. Hope your girls are basking in the new light!
Thanks Derby! While I have you, let me ask you a lighting question (anyone can answer though): Since my coverage in the shed is now edge to edge inside the Oval of Brightness®, am I better off slowly lowering the light rather than upping the watts? I could save some electricity that way, no?Those plants in the shed will really like the extra light.
Green is ground coming from the driver or the AC plug. The wires from strip to strip just happen to be green as well even though they're hot.Green is ground ?
--------------------------------------------------------------
I'm glad you all stuck with me through this process and didn't drop off after seeing all the discussion of parts and math and
non-plant-related stuff. I'll now be able to get back to growing and talking about growing, with the occasional lighting question that many who grow with lights have (see above)!
I didn't have time to transplant anything this weekend so I'll be doing that tomorrow morning.
Sorry I've been absent for much of the weekend and I am pages and pages behind on your journals
 . I have the rest of this week off work so I should start catching up tomorrow.
 I love ya buddy your worth the wait 
