WW/Wappa 2L Hempy GLR 1st Grow!

So far they've been alive for 4 days outside of the tent with no water at all. I just watered 2 of them today, which I guess was a mistake, because I put tags on them of "none", "3 days" and "1 week" - I guess I messed up the one week, and the 3 days is late. Oh, well. I wasn't planning on turning it into an experiment, I was just biding my time until throwing them out until I had that idea.
 
So, today will be the 3rd day of flower for my set-up. I have the original 32 doing very well, and another 15 or so that I'm not so sure about. I let them go so long that they got all dry and brittle(I was waiting for the epic root growth from before). I have popped more clones from the dying moms into Ren, and am trying to replicate the conditions from the first run of Stimpy. I think the tent temps, spray amount or water temps may have been the difference, and am messing with all of them to get those results, even though I am now on flower lights and times. I've decided not to worry too much about them anyways, as I was only planning on 25-30 plants, and I already have more than that very healthy, and many more potentials, so I wont worry over every single plant. I've set my lights to 10/14, and have switched the cycle to be at night. This nocturnal cycle, coupled with the colder temps(finally), has allowed me to switch over to outside air pumped in thru a duct fan, rather than running the a/c the whole time. much less noise and energy use. So now I have a 250cfm sucking cold air from outside, and blowing it into the tent; then a 250cfm pulling thru the carbon filter, and blowing out into the room. The filter is set to 24hrs, and I get a max of 85f during lights on, around 70f during dark. The "experiment" to bubble clone with either slits in the stem or not, never got a chance to go full term, but there were already more signs of roots on the slits, so I put slits in all the new clones. As far as the water test, after about 4 days the older growth started to droop on all plants, but new growth continued even as the whole plant dried out around it. New growth would still pop up, even when it would be very light in color, and dry itself. I would say no more than 4 days without water, but even after a week, when given more water, they perked back up - the problem is, much damage already done by then to leaves/branches that got so dry that they fell off or completely died. Here'sa quick pic of the setup in bloom:
IMG_028112.jpg
 
After much trial and error, and many returns/exchanges, I have found the perfect camera. I'm a week away from the first chop of the fan leaves, and I am really happy with the results. I now have 44 plants flowering, and about 10 in the cloner(outside of the tent). Since I'm not packing in so many, /i decided to use some soda crates that I "rescued" from behind a store one night. After searching for days online, and finally giving up, weeks later I happen to pull into a driveway leading behind a small store to take a leak. I step out, and there's tons of all different kinds of crates stacked/thrown everywhere. I grabbed enough of the best ones to fill my tent plus a couple extra. That has also neatly handled my desire for trays to move my plants more easily. Anyways, now they have a bit more space to get comfy. I've reorganized them by height, from back to front, but I'm thinking of using more of an I-max type, stadium setup - something with the smallest, least obstructive in the center, with the biggest at the edges. I feel this would maximize light distribution, but may not be practical with my small setup. For someone with tons of plants, and lots of room on all sides to access the plants to water, this may help nurture seedlings, while not neglecting giants sharing the same light. I think the step-method clearly favors the bigg'uns.
There's crazy hairs popping out from all levels of these plants. I just got my newest camera today, so I'm still learning how to use it, but I'm already seeing huge improvements over the other cameras. I've been using Blue planet 2-part, now with bloom booster, exactly as the instructions say. I've been supplementing that with cal-mag, b-52, sugar daddy, and root66 with water from a reverse-osmosis filter. I don't even usually bother to Ph the water. I have no brown or yellow on any of the plants once they get over the cloning process. Out of the main 32(the other 12 were potted later) are between 12-24" after 2 weeks in bloom. Perlite/Coco does not seem to be having much of an effect that I can see so far in performance. Both are doing very well. I'm kinda awed at the health of the girls, as there's not a single bad leaf on any of them. I can see the difference in genetics, even though I have given up following which seed each plant came from. Many show very clear similarities to one of the original plants, like leaf bunching patterns or anomalies like dual stems.


DSCN00586.JPG

DSCN00627.JPG

DSCN00647.JPG

DSCN00664.JPG

DSCN00674.JPG

DSCN00683.JPG

DSCN00485.JPG

DSCN00496.JPG

DSCN00473.JPG
 
Very nice your plants are starting to take off. Plants are very healthy. Nice catch on the crates. They do come in handy when moving plants around. Good to know you finally got the camera you like. What was wrong with the first purchased?

Well, the small cannon you recommended was good - better than most p/s that I tried, but the macros were just not popping for me, many times the af would go thru the good range, and fall back out of focus, and even when in focus, it wasn't as clear as I wanted. The L120 was a bit better, but still not perfect, and on top of it, lugging a dslr around was a pain. It was too big for a pocket, had a lens cover to lose, etc. I now have a nikon coolpix7000. Which is a bit bulky, but not with all the protrusions, so it still slides into my jacket pocket. This camera has fully adjustable focus, not just af, so I can manually focus by increments. It has a built in flash(hidden/pop-out, didn't see it at first), as well as a mount for better flash setups, saves raw or jpeg files, adjustable aperture or white-balance while shooting, what looks to be a removable lens(??), and about a thousand modes and setting I haven't even learned of yet. I have a viewfinder(with focus control) and a 3" lcd with awesome resolution. My macro shots now have that crisp front/ blurry back that looks great, and I haven't even messed with the aperture yet. All in all, for $200, I can't think of a better camera, and I've been researching for weeks!
 
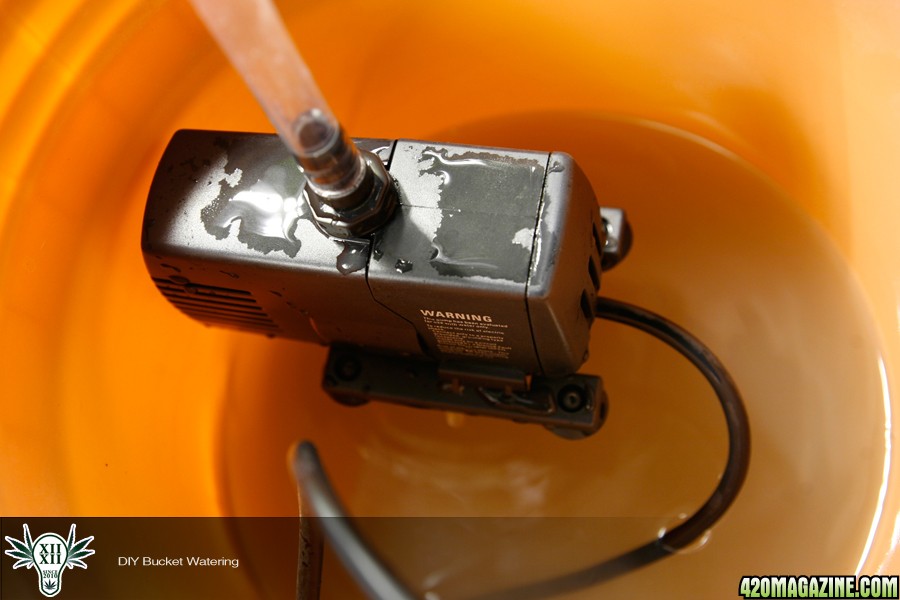
I know what you mean on watering the plants by hand. Made this little device to help with the watering. Use a 5gal bucket, fill it with the premix, have a water pump in there (use 100-200 gph pump), with a tube, and a stick at the end. The stick help stabilize the tube and for easy griping and reaching towards the plants at the edges of the tent. Plug the water pump to a power strip to control the on/off of the flow. Saves lots of time watering by hand. This is semi-automatic.

MG_1997.jpg
MG_1998.jpg
 
Playing with the menu while taking some shots just now, I realized that there is a raw file editor in the camera itself. I can change the exposure, white balance, file size, image quality, and a few other things, without needing a program to do it on the pc. This camera is leaps and bounds above the other ones I've found in the price range. The other version is more popular because it has a pop-out lcd, so you can see yourself, or around corners or whatever- but that model costs $200 more. I would recommend anyone who has interest in good pics to do a Google search of this beast! I'm in no way getting anything out of recommending this product, but I think it's such a great deal that it's actually a public service to spread the word. I bought a $400 camera that didn't do things this does. Glad I kept the receipts!
nikon-cooplix-p7000.jpg

nikon_coolpix_autumn_2010-542x400.jpg


12, What's your favorite camera to use, how much was it, and what features are your favorite?
 
Chopped the 16 girls that were at or above 24". Huge improvement in light penetration is clearly evident. I've gotten to 48 plants, and have tossed the rest that were still in the cloner after all this time. I'm comfortable with my space right now. I'm just hoping that the smaller girls in front are getting enough light to catch up to their big sisters eventually. I have been using a 5gal bucket to mix/store nuted water, and realize now that you need to clean these things out now and then. It was starting to stink like a public gym, and I had more and more floating debris in there, so I cleaned out with bleach, rinsed, dried, rinsed again. I've only been using the h2o2 that I have for cleaning only, because I'm not quite comfortable throwing free-radicals all over my roots.

It was getting pretty cramped in there:
Defoliation1_29_004.jpg

Defoliation1_29_006.jpg

Defoliation1_29_005.jpg


So, here's the first set, pre-op:
Defoliation1_29_013.jpg


and post-op:
Defoliation1_29_014.jpg

Defoliation1_29_015.jpg

Defoliation1_29_017.jpg


The second set before:
Defoliation1_29_018.jpg

Defoliation1_29_019.jpg


And after:
Defoliation1_29_020.jpg

Defoliation1_29_021.jpg

Defoliation1_29_022.jpg

Defoliation1_29_023.jpg


Here's the whole tent before defoliation:
Defoliation1_29_002.jpg


And after:
Defoliation1_29_024.jpg

Defoliation1_29_025.jpg


I tried to just clip what was in the way, and leave the smaller leaves intact. The upper-most canopy is left on, along with the bottom level of leaves that are beneath all the bud sites. All the sites really pop out now. Given the growth rates, and size difference, I expect to do a clipping a week, as each row gets big enough.
 
I know what you mean on watering the plants by hand. Made this little device to help with the watering. Use a 5gal bucket, fill it with the premix, have a water pump in there (use 100-200 gph pump), with a tube, and a stick at the end. The stick help stabilize the tube and for easy griping and reaching towards the plants at the edges of the tent. Plug the water pump to a power strip to control the on/off of the flow. Saves lots of time watering by hand. This is semi-automatic.

Thanks for the suggestion, 12. I used the same kind of thing to suck out overflow from dripping cloners in my tent. I used a hand-powered siphon pump, but the same idea with the bamboo in the hose to make it easy to reach the water you're removing. Also helped me to cut the stick in half, to let more flow through easily. I haven't used this method for watering because of the lack of control in pressure or when it shuts off. I don't want to pump an extra 10 seconds worth of water into the tent while I'm trying to unplug the pump. I was planning to use a 5 gal bucket with a dwc-style hole in the side, running to a length of tubing. I would elevate the bucket, to use gravity as the pump, then have a pinch-valve to turn the water flow on and off. This would make things easier on me as well, because I like mixing nutes by the 5gal, and I could mix in the same bucket that the hose runs from, eliminating the need to pour , and a chance to spill.
DSCN01015.JPG

DSCN01044.JPG


On a side-note, I'm testing the waters of making hash, and am planning a test of making some bho from bud/kief. Any of you have experience with that? I'm really excited to try to get some bubble hash from my trim on this batch. Anything I should be doing to help that along besides low humidity? I saved the tar from a recent iso-cleaning of a glass piece that was completely stopped up, and gave about a gram ball to a friend to try. Waiting on the review. Here's about another gram here:
DSCN01054.JPG
 
Nice review on the camera. Glad to know you have found your camera. Went through so many of my own before selecting a keeper. I use Canon 5D with 24-70mm Lens. About 4K at the time. The manual mode is my favorite.

Good work on the trimming. Looking forward to the buds swelling and your watering system built. You've been busy!
 
I got my watering system finished. The Home Despot employees were mostly useless, as always, so I had to figure this out myself - there may be a better way. All together I spent about $25 on the whole thing, not counting the drill I used to make the hole in the bucket.
I started with a normal bucket, then used a washer as a guide of how big, and where to make the hole. At the base of the whole setup(sorry I didn't take pics before) is a threaded connection piece that both of the white pvc pieces can screw onto. Make sure to put some cheap teflon tape on all the threads to avoid leaks. I put a washer that feels like a pencil eraser of each side of the bucket, to make a water-tight seal. The inside pvc piece is just a 1" piece of threaded pvc, which is just to hold the inside on, and a flow control valve(fcv) to allowme to turn off the water at the bucket, for when I want to remove the hose. I put a barbed end onto the fcv, to receive the tubing, and put some teflon tape on here to make the fit better. The tubing (I chose to use 5/8 inner diameter(ID) / 3/4 outer diameter(OD) tubing, because it fit my wand well, and was thin enough to flex and pinch well. You could also use a hose clamp to pinch the tubing down onto the barbed spout, but I want to be able to pull off and put on easily. The hose continues 10ft. to my wand, where I used a hose clamp to pinch it down tight. That's it.
With the fcv closed, I can fill the bucket with water and nutes(leave a bit of air space to allow room to mix - I even threw a couple blender balls in there for good measure), and with the tubing removed, it is pretty easy to shake up for good mixing. I put the bucket up higher than the wand and turn the fcv on. The water flows down to the wand, where I can control the flow with the blue thumb slider. The handle telescopes, to give me just the right length. This can be mounted onto a 5,10,35 gal bucket, or most any res you have. Just remember, even the lowest part of the hose has to be higher than your hand level to work, and water weighs 8#'s a gal, that means a full 5gal will turn into a 40# wrecking ball if you tip it over, so be careful with placing and using this!

Here's the general assembly pics:
DSCN01243.JPG

DSCN01253.JPG

DSCN01263.JPG

DSCN01277.JPG

DSCN01287.JPG

DSCN01293.JPG


See how you can control the flow down to a tiny trickle. This is not even the lowest I can get it, you can have almost a drip trickling out.
DSCN01314.JPG


It's so easy to get through all that growth now!!
DSCN01335.JPG

DSCN01344.JPG


Here's what I've been enjoying as of late, a nice bowl of hash:
DSCN01398.JPG
 
Back
Top Bottom