The Honey Oil Thread: From Raw Bud & Trim, To RSO, Through An SPD, To Golden Love!

Getting ready to decarb. Before I do that, I wanted to talk a little bit about vaporization temperatures. Last I read, there were over 400 different compounds in cannabis. I've only been able to gather a list of the vaporization temperatures for the ones I could find on the interwebs.

But even before vaporization temps, it's important to first explain fractions.

As it relates to the short path distillation process we are embarking on, a fraction is: A range of temperature that specific compounds will vaporize.

Very shortly, we will get the short path distillation rig setup. As we go through the run, we are essentially increasing the temperature of a solution slowly. As we do, compounds evaporate. Some of these compounds we want. Some of them we don't. Still yet, there are some that we want, but they fall too closely to an undesirable, so we bypass it.

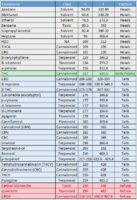
Take a look at this image. These are the compounds I have found vaporization temperatures for.

1580347948693.png


As you can see, the Grey colored compounds will be in the Heads Fraction. The only Green colored compound is THC, so that will be the Mains/Body Fraction. Finally, the compounds colored blue are the majority of the terpenes and flavonoids, which are considered the tails. As we go through the process, we separate the three fractions into three different receiving flasks. We turn the SPD rig off when the temperature reaches ~224c or so. Anything shaded in Red is left in the boiling flask we started with, and is discarded.

Regarding CBD, the temperatures are so close that I don't see how it can be separated without much more sophisticated gear than I have access too. I'm assuming that some of it goes into the mains with the THC, and some of it goes into the tails with the terps.

Next, we'll get into the decarb.
 

Attachments

  • 1580346227263.png
    1580346227263.png
    57.1 KB · Views: 152
great information ..looking at the chart I see some terpenoids and cannabinoids that evap under the 224c mark, I'm assuming that would go into the tail but in the chart is says "refuse"
 
great information ..looking at the chart I see some terpenoids and cannabinoids that evap under the 224c mark, I'm assuming that would go into the tail but in the chart is says "refuse"

Why thank you good sir. I replaced the pic. Take a look and let me know if you see anything else out of sorts.
 
You're very welcome . Now as you know I have never run SPD. Looking at the chart it seems to me that if you wanted to capture all the terpenes that at the vary least you would have to run the tails flask twice , first run into it would be from 105-156c and the second fun into it at 160-224c and true heads (stuff you don't want ) 56-100C . The other thing I was thinking is that all the thca would be converted in the decarb.

edited …GREAT CHART !
 
your statement about loosing terpenes just hit me ...you lose te top ones in the decarb . now this would require an extra step/distillation you could do the first run before decab then just decarb and redistill the tails flask to make a complete full spectrum oil, couldn't you ?
 
***The Decarb Post***

Time for decarboxylation! What's that you ask? Essentially, you are knocking a carbon molecule off of the THCA chain. This converts the THCA into THC. THCA will not provide euphoria, THC is what we are after. For most folks, heating your oil to 105c (220f) will get your oil to where you want it to be. This is how I typically do it.

This time around, I wanted to isolate the THC as much as possible. This means I don't care about anything in the Heads Fraction. That being the case, I'm going to add a step once my Decarb is complete.

Before I get going, this is a stir bar. Its not a pill, lol! Just about every time I send a pic to someone and they see it, they asking me what I am dosing my oil with. For the record, I don't dose. This is coated magnet. Under the hotplate, there are magnets that spin at whatever RPM you set it to. The magnets spinning makes the "stir bar" spin inside the flask, effectively stirring it.

IMG_1542.JPG

Once I have my hotplate setup, I add the crude oil I collected from the evaporation process last weekend. I like to add heat very slowly, 10c increments at a time. I like to start with the heat on 30c.

IMG_1669.JPG

Once the oil is thin enough to stir, I drop the stir bar in and set the stir for 100rpm.

IMG_1671.JPG

Again, I slowly increase the temperature in 10c increments. Once the heat reading inside the fluid reaches the set temperature, it will likely overshoot unless you go slow. As we near 105c (220f), tiny bubbles begin to from. This is a sign that the carbon molecules are separating from the THCA chain, converting it into THC.

IMG_1677.JPG IMG_1685.JPG

Once we get to this point, we dwell at 105c until the small bubbles stop. This can be up to 30 minutes depending on the amount and purity of the crude oil. Once all of the small bubbles stop, the oil should look like a lake, nice and smooth like glass. At this point, you can go ahead and turn off the heat and let the heat source and container cool down.

In my case, I'm going to get rid of the heads now, to make my life easier once I hit the SPD rig. Again, I want Isolate the THC to get the highest THC percentage I can, which means eliminating or separating everything else prior to 157c or so. Also, I don't know which compound it is, but the heads fraction smells like the worst thing you can possibly think of. At first, its very pleasant, then turns to a fowl fishy dog ass smell. Not sure what it is, but I tossed the head the last two runs.

Once I see the oil settle down, I increase the temp 10c at a time, on my way to about 135c.

IMG_1706.JPG IMG_1711.JPG

Once I get around 135c (274f), I dwell until the vapors stop. As the vapors start to come up, you can smell the very nice smells, and then eventually a very fowl smell. Make sure your space is vented!

Again, after the vapor stops, I turn off the hotplate and let it come down. When the oil is at around 40c, I start transferring it over to a container to keep it in until its time to run it through the next step.

Here we have 62.91g of of cruide oil. No idea how pure it is. I love the color and consistency. No burned or fowl smell. Think i'll grab a dab.

IMG_1729.JPG
 
your statement about loosing terpenes just hit me ...you lose te top ones in the decarb . now this would require an extra step/distillation you could do the first run before decab then just decarb and redistill the tails flask to make a complete full spectrum oil, couldn't you ?

The first two times I did a run, the heads smelled fowl. I can't recall smelling anything that bad before. But if you have every had a dog that needed its anal glands expressed, that would be fairly close. I looked it up in the various forumns, and everyone is tossing it.

This time, right after I decarbed, i went up to 135c and dwelled for about 10 minutes. Its crazy how the vapor starts off smelling so nice, and then quickly gets so fowl. Man, its nasty. Yuck!

So, when I get to the next step, I pretty much ramp the still right up to 140c, and I should start hitting the mains/body.

Other thing to note.... Having the tempertures is like saling in the ocean at night guided only by the stars. The temps are just meant to guides. In reality, I know when its time to switch from the heads flask to the mains flask by the color and consistency of the fluid. It goes from a thin clear fast dripping fluid and slowly goes to a golden yellow thicker liquid. Thats the fraction changing. On the thermometer it can vary. There is an art to this science for sure.
 
I dunno if anyone ever has seen Grumpy Old Men.... but the part where the one old guy puts a dead fish in the door panel of the other guys car.… You could totally spill the heads fraction all over the inside of someone's car, who you don't like. They would have to sell it. Worse than spilling 6 month old bong water on your couch!
 
Ugh... Have you ever been stuck the house long enough that you actually want to go to work? On a Friday even?

Cabin fever!
 
Happy Friday Everyone!!! :cheer::hippy::slide::tommy::goof::snowboating:


Fun last minute add. I had a friend who I have been sending pictures of the process as I go. He seems to be digging it enough that he dropped off a couple of large zip lock bags full of grade a trim. It smells lovely.

I popped in the freezer, and will run it through this evening. I'm still on schedule to assemble the SPD rig this afternoon, test vacuum and resovle any leaks this evening. I'm planning for Saturday mid morning SPD run, starting around 11am or there about. I'll post some pics of the build and explain it as I go later today/this evening. Until then.....
 
Decided to do some color remediation testing.

As I was washing the goodies my buddy dropped of this morning, I figured I would do a test. Instead of washing the way I did the rest, two out of 5 mason jars, I let the biomass sit in the ethanol for about 3 minutes, instead of the usual 30 seconds or so. Usually I don't agitate the wash, other than spinning the jar twice. This time, I agitated the hell out of it. Below is the picture of what I wound up with. I'm going to do some color remediation and see if I can improve it. The goal is not to put it under a light, because this will somewhat degrade the THC, in my opinion.


BFD6E5E9-C894-4F66-9A9B-C88124A62F86.jpeg
 
Better, but not great. Next time I'm going to test with Bentonite T-5 Clay. You basically make a "puck" by putting a half inch of T-5 between two filter papers and then seal them together. As you pour our wash over it in the funnel, it cleans up the color allot.

With this test, I just used activated carbon.

ED9AD3F5-F50B-4250-B501-68897590011D.jpeg6756BABC-4156-4CC0-9228-28C2FB96AC9F.jpeg
 
Good day all. As usual, life interjected and I got behind. Oh well. The good news is, I do have the SPD rig all setup. I haven't gotten a chance to vacuum test it to ensure I can get the pressure down low enough. Hopefully I get through that early afternoon.

I'll apologize in adavance. Roughly 42 pics coming. If anyone were ever to need to follow these directions, I wanted to have decent pics to refer to.

Hope everyone's weekend is going well thus far!
 
*** The Short Path Distillation Rig Assembly Post (1 of 6)***

Before we begin with the build, it is important make a few quick points about the room we are using. We are past the point where we will be using any gases that could cause a fire/explosion, so that's not really an issue. More of a problem is the temperature in the space, the smells that may make it past the cold trap which are expelled through the vacuum, and the durability of the surface you are building your rid on.

The temperature needs to be as warm as you feel comfortable. During the process, the heat in the condensing head will transfer through the glass and into the environment. The colder the room is, the more problems we will have with the vapor re-condensing too soon, and then falling back down into the boiling flask. I actually use heat rope to insulate some of the glass pieces to ensure the heat stays in the flask and condensing head, as much as possible.

Of course, there is the smell. Some of the smells make it past the receiving flask that is meant to catch the heads. The majority of it will be caught in the Cold Trap (more on that later). However, a bit even makes it past that. It winds up getting sucked into the vacuum, and then gets absorbed into the vacuum oil. Some of it actually blows into the room, which can stink things up. During decarb, I eliminated everything that boils off at temperatures less than 140c, so I'm hoping this isn't a problem this time.

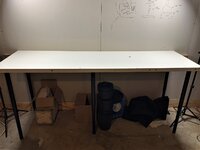
Lastly, make sure the surface you are working on is as stable as possible. In my case, I have a 2x4 secured to the wall, and then the table's edge rest on it, and then I secure the table to the 2x4 with several metal brackets. If our table was to have an issue during the process, your glass is likely to be destroyed. More importantly is the precious material you are working with. Enough said, lets get on with it!

First, lets take a look back at our reference drawing.

1.JPG

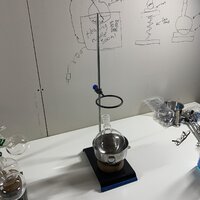
We'll start with the Heating Mantle. It will heat our round bottom flask and the material in it. The particular model I am using also stirs, and has a thermometer so that the mantle can keep the liquid at the set temperature. I purchased this from Alibaba for $42. Quite often, it is necessary to elevate the Heat Mantle in order to align it with the rest of the rig. In my case, I had this chopping board laying around, so there ya have it. Don't use anything that will conduct heat. We want as much heat going to and staying in the flask as possible. Its important to note, Heat Mantles come in sizes that match the size of your boiling flask. I have a couple of them, this time around I am running with a 250ml Round bottom boiling flask (RBF). This is a 250ml Heat Mantle.

4.JPG 3.JPG 5.JPG

What's a Boiling Flask you ask? Some folks just call it a BF. We place our crude oil into the BF and then slowly crank up the heat. Once the temperature inside the BF reaches the temperature that our terpenes and cannabinoids vaporize, the vapors will travel up and into the condensing head. For now, just know that the Boiling Flask, or BF is where we heat the material. Generally speaking, the goal is to start with at least half of the BF full, but no more than 60% full. I have a 500ml and a 250ml, so I'm going with what I got. I have been having trouble finding a decent 100ml Digital Heat Mantle. I feel working with a 100ml boiling flask would be optimal for me, as I always seem to have 50ml/grams of crude oil to work with.

6.JPG 7.JPG
 

Attachments

  • 2.JPG
    2.JPG
    433.4 KB · Views: 132
*** The Short Path Distillation Rig Assembly Post (2 of 6)***


As mentioned in the last post, once the boiling flask temperature reaches the vaporization point of the goodies we are after, the vapors travel up and into the Vigreux. The Vigreux is a glass tube with several sharp indentations and bumps on the side. These bumps and indentations significantly increase the surface area that the vapor needs to travel. They also create an effect where the vapors going up the glass tube condense before they reach the top and then vaporize again. This cycling creates a more pure product. The top of the Vigreux is open, so that a thermometer can be placed inside. This is how we will know the temperature inside the head. The Head Temp is the temperature that is important, much more than the temperature inside the Boiling Flask.

The Condensing Head basically takes the vapors that come through the Vigreux and turn the vapors back into a liquid. The head is angled on a downward slope. As the vapors turn back into liquid, the liquid runs through the head and into the triple cow. The head is double jacketed. There is a glass tube inside the glass tube. There is also an inlet and an outlet that water will flow through once we get to the heat bath step of the build.

Pics of the Vigreux and Condensing Head.

9.JPG

As we build the Rig, we want to make sure we are securing the glass pieces together with Keck Clips. There are metal ones and plastic ones. We need to use a metal one for the hot connections, such as the one between the Boiling Flask and Vigreux/Condesing head.

12.JPG

Also, before we connect the Boiling Flask to the Vigreux/Condensing Head, we need to slap a stand together to support it. We'll use a claw mounted onto the stand with a Boss Head.

10.JPG 11.JPG

And here it is put together.

13.JPG

Next comes the Triple Cow. The purpose the Triple Cow is to allow us to use three different Receiving Flasks. Because the Rig is under vacuum, we can't simply pull one Receiving Flask off to put a new one on when we go from the Heads to the Mains. The triple cow connects to the end of the Condensing Head, and has three outlets that come off of it. It also has a nub for the vacuum. I also use a metal Keck Clip on this connection.

14.JPG 15.JPG

Now that we have the Triple Cow connected, we'll go ahead and connect the three Receiving Flasks. These are 250ml each. There is one that will collect the Heads. The Heads are the compounds that vaporize at lower temperatures. Most of it is fowl smelling and has things in it that are really good for us (small amounts of Benzine). The second Receiving Flask will collect the Mains. Typically, this would be the THC/CBD. Finally, the third Receiving Flask will collect the Tails. Tails are the Terpenes that vaporize off between 165c or so and 220c. This time around, I think we are going to go full spectrum, so I am going to catch the Mains and the Tails in the same second Receiving Flask.

To support the Receiving Flasks and allow us space to rotate the Cow, we will use a Jack Stand.

16.JPG 17.JPG 18.JPG
 
*** The Short Path Distillation Rig Assembly Post (3 of 6)***

Now that we have the main section of the Rig setup, we'll setup a Cold Trap. More specifically, a Dewar Cold Trap. The purpose of the Cold Trap is to catch any vapor that makes it past the Cow and Receiving Flasks. It does this by creating a bunch of surface area that is significantly colder than the condensation point of most of the compounds we are working with. Its much colder, because there is dry ice packed in a tube that runs down the center of the larger glass piece. At the bottom, is a Receiving Flask that catches any liquid that condensates. The Receiving Flask sits in a small bowl with dry ice in it.

23.JPG 19.JPG

This is a large piece of glass that is heavy. We'll setup another stand, and secure it using a support ring and chain clamp. Once put together, we'll use a plastic

20.JPG 21.JPG 24.JPG

Cold Trap Done! I'll add a plastic Keck Clip later.

25.JPG
 

Attachments

  • 22.JPG
    22.JPG
    488.4 KB · Views: 111
*** The Short Path Distillation Rig Assembly Post (4 of 6)***

At this point, we have the main section of the SPD Rig assempled, we have our Dewar Cold Trap setup, and then we have our Vacuum Pump and Heat Bath. Now we are going to connect the four of them together.

First, a note on Vacuum Grease. With Chinese glass, its a must. I typically do that last. I feel that the Rig moves around too much during assembly and things get too loosened up. I'll cover Vacuum Grease a bit later. For that matter, you'll probably see pics where I don't have the Keck Clip on yet either. I'll ensure those are connected as well prior to running the Rig.

With that out of the way, on with making our connections.

First, we'll connect the main section of the SPD Rig to the Cold Trap using a length of rubber vacuum hose. Make sure you are using premium tubing meant for vacuum pressure. Otherwise, it will collapse. In additional, the goal should always be to make the hosing the shortest you can. However, with this particular connection, you want to leave a bit of slack so that you can easily rotate the Cow when necessary.

26.JPG 27.JPG

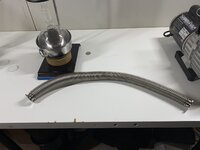
In a bare bones setup, next you would connect your Cold Trap to the Vacuum Pump. However, I like to know what the exact pressure is inside the still, so I am adding a T connection between the Cold Trap and the Vacuum Pump to keep constant watch. Also, I use a larger diameter steal bellow hose to go from the T connector to the vacuum pump. In order to make these connections, I use standard KF-25 hinge clamps with metal centering rings and viton O-rings. These make the connections extremely well sealed, but also are very easy to take apart and connect. The viton O-rings expand when under pressure, so those fill in any gaps very well.

29.JPG 30.JPG 31.JPG

We'll be setting up another stand to support the weight of the T connector and the bellow hose. Same deal, we also use a claw and Boss Head.

I use a small length of rubber vacuum hose to connect the Cold Trap to a KF-25 adapter. I then connect the adapter to the KF-25 T. I leave the adapter for my Micron meter attached, which sits at the top of.

36.JPG

I've found that its easier to connect the hose to the pump first, and then make the connection to the T, or if you are going directly to your Cold Trap, I would still connect the Vacuum Pump first and then make the connection to the Cold Trap.

In this case, Vacuum Pump first, then connect the T connection side of the hose.

IMG_1922.JPG IMG_1923.JPG
 

Attachments

  • 32.JPG
    32.JPG
    371 KB · Views: 101
  • 33.JPG
    33.JPG
    279.5 KB · Views: 109
Back
Top Bottom