

Nice little setup. Should get a nice personally stash out of this stealth stash!
Navigation
Install the app
How to install the app on iOS
How To Use Progressive Web App aka PWA On 420 Magazine Forum
Note: This feature may not be available in some browsers.
More options
You are using an out of date browser. It may not display this or other websites correctly.
You should upgrade or use an alternative browser.
You should upgrade or use an alternative browser.
Sweetsue's First Grow - Stealthy Trio of Autos Under CFLs
- Thread starter SweetSue
- Start date
-
- Tags
- auto cfls closet growing
- Thread starter
- #282
The enzymes do seem to like oxygen so you'd think that bubbling can't be a bad thing. But, is it a necessary step? I don't know either.
And I did read somewhere that enzymes degrade over time.... so if you've sprouted your seeds and blended them up, and enzymes are at their peak, then the extra time taken to aerate them may cause a decrease in enzymes..... Don't know....
This is an excellent point Sam, and one worth looking into. Let me see what I can find out. My gut tells me you're on the money. That makes the process even easier.
What makes you think "the enzymes like oxygen"?
That's the part I don't get. Bubbling seems like it's over complicating it. Do you think enzymes that we are after will multiply due to bubbling it?
Not at all arguing with anyone, just curious now and would like to get to the bottom of it.
That's the part I don't get. Bubbling seems like it's over complicating it. Do you think enzymes that we are after will multiply due to bubbling it?
Not at all arguing with anyone, just curious now and would like to get to the bottom of it.
SAMtheAPman
New Member
What makes you think "the enzymes like oxygen"?
I thought I read it on a soil building website... and they were also saying that the deeper you plant a seed, the less likely it will sprout, mainly because of the lack of oxygen. I thought they were relating the lack of oxygen to lack of enzyme function. They definitely said that the enzymes were aerobic.
That's the part I don't get. Bubbling seems like it's over complicating it. Do you think enzymes that we are after will multiply due to bubbling it?
Maybe not multiply (can enzymes multiply?), but possibly more will activate?
From what I've been reading, you don't need to aerate to have a good SST. I don't think I will be doing it myself.
SAMtheAPman
New Member
Seeds planted too deeply in soil, where little oxygen is present, will not live. As the depth of planting increases, the available oxygen and seed survival decrease. Wet or poorly drained soils also lack oxygen and inhibit the living processes of the seed. Most seeds immersed in water will die unless air is bubbled through the water. A shortage of oxygen usually kills the seed when the temperature or respiration is high. This happens because enzymes need oxygen to produce energy for growth of the embryo. The energy is released when the enzymes combine oxygen with various cell compounds.
So bubbling during sprouting might be a good idea if you're having trouble with seeds not sprouting, but I don't think bubbling after sprouting/blending is needed (or even beneficial, if time degrades enzyme function).
The quote is from buildasoil.com
- Thread starter
- #286
Hello Radogast. I'm thrilled to find you've caught up. Hopefully we can all learn together. We all have such different realities to deal with in our grows. Your unique viewpoint and sense of humor are welcome here.
Welcome also HealingKronic. It's my expectation to grow incredibly potent cannabis because my husband deserves the best available. This approach to that end has brought me tremendous joy and engaged my creative and student spirits in the desire to be a better organic gardener. There's just something about this living soil.
Now for some fun.
Traveling to cardiac rehab by bus means each trip is an exhausting 5-6 hours out of your day. It has seriously cut into my available free time, although I've made the best of my data plan update to keep up with other grow journals and study as we travelled. Being sick didn't help keep things moving along as smoothly as I'd hoped either, but I finally found time to get that Geo Pot worm bin up and running.
The processed leaves and additives have been becoming one for almost three weeks. It should now be more than ready for some worms to burrow into.

After dumping all of it into the pot I was surprised to discover how much they'd compacted. It only fills half the capacity. Oh well, it'll take the worms less time to work their alchemy.

Let's take a look in the kitchen worm bin. I must admit to following CO's lead and taking the gnat-covered cloth cover out into the snow to shake them out. Ha! Take that! Like it will make any real difference. LOL!

Somewhere in here are some worms.

A few hands full of little wrigglers should be a good start. They'll procreate to the level that the bin will feed. I like that about worms. I never have to worry about over population.

Note to self: avoid this in the future by tossing potato skins into the blender to make a paste.

The worms waste no time burrowing down into their new home.

I like to use the tops of egg cartons for a cover. They are in constant supply, offer cover with flexibility and can be incorporated into the bedding at any point.

Now for a new home. We have a wonderful landlord couple who offered me the use of the space under the stairs for storage, if I wanted to clean up the 100 years worth of dirt. It's located right outside our apartment door so I jumped at it. This looks like a good place to put worms. I have easy access, but no one else but the landlord does (and he avoids snooping). It's never too extreme in temperatures and it is completely dark when the lights are off and the door closed.
Under the stairs there's a nice space to tuck the bag in. I'll stop in later and set a spacer underneath to get better airflow underneath as well.

No lights = complete darkness. Comfortable temps, complete darkness, decent compost and total neglect. What more could a worm community ask for?

Last house on the block means no one comes this way. We keep it safely locked up.

And so the leaf mold experiment begins. The rest of my leaf haul will be sitting on the balcony, catching the sun every day and slowly but surely breaking down. Any worms in there were by accident. Let's see how long it takes both approaches.
Dale just got the email confirmation that my perlite for my SWICKs is on its way. I'm really excited about incorporating this technique. To have the plant regulate the water supply - well, I'm in awe.
I've been working out a simple system at minimal cost that will allow me to easily reposition and level the pots at will. Living in an old Victorian with not one level floor, or section of floor, one comes to believe, the ability to level without construction becomes a valuable thing. This is going to be fun.
OK, my domestic life responsibilities call.

Welcome also HealingKronic. It's my expectation to grow incredibly potent cannabis because my husband deserves the best available. This approach to that end has brought me tremendous joy and engaged my creative and student spirits in the desire to be a better organic gardener. There's just something about this living soil.
Now for some fun.
Traveling to cardiac rehab by bus means each trip is an exhausting 5-6 hours out of your day. It has seriously cut into my available free time, although I've made the best of my data plan update to keep up with other grow journals and study as we travelled. Being sick didn't help keep things moving along as smoothly as I'd hoped either, but I finally found time to get that Geo Pot worm bin up and running.
The processed leaves and additives have been becoming one for almost three weeks. It should now be more than ready for some worms to burrow into.
After dumping all of it into the pot I was surprised to discover how much they'd compacted. It only fills half the capacity. Oh well, it'll take the worms less time to work their alchemy.
Let's take a look in the kitchen worm bin. I must admit to following CO's lead and taking the gnat-covered cloth cover out into the snow to shake them out. Ha! Take that! Like it will make any real difference. LOL!
Somewhere in here are some worms.
A few hands full of little wrigglers should be a good start. They'll procreate to the level that the bin will feed. I like that about worms. I never have to worry about over population.
Note to self: avoid this in the future by tossing potato skins into the blender to make a paste.
The worms waste no time burrowing down into their new home.
I like to use the tops of egg cartons for a cover. They are in constant supply, offer cover with flexibility and can be incorporated into the bedding at any point.
Now for a new home. We have a wonderful landlord couple who offered me the use of the space under the stairs for storage, if I wanted to clean up the 100 years worth of dirt. It's located right outside our apartment door so I jumped at it. This looks like a good place to put worms. I have easy access, but no one else but the landlord does (and he avoids snooping). It's never too extreme in temperatures and it is completely dark when the lights are off and the door closed.
Under the stairs there's a nice space to tuck the bag in. I'll stop in later and set a spacer underneath to get better airflow underneath as well.
No lights = complete darkness. Comfortable temps, complete darkness, decent compost and total neglect. What more could a worm community ask for?
Last house on the block means no one comes this way. We keep it safely locked up.
And so the leaf mold experiment begins. The rest of my leaf haul will be sitting on the balcony, catching the sun every day and slowly but surely breaking down. Any worms in there were by accident. Let's see how long it takes both approaches.
Dale just got the email confirmation that my perlite for my SWICKs is on its way. I'm really excited about incorporating this technique. To have the plant regulate the water supply - well, I'm in awe.
I've been working out a simple system at minimal cost that will allow me to easily reposition and level the pots at will. Living in an old Victorian with not one level floor, or section of floor, one comes to believe, the ability to level without construction becomes a valuable thing. This is going to be fun.
OK, my domestic life responsibilities call.
- Thread starter
- #287
There are a wealth of forums on cannabis growing around the Internet dedicated to spreading the word about living organic soil to other growers. These men have devoted years to researching the intricacies of growing organically indoors. Today I was revisiting one of my favorites and remembering that ROLS is Recycled Organic Living Soil. The thread is ROLS and No-Till, and the information contained in the first two pages is like a couple seminars in organic gardening.
My reason for visiting today was looking for the most recent thoughts on enzyme teas: to bubble or not? Turns out the answer appears to be not. Here's a copy of the recipe for enzyme tea from page one of the forum.
"-Enzyme tea -2 tablespoons of seeds (1 oz.) The choice of seeds is non specific. Almost anything works. Soak for 12-18 hours in mason jar. Drain that water and throw away it's full of growth inhibitors. After a day or so once sprouted, add 1/2 gallon of water to the sprouts for a 36-48 hour soak. Strain and use 1 cup of this to 1 gallon of water as soil drench. Observe 'praying' leaves. Chop seeds for worm food. Do not store these teas."
Note the lack of any bubbling. I found that simple approach repeated again and again as I continued reading.
There's also another excellent thread on "SST - Sprouted Seed Tea" on yet another site. The first page of that site is invaluable for anyone wanting to explore enzyme teas. For the party truly interested in learning more, there's more than enough to keep you engaged. Then there's always the permaculture sites, which will really get your blood flowing. LOL!
Without having to read all of those sources you could simply trust that the process is as successful as the growers claim and document. I find the research invigorating. What a wild and wonderful world.
SoilGirl
Well-Known Member
Sweet! All caught up, you're in flowering! yes I'm a ditz - I didn't see that my last visit - but for the record I know you've been growing autos hahaha and yeah, seeing your CFL plan, you don't mess around with those, I'm sure you'll get some awesome buds. Just still, having an LED or HPS/HID is light years better than using CFL's - I started out with CFL's too. Lots of work for less pay off >.< Not ever going back. My CFL days are like a bad dream I need to forget,  though I'll admit not all of that was because of the CFL's.
  oh... my pre-real organics days...
but anyways everything's looking awesome and great info is being shared here as always. I'm going to make an SST starting tonight") no bubbles - that's the thing I've been dying to hear lol. but also, I'd like to make an ACT brewer similar to yours, can you tell me the things I'd need to buy for that? I don't want to have to spend lots of money. :\ - I'm also going through the free IPM Report from buildasoil. Awesome stuff. So glad to be starting down the best organics road I can now, PeeJay's was great, grew very nice buds after finding him, but its time for a truly Living soil for me. Keep up the great work Sue! You're such a great member to have here. I hope the cardiac rehab is going well!
no bubbles - that's the thing I've been dying to hear lol. but also, I'd like to make an ACT brewer similar to yours, can you tell me the things I'd need to buy for that? I don't want to have to spend lots of money. :\ - I'm also going through the free IPM Report from buildasoil. Awesome stuff. So glad to be starting down the best organics road I can now, PeeJay's was great, grew very nice buds after finding him, but its time for a truly Living soil for me. Keep up the great work Sue! You're such a great member to have here. I hope the cardiac rehab is going well! 
though I'll admit not all of that was because of the CFL's. oh... my pre-real organics days...but anyways everything's looking awesome and great info is being shared here as always. I'm going to make an SST starting tonight
no bubbles - that's the thing I've been dying to hear lol. but also, I'd like to make an ACT brewer similar to yours, can you tell me the things I'd need to buy for that? I don't want to have to spend lots of money. :\ - I'm also going through the free IPM Report from buildasoil. Awesome stuff. So glad to be starting down the best organics road I can now, PeeJay's was great, grew very nice buds after finding him, but its time for a truly Living soil for me. Keep up the great work Sue! You're such a great member to have here. I hope the cardiac rehab is going well! - Thread starter
- #289
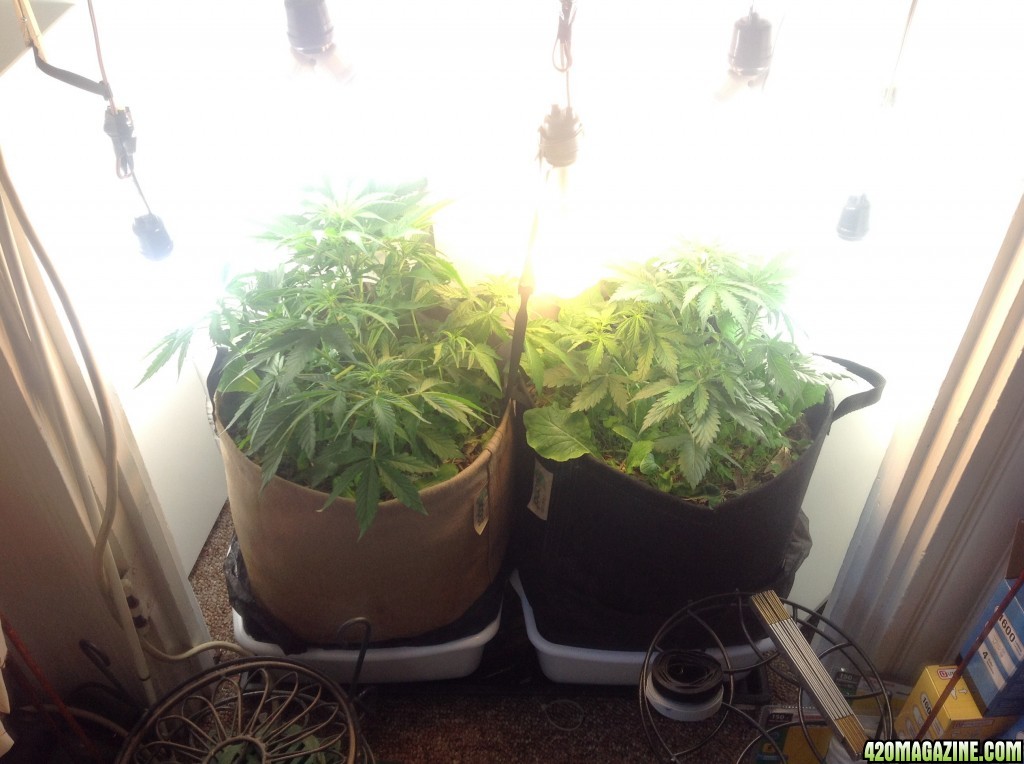
I was looking at the space yesterday and decided that the rush of growth going on called for more lights NOW! This morning I dug out the equipment and added two more 5000k bulbs to the mix, one on each side. So now the array looks thusly:

I figured out that a good way to reposition and stabilize the lights was to make good use of all those Velcro strips I bought last weekend. These things come in so handy all over the house - tying up extension cords, bundling electronics cables, and now, holding the lights stable around the fabric pots. I read they're really good for training plants in fabric pots. I can certainly see why.

The Bomb is standing about 12" and the Buddha is right behind her at 11". Swimming in light.

I can't wait to get the LED SoilGirl. As enjoyable a challenge as the CFLs present I know it will be a world of difference in both yield and potency to upgrade.
I figured out that a good way to reposition and stabilize the lights was to make good use of all those Velcro strips I bought last weekend. These things come in so handy all over the house - tying up extension cords, bundling electronics cables, and now, holding the lights stable around the fabric pots. I read they're really good for training plants in fabric pots. I can certainly see why.
The Bomb is standing about 12" and the Buddha is right behind her at 11". Swimming in light.
I can't wait to get the LED SoilGirl. As enjoyable a challenge as the CFLs present I know it will be a world of difference in both yield and potency to upgrade.
- Thread starter
- #290
Sweet! All caught up, you're in flowering! yes I'm a ditz - I didn't see that my last visit - but for the record I know you've been growing autos hahaha and yeah, seeing your CFL plan, you don't mess around with those, I'm sure you'll get some awesome buds. Just still, having an LED or HPS/HID is light years better than using CFL's - I started out with CFL's too. Lots of work for less pay off >.< Not ever going back. My CFL days are like a bad dream I need to forget,
but anyways everything's looking awesome and great info is being shared here as always. I'm going to make an SST starting tonight
Let me begin by saying that I read your reason for editing and exploded in laughter! I am soooo guilty of that same thing.
 I have a dear friend who is an American Indian who is torn between naming me "She Who Hugs A Lot" or " Laughs With The World".
 My little tea set up is meant for occasional, small volume teas. I only grow two plants, and previous to this my adoptees were lonely individuals, so I brew about a quart or so tea and dilute it to make a gallon. I have an old Brita pitcher that was within teach the day I needed to make one, but you could also get a cheap two quart pitcher at the local dollar store. The lid on this one is handy to have. It both keeps the bubbles contained and also covers the noise (somewhat). I covered mine with painter's tape. One could also paint the outside, or purchase a dark pitcher. The micro beasties you will brew don't like light. Again, the extra roll of painter's tape was staring me in the face the day I needed to construct so that what was my choice. Not one I would recommend for cleaning purposes, but I'm very careful.
The aquarium pump was $12 at the local Petco.
The extra large drain tray it sits on to catch any spills is invaluable and was left over from a previous gardening adventure. Somehow it escaped the purge last fall.
Couldn't have been cheaper, and I could have saved myself the $12 if I had found the pump I knew we had somewhere in this tiny apartment before I broke down and bought another one. I found the first one the next day. HA! Such is life. That's ok. Dale has another use for that first one and just didn't know where to find it. All's well.
I ordered some kelp meal today. It's time to step up to the bat and get serious about maintaining my soil community. We had to call off cardiac rehab today. It's so cold out there it could kill him, so we're snuggling at home instead. Coconut water will have to wait until Friday's trip.
I've begun to consider the easiest way to do a foliar feeding inside this space. Getting the tops of the leaves isn't nearly the challenge the undersides of them would be, and the lights would all have to be raised. No matter what it would be a pain, but the plants would certainly appreciate it. Hmmmmm. Maybe I just need to work up easy transport to the shower. It's not like I'm not strong enough to lift them carefully, and isn't that why wheels were invented? I may even have one of those plant stands on casters around here somewhere.
- Thread starter
- #291
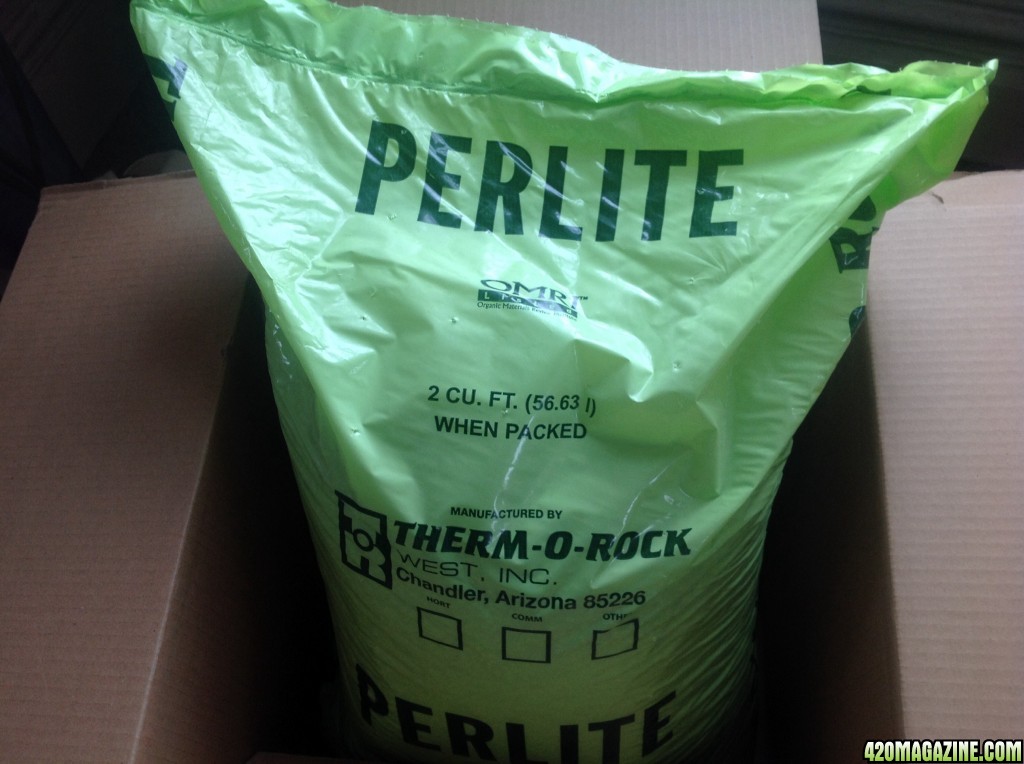
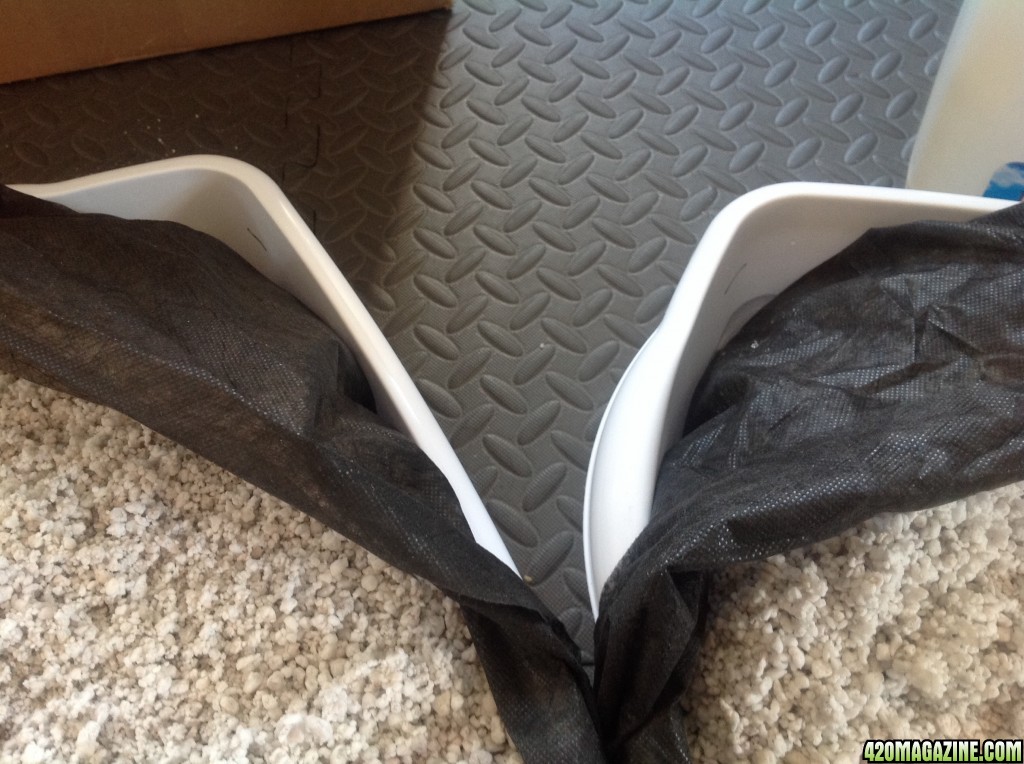
Perlite arrived today!! 
Time to make some SWICKs.
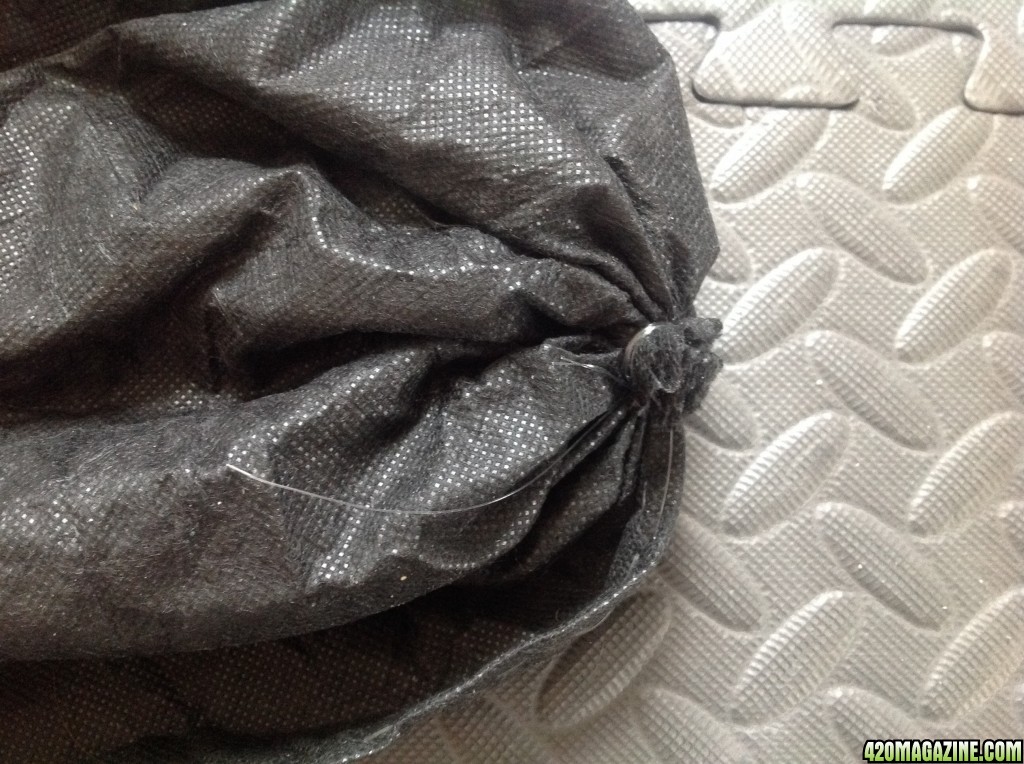
The other day I put together some quick bags to line the basins and hold the perlite. This is altogether unnecessary in my case since my pots are such a snug fit, but extra large liners it will give you the added benefit of having something to cover your exposed surface area and keep algae down. My thought was that if I ever needed to remove the perlite for any reason it would be much easier to simply lift out the bag filled with it than to scoop it out. So I grabbed some garden fabric I had laying around and cut it down to fit the basins I'm using.
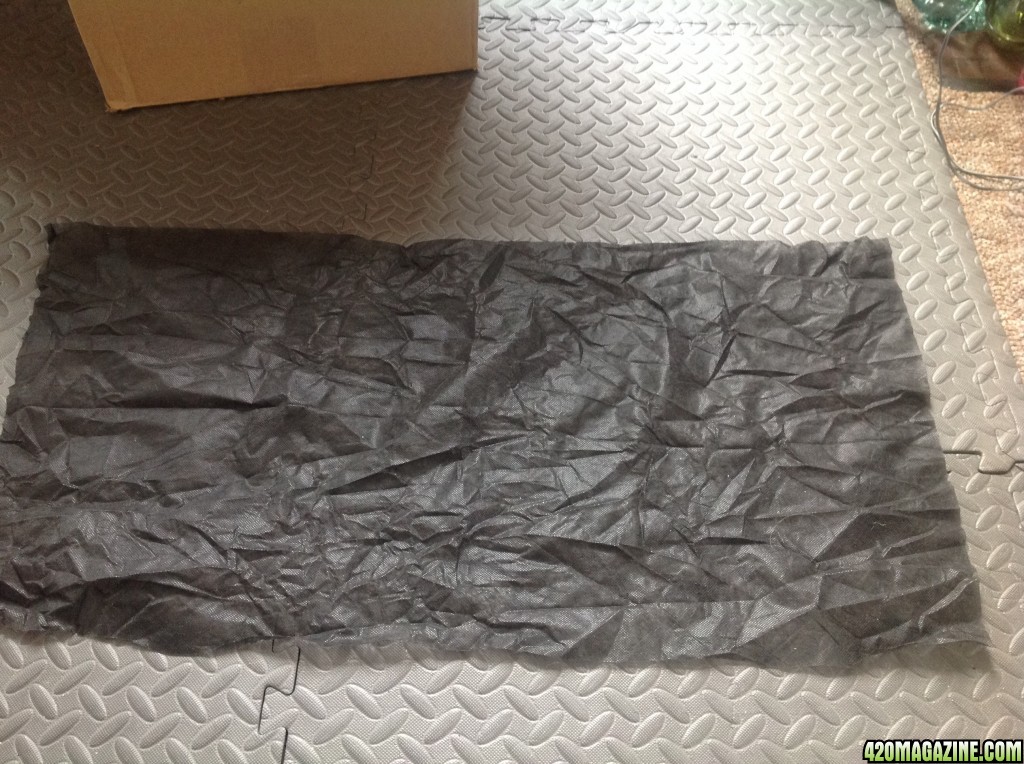
I folded it over and used some fishing line to sew it together.
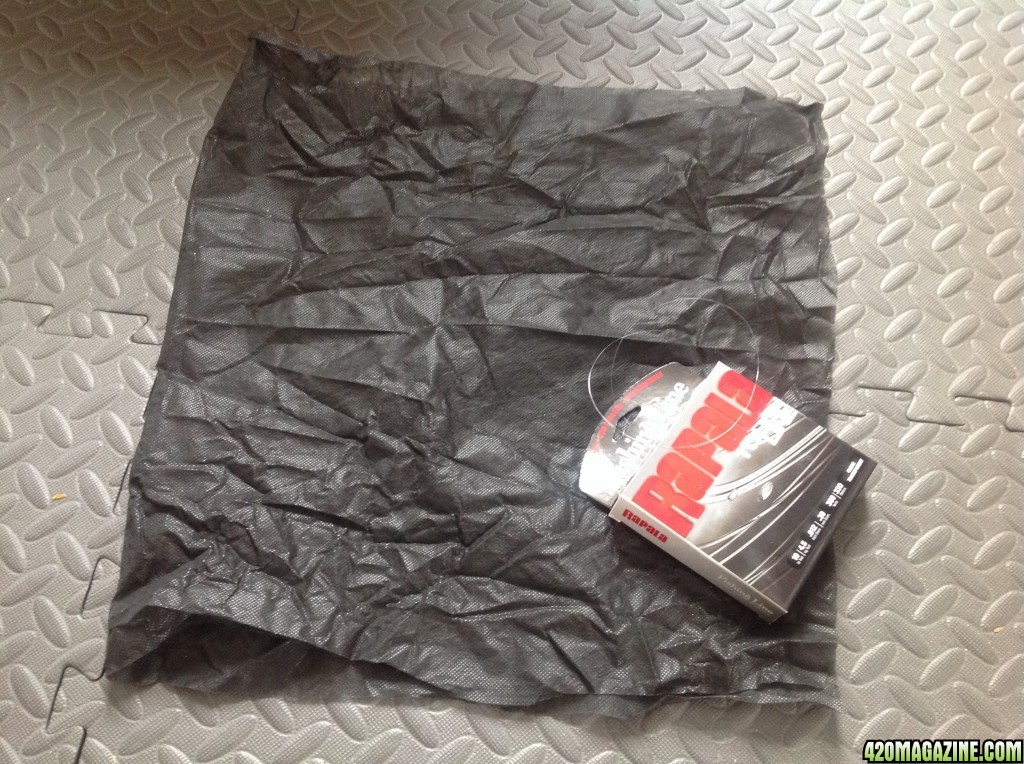
Stitching from the bottom up the side to the top first, I took the time to make this seam sturdier.
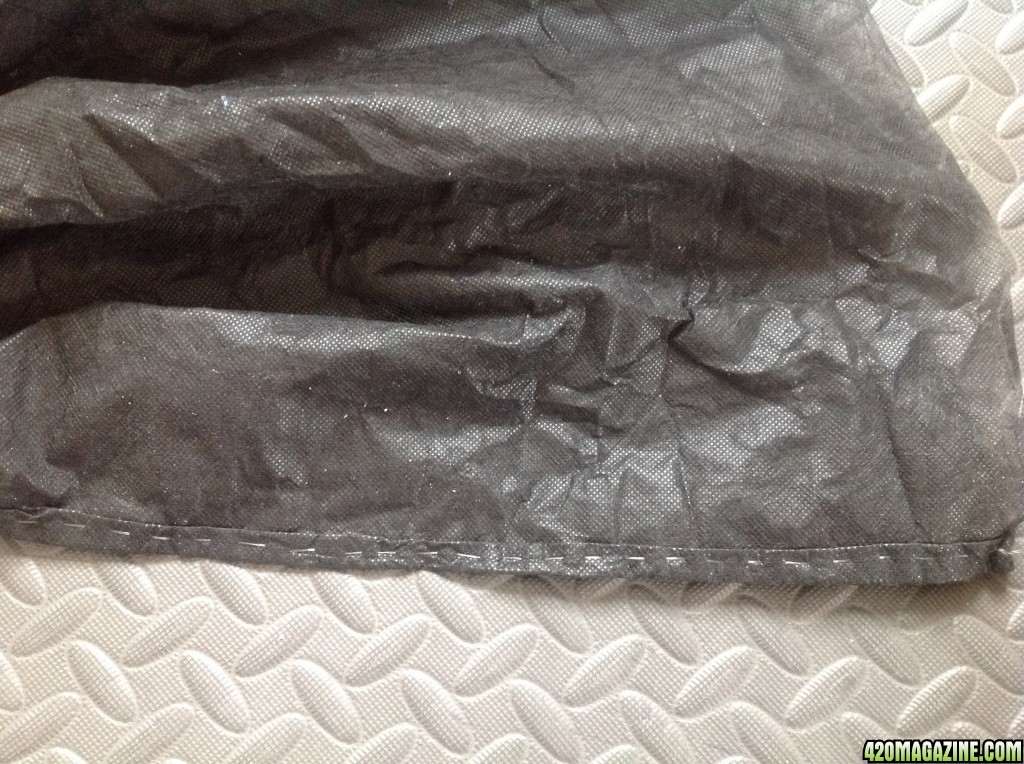
The bottom seam was done with a much looser stitch because I knew I would be gathering it together to tie off and secure the bottom.
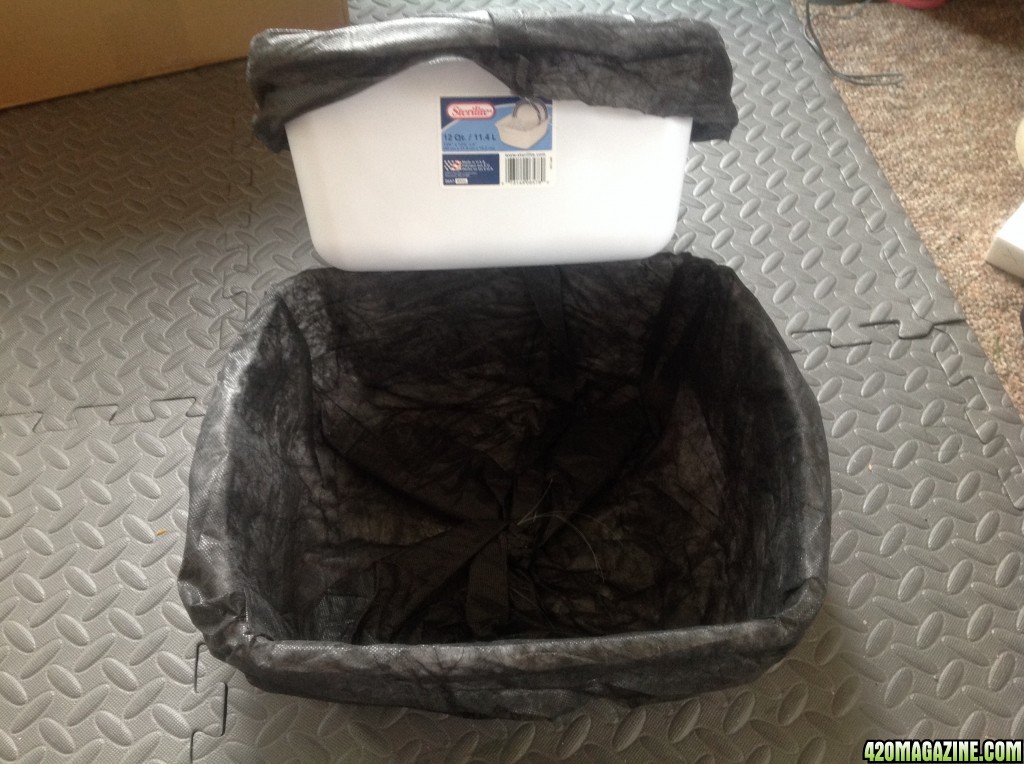
All finished and they pop right into the basins I purchased. Seams to the inside. Two plain wash basins fit the bill perfectly and only cost $2.50 each.
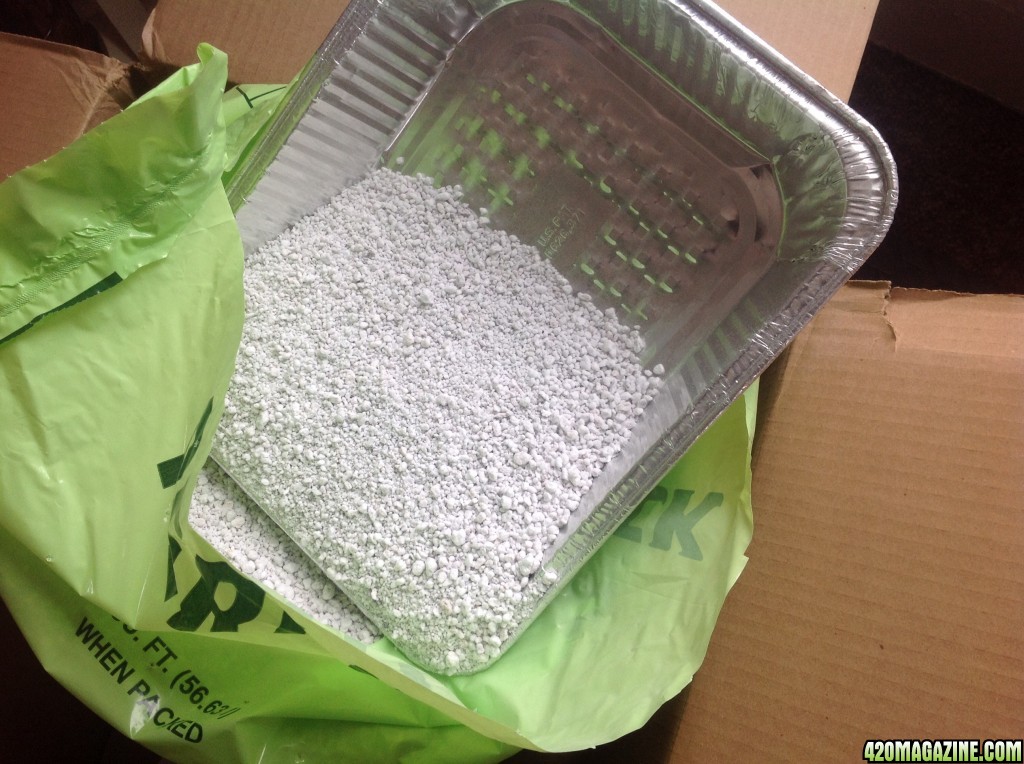
An aluminum pan sitting unneeded in the kitchen served as a beautiful scoop that kept the dust to a minimum. One should be careful with perlite and wear a mask. Most of us don't. I didn't. Be smarter than me.
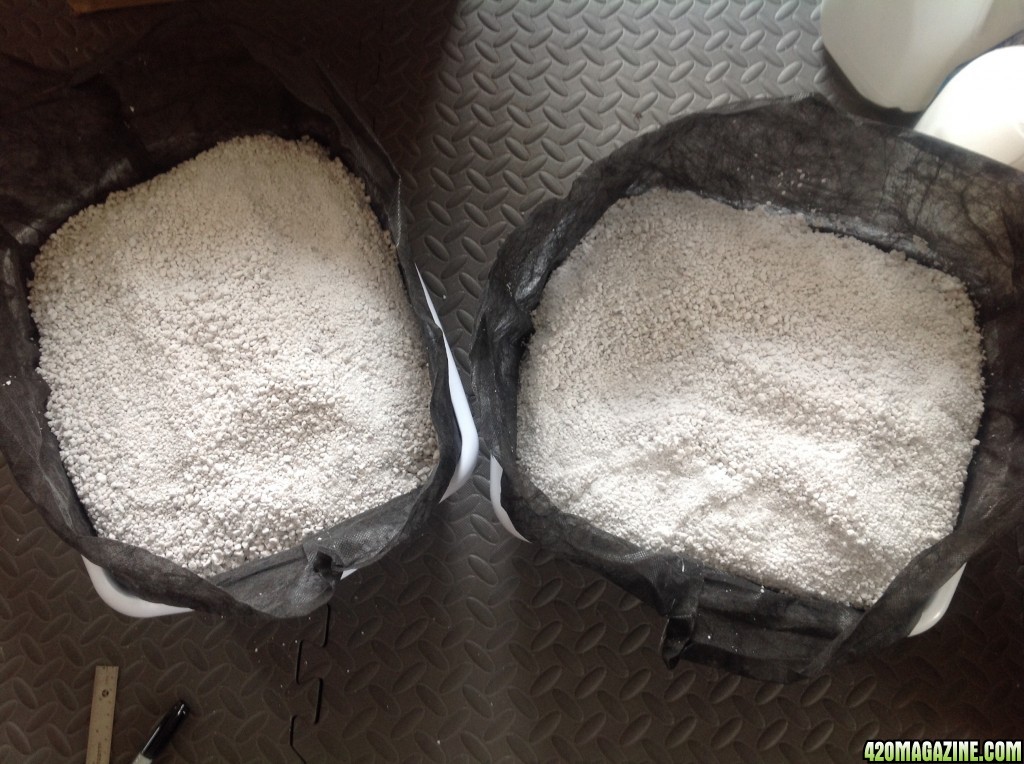
Two basins filled to the brim with perlite. Let's add some rainwater.
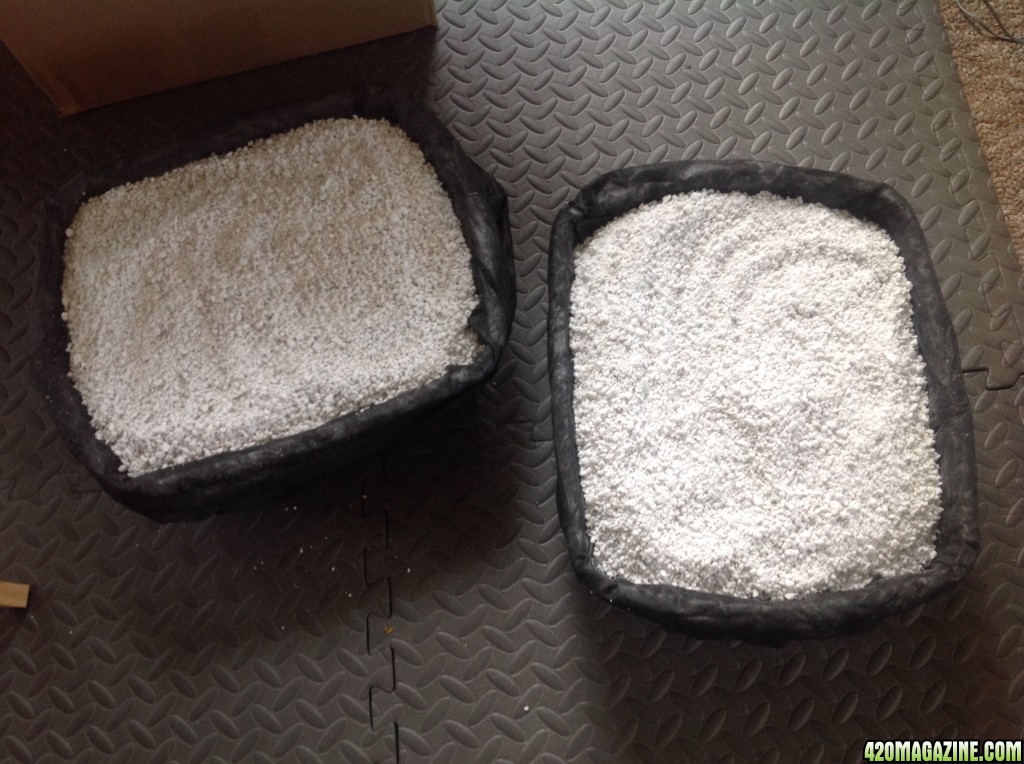
I marked the inside to show me the water level I wanted to come close to. Filled to the top and fully hydrated this will allow at least a 1" break between the bottom of the pots and the water level. It can be lower, but it should never be higher. They took about 5 quarts each before I stopped.
I took the time to press the perlite down into the water to help it settle and get fully hydrated. Then I topped them off with a couple more scoops of dry perlite, pressed it all level and went to have lunch.
When I came back after lunch it was firmly packed and moist all the way to the top. The water level was still below my lines. Time to get them settled under the pots.
I had to adjust the lights back to the previous count. They will work better with y-adapters and I can pick some up tomorrow. Facing that reality means I have to make arrangements for a couple power strips along the bottom to add more bulbs. That works for me. For now, there sure is a lot of light in this closet and the girls look happy as can be.
The perlite makes it easy to level the pots with a simple shift. The pots fit right on top, so there shouldn't be any concern with algae buildup on the perlite. The weed blocker cloth helps with that. You can cut the liner big enough to cover over any exposed surface when you have the luxury of space and a larger container. It will still be easy to rotate the pots that 1/4 turn every morning.
I'm going to give them about a week to adjust to this new watering approach and then give them a nice enzyme tea. My first attempt ever at sprouting seeds.
I'm wanting that LED light. Patience girl. All things in their right time.
Time to make some SWICKs.
The other day I put together some quick bags to line the basins and hold the perlite. This is altogether unnecessary in my case since my pots are such a snug fit, but extra large liners it will give you the added benefit of having something to cover your exposed surface area and keep algae down. My thought was that if I ever needed to remove the perlite for any reason it would be much easier to simply lift out the bag filled with it than to scoop it out. So I grabbed some garden fabric I had laying around and cut it down to fit the basins I'm using.
I folded it over and used some fishing line to sew it together.
Stitching from the bottom up the side to the top first, I took the time to make this seam sturdier.
The bottom seam was done with a much looser stitch because I knew I would be gathering it together to tie off and secure the bottom.
All finished and they pop right into the basins I purchased. Seams to the inside. Two plain wash basins fit the bill perfectly and only cost $2.50 each.
An aluminum pan sitting unneeded in the kitchen served as a beautiful scoop that kept the dust to a minimum. One should be careful with perlite and wear a mask. Most of us don't. I didn't. Be smarter than me.
Two basins filled to the brim with perlite. Let's add some rainwater.
I marked the inside to show me the water level I wanted to come close to. Filled to the top and fully hydrated this will allow at least a 1" break between the bottom of the pots and the water level. It can be lower, but it should never be higher. They took about 5 quarts each before I stopped.
I took the time to press the perlite down into the water to help it settle and get fully hydrated. Then I topped them off with a couple more scoops of dry perlite, pressed it all level and went to have lunch.
When I came back after lunch it was firmly packed and moist all the way to the top. The water level was still below my lines. Time to get them settled under the pots.
I had to adjust the lights back to the previous count. They will work better with y-adapters and I can pick some up tomorrow. Facing that reality means I have to make arrangements for a couple power strips along the bottom to add more bulbs. That works for me. For now, there sure is a lot of light in this closet and the girls look happy as can be.
The perlite makes it easy to level the pots with a simple shift. The pots fit right on top, so there shouldn't be any concern with algae buildup on the perlite. The weed blocker cloth helps with that. You can cut the liner big enough to cover over any exposed surface when you have the luxury of space and a larger container. It will still be easy to rotate the pots that 1/4 turn every morning.
I'm going to give them about a week to adjust to this new watering approach and then give them a nice enzyme tea. My first attempt ever at sprouting seeds.
I'm wanting that LED light. Patience girl. All things in their right time.
SoilGirl
Well-Known Member
Awesome work Sue! I love the thrifty sip/swick system. That's something I might add to my own grow in the future, lord knows I've got the perlite.
Your plants look so freaking great. Never seen auto's do so well on all 420 mag so far. Idk why daTenshi isn't in here I might send her a little invite - I bet she'd love this, she's all about autos and organics - though idk that getting all the sorts of LOS ingredients we have easy access to is an option for her in Romania, either way she gets by pretty dang well imo.
and hahaha yeah I wasn't meaning to copy the pitcher aspect of your brewer. I'll probably just use a 5 gal bucket instead with the air pump. do you think that's enough hahaha? All I need to do is go get a ~12$ air pump and a 5 gal bucket and something to catch splashes? I'll macguyver some sort of lid hahaha not worried about that. Anything else you'd recommend? - I understand the basic ideas of a brewer, but never having made one, I consider my understanding useless. I learn best by doing, teaching about doing, and being given step by step directions from 'do-ers' who intricately understand what they're doing LOL. Problem is sometimes I learn from do-ers that don't intricately understand, I end up copying them, and then my understanding gets skewed in turn. :\ (in a nutshell why so many cannabis growers still use bottled nutrients and synthetics imo - I think it all begins with, "idk how to grow cannabis... looks like they do!!")
-lately I've been learning that actually, I know A LOT more about growing cannabis than most cannabis growers. (and about growing things in general! Trust in all your gardening exp, cannabis isn't different! it grows like corn or strawberries or tomatoes!) not the other way around like I've always assumed when talking to other growers... not that other growers' experience isn't valuable, just..yeah. I've finally learned to differentiate between growers that have valuable experience to me, and those whose experience I never want influencing mine. Self Reliance. What a lesson I've learned hahaha I digress.
Thanks for the help Sue! and hahahahaha your amerindian friend's name for you sounds like one of my old friend's for me! (he's lakota) totally forgot what he called me but it had something to do with smiling and laughing. glad that gave you a laugh
Your plants look so freaking great. Never seen auto's do so well on all 420 mag so far. Idk why daTenshi isn't in here I might send her a little invite - I bet she'd love this, she's all about autos and organics - though idk that getting all the sorts of LOS ingredients we have easy access to is an option for her in Romania, either way she gets by pretty dang well imo.
and hahaha yeah I wasn't meaning to copy the pitcher aspect of your brewer. I'll probably just use a 5 gal bucket instead with the air pump. do you think that's enough hahaha? All I need to do is go get a ~12$ air pump and a 5 gal bucket and something to catch splashes? I'll macguyver some sort of lid hahaha not worried about that. Anything else you'd recommend? - I understand the basic ideas of a brewer, but never having made one, I consider my understanding useless.
I learn best by doing, teaching about doing, and being given step by step directions from 'do-ers' who intricately understand what they're doing LOL. Problem is sometimes I learn from do-ers that don't intricately understand, I end up copying them, and then my understanding gets skewed in turn. :\ (in a nutshell why so many cannabis growers still use bottled nutrients and synthetics imo - I think it all begins with, "idk how to grow cannabis... looks like they do!!")-lately I've been learning that actually, I know A LOT more about growing cannabis than most cannabis growers. (and about growing things in general! Trust in all your gardening exp, cannabis isn't different! it grows like corn or strawberries or tomatoes!) not the other way around like I've always assumed when talking to other growers... not that other growers' experience isn't valuable, just..yeah. I've finally learned to differentiate between growers that have valuable experience to me, and those whose experience I never want influencing mine. Self Reliance. What a lesson I've learned
hahaha I digress. Thanks for the help Sue!
and hahahahaha your amerindian friend's name for you sounds like one of my old friend's for me! (he's lakota) totally forgot what he called me but it had something to do with smiling and laughing. glad that gave you a laugh - Thread starter
- #293
SoilGirl I wasn't sure an aquarium pump would be sufficient, and then I stumbled upon this page:
https://https://homesprout.typepad.com/homesprout/2012/05/aerated-compost-tea-.html
She has great success with her approach, which quite frankly I find intriguing. Adding oatmeal to the compost and giving it a couple days to grow some fungi. Interesting.
https://https://homesprout.typepad.com/homesprout/2012/05/aerated-compost-tea-.html
She has great success with her approach, which quite frankly I find intriguing. Adding oatmeal to the compost and giving it a couple days to grow some fungi. Interesting.
smithy8806
New Member
Lookin awesome
SoilGirl
Well-Known Member
Thanks so much Sue!!
SoilGirl
Well-Known Member
hi Sue, so a question.... Does this mean I just drain the mason jar after the first 18 hours then the sprouts will sprout on dry glass for the next day or two? Like, no paper towel down there or anything? or did it just go unspoken that I'm supposed to fill up the jar again with fresh water? I need specifics LOL. I ask because I've never done this before... sprouting without any media worries me.. but I'm starting my tea anyways."-Enzyme tea -2 tablespoons of seeds (1 oz.) The choice of seeds is non specific. Almost anything works. Soak for 12-18 hours in mason jar. Drain that water and throw away it's full of growth inhibitors. After a day or so once sprouted, add 1/2 gallon of water to the sprouts for a 36-48 hour soak. Strain and use 1 cup of this to 1 gallon of water as soil drench. Observe 'praying' leaves. Chop seeds for worm food. Do not store these teas."
.
- Thread starter
- #297
Ok SoilGirl. I'm new to this just like you, but I've checked out a few places and read this and them numerous times. It reinforced my plan to order BAS Malted Barley Grain that can be ground up, added to water, bubbled (or not) for 4 hours and then used as a soil drench. No sprouting, although there are other seeds to chose from, aren't there? Who knows, we may incorporate them into our diet.
Anyway, the accepted approach is to soak for 12-24 hours (rainwater is preferred) then drain and rinse. The next stage is the "Rest" stage, where you let them set in a jar or a sprouting basket of some sort, rinsing at least morning and night. I believe this is done in a cool, dark place. When they have sprouted tails as long as the body of the seeds they are ready for harvest. At this point you can either purée them and add to your water for use as a drench or foliar feeding, or you can soak them in fresh water as outlined in that post and use.
That sounds reasonable and adaptable to any seeds. If anyone has expertise and wants to chime in before we do it wrong, we would appreciate a heads up.
I have also seen posts of them sprouted in a mason jar with an air stone. Obviously there are many ways to reach the desired end.
akisunni
New Member
This is extremely close to a process that farmers are starting to use for their cattle. They grow the grains for 7 days in total darkness. The grains provide a significant boost in valuable nutrients to the animals with zero energy cost in lighting. Each day they load up trays, and each day they harvest 1 week old grains for feeding. The only cost is water, and setup. Oddly it appears that the animals need a lot less of it per day and its healthier for them vs dried grains.
SAMtheAPman
New Member
Just blended up my sprouts today and watered them onto my plants (pretty much done the way you say in your last post Sweetsue - no airstone). Won't hijack your thread with lots of info about my grow though... if you want more details check out my journal (probably take me a day to get the info up 'cause this is just a quick stop by).
Thanks for the inspiration!
Thanks for the inspiration!
- Thread starter
- #300
This is extremely close to a process that farmers are starting to use for their cattle. They grow the grains for 7 days in total darkness. The grains provide a significant boost in valuable nutrients to the animals with zero energy cost in lighting. Each day they load up trays, and each day they harvest 1 week old grains for feeding. The only cost is water, and setup. Oddly it appears that the animals need a lot less of it per day and its healthier for them vs dried grains.
This is fascinating akisunni. Where can I find reference to this? I'd like to read more.