Jandre2k3’s Intelligent-Gro Testing: Phase 1
PREPARATION:
The Lights:
2/27/2014
First impressions:
Thought one: When picking up the box. "This box is bigger than I thought it would be"
Thought two: "It's heavier, too"
When unpacking the box from it's nondescript shipping, I notice how NOTHING is rattling around inside. Well packed, and tightly bound, the product stayed safe and undamaged in near perfect condition. I say "near perfect" because while the fixture itself is perfectly unmarred, the touch-pad on my control unit's face is cracked. No consequence, though, because the touch-pad still works, except for "Power", but all other controls are fully functional. This is okay for me because the remote still turns the unit off and on. This will not effect the testing of the light in the least, because the light will have its power "On" full-time, so no big woop there.
So the labeling flaws, and the minor crack in the controller aside, I decided to turn on the light FULL POWER and check things out a bit. All the LEDS work and actually caused me to be blinded for a while when looking at it on full power for all three channels. Then I noticed something, when my eyes adjusted of course, there are a few lights that appear much dimmer than all the others. A few "red" and a few "blue" LEDs really looked a lot dimmer, and that concerned me. Keeping in mind the crack in the controller pad I initially assumed that the light had taken damage during shipment, somehow... Then my brain kicked in... INFRARED AND ULTRAVIOLET are nearly IMPOSSIBLE to see with the human eye. So knowing that infrared equals heat, I held a finger over a "dim" red one, then a bright red one. I noticed a definite heat difference between them and got excited. I went tearing through my things until I found my UV reactive bouncy ball! Holding it over the "dim" blue LED, it lit up like a Christmas tree. Proof of my hypothesis achieved, I decided to play around with the settings...
This proved to be confusing at first, and took about a minute to realize how the charts 1 and 2 are achieved. At first I thought the labeled settings on the remote were 1, 2, 3, and 4 from the charts on page 1. They really are as follows[TABLE="class: outer_border, width: 500"]
[TR]
[TD]
SETTING[/TD]
[TD]GROW (White/Red)[/TD]
[TD]VEG (Blue/UV)[/TD]
[TD]BLOOM (Fuchsia)[/TD]
[/TR]
[TR]
[TD]Sunny[/TD]
[TD]100%[/TD]
[TD]100%[/TD]
[TD]100%[/TD]
[/TR]
[TR]
[TD]Cloudy[/TD]
[TD]65%[/TD]
[TD]40%[/TD]
[TD]40%[/TD]
[/TR]
[TR]
[TD]Moon[/TD]
[TD]5%[/TD]
[TD]0%[/TD]
[TD]0%[/TD]
[/TR]
[TR]
[TD]Custom[/TD]
[TD]Will Explain[/TD]
[TD]Will Explain[/TD]
[TD]Will Explain[/TD]
[/TR]
[TR]
[TD]Manual[/TD]
[TD]Cloudy?[/TD]
[TD]Cloudy?[/TD]
[TD]Cloudy?[/TD]
[/TR]
[TR]
[TD]* (Sunrise/set)[/TD]
[TD]40%[/TD]
[TD]80%[/TD]
[TD]80%[/TD]
[/TR]
[/TABLE]
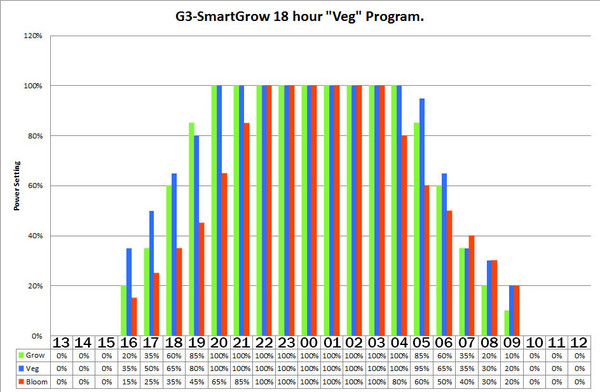
Then I when I was playing with the "Custom" setting, I realized that I could scroll through the different hours... and the three settings could be changed according to the hour. That's when I realized "Here's where I set the charted values!" I hurriedly mapped out a new chart for my "Nighttime Sun" hours. Okay, because the electrical prices in my area are higher during the day then at night. This means that my Lights On period is at night for cost reasons. Moving on.
Here's the chart, shifted for my nighttime hours... Midnight is "00"

So, yeah, there's a small learning curve and no documentation on how to do this, but it's retty easy to figure it out.
That done, you only have to go to "Settings" and set the time for YOUR time zone, and it will automatically cycle through each hour as set in the chart. For those of you who like the "Full on, Off" you can set it to do that in two ways: Set it for "Sunny" and place it on a timer -OR- considering this thing comes equipped with its own timer, you can set it on the same 100% on all three channels for 18 hours, and 0% on all three channels for 6. Easy as pie, no reason to involve any other hardware.
----------TO BE CONTINUED-----------


