Deep Water Culture Tutorial, SH Kit & DIY

Re: Roseman's Deep Water Culture Tutorial, SH Kit & DIY

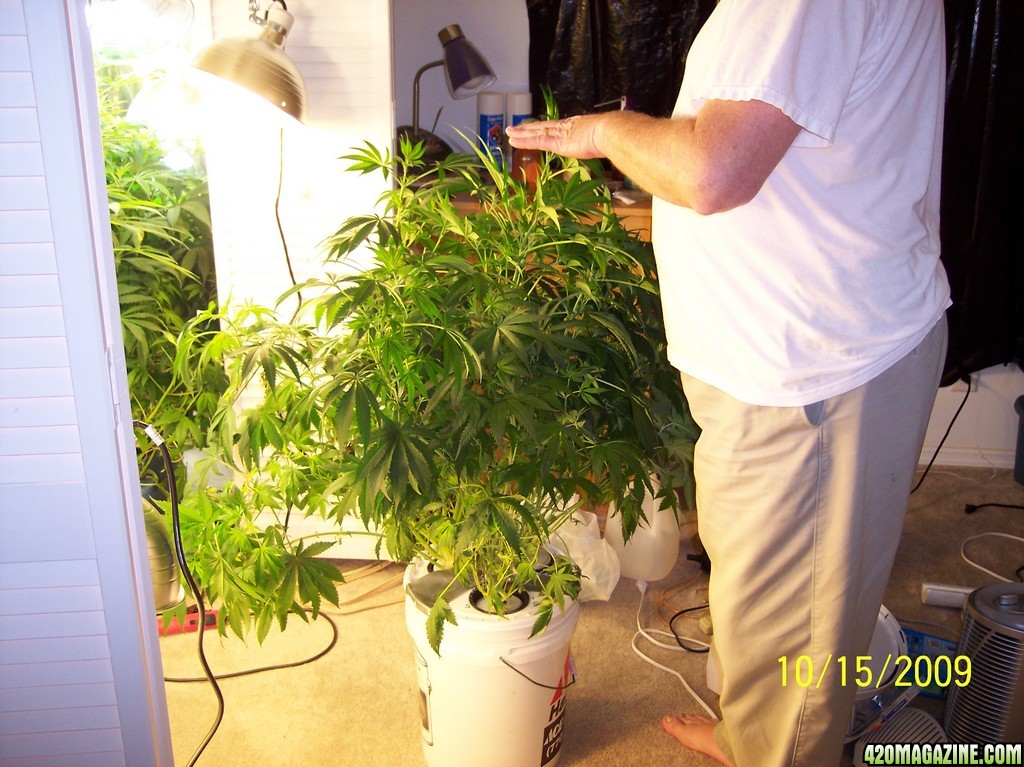
5 weeks of VEGGING and 24/7 LIGHTs is about over.

WHEN DO I START 12/12 FLOWERING CYCLE?

The longer the VEG cycle, the more the yield.
Consider that in nature, outdoors, we plant a seed in mid to late April. It grows through April, May, June, July, and in mid to late July, as the sun's rays change, and the lenght of the daylight changes, the plant naturally changes from VEG to FLOWER, with the diminishing sun's rays. (It is not hte new nutes taht changes the cycle) That is nature's way. The plant grows and matures to an adult plant for about 3 to 4 months. THEN, it makes flowers. That is nature's way.
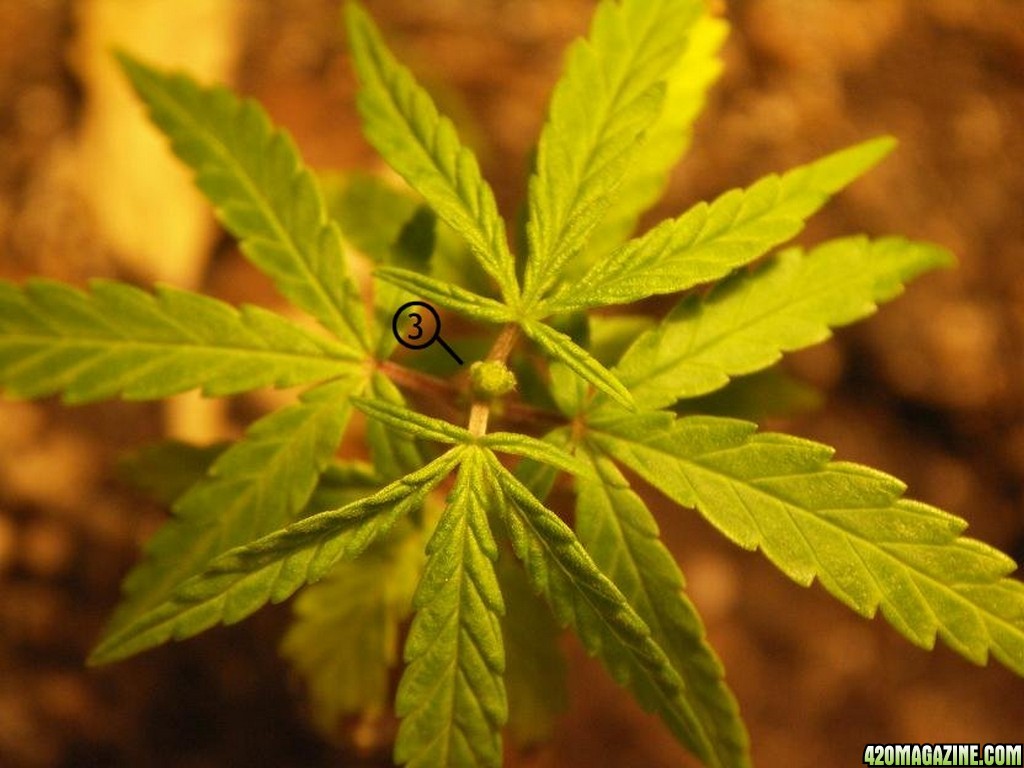
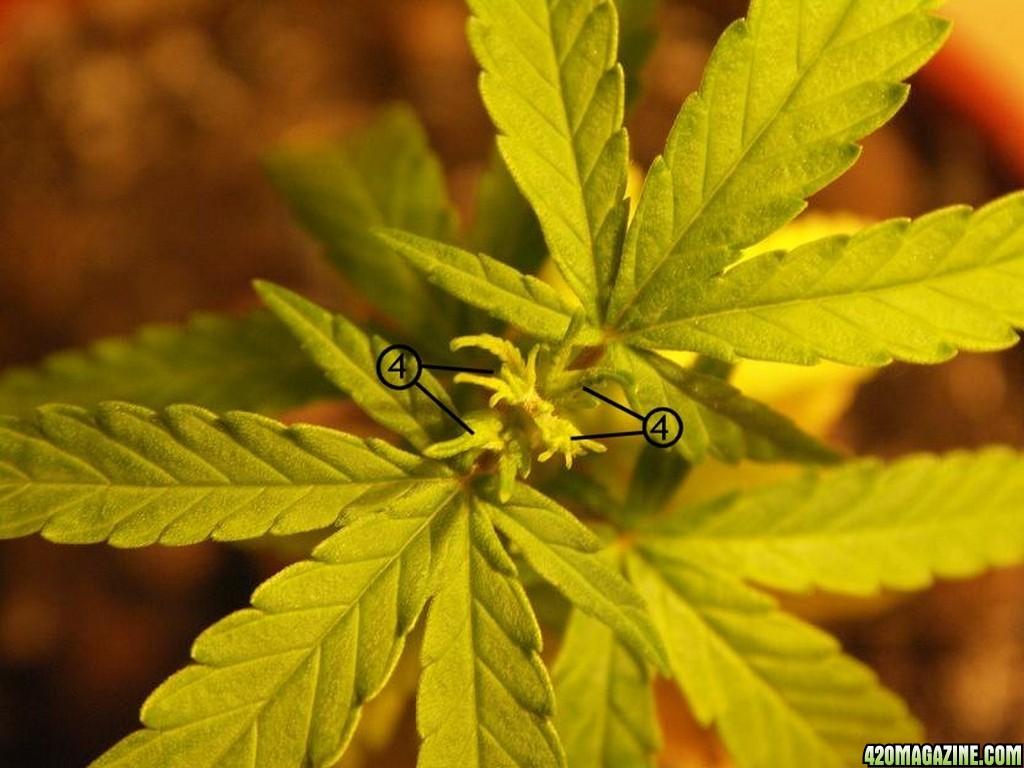
Indoors, in HYDRO with feeder tubes, we cut that time in half, by using 24/7 LIGHT. instead of 3 months, or 13 weeks, it takes about 5 to 6 weeks to become a mature plant in HYDRO, with 24/7 LIGHT. Pot plants growing as young plants, make what we call nodes, or a set of two leaves, one directly across form the other. When a pot plant is mature, it will make new leaves one at a time, not directly across from an other leaf, but staggered. The new leaves "alternate" instead of appearing in pairs.


OK, also in nature, in addition to plants, we see animals and humans reproduce at maturity or adulthood. If a human, (or dog or any animal) is forced to make babies before maturity, like getting a 12 yr old girl pregnant, or a dog in her very first heat, then the babies are weak, or runts, or deformed, and just not at their best or strongest.
It does not make sense, it is not wise, it is not logical, to make a child have a child, and it is not wise or smart or logical to make an immature baby plant, have babies if you don't have to. LET THE BABIES GROW AND LET THE ADULTS MAKE BABIES. Of course, if you are doing a SOG Grow, or have limited Height Space, well you ahve to do what you have to do, when you have to do it. But if time and space allows, then VEG that plant to maturity before starting the 12/12 Flowering Cycle..
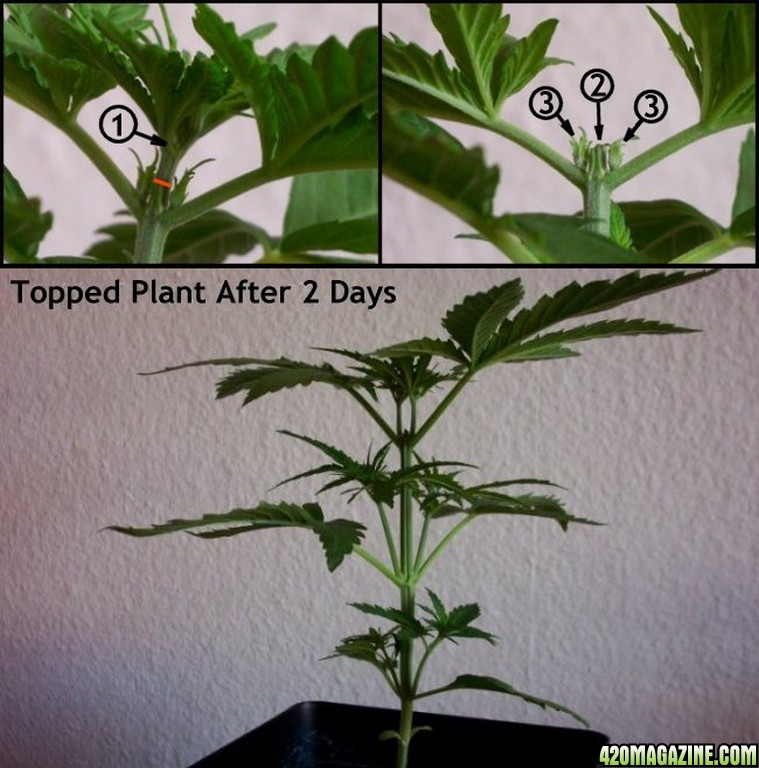
If you will VEG for 5 weeks, to 6 weeks, you will have more time for proper TOPPING, PRUNING, AND FIMMING, and you'll get bigger plants, a much larger yield, and you will also have a mature happy adult plant, ready to make healthy, stronger babies (flowers) .

If you begin Indica Flowering, after VEGGING 3 or 4 weeks, you will harvest about 70% of what you would have harvested, IF you had waited and VEGGED for 5 or 6 full weeks before starting 12/12.

This info applies to rapid growing in Hydro, and to Indica strains. NOT slowly in SOIL, and NOT Sativa strains.

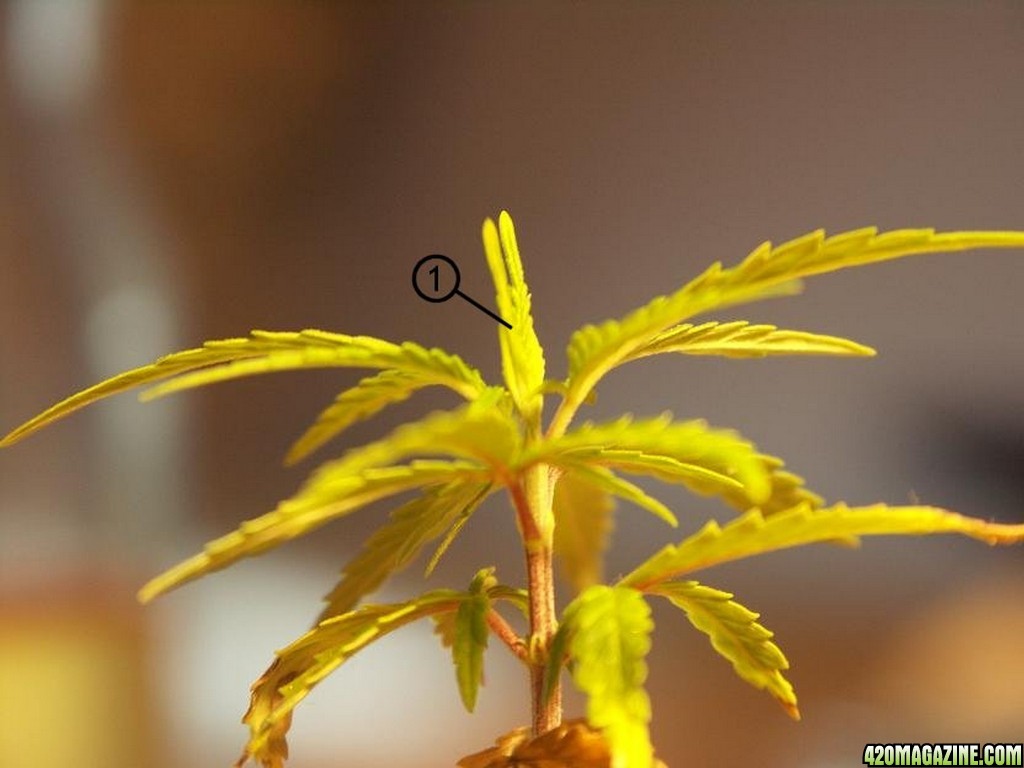
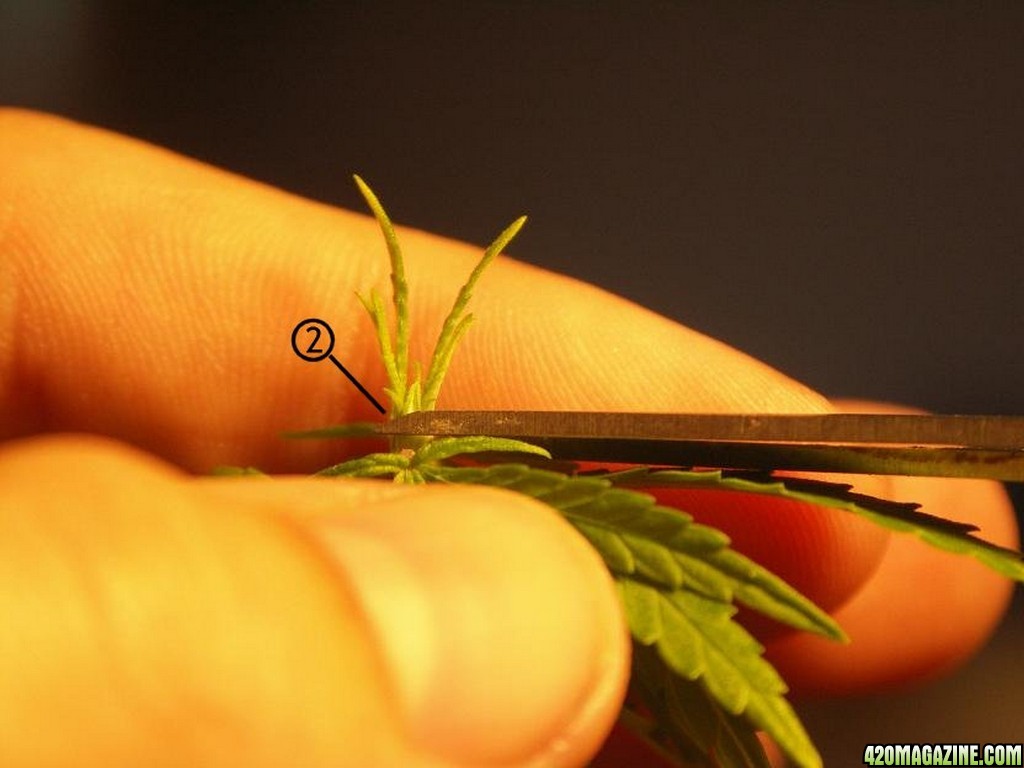
I average 3 to 4 ounces per plant, VEGGING 5 to 6 weeks, and I have gotten 7 ounces from one plant. I have pics to show it. I got that with a long VEG Cycle, planned, proper Topping and Pruning and Fimming, and creating more tops or cola sites by proper Topping.

I have seen grows done where 12/12 was started the very first day, and they got 24 to 30 inches tall by harvest time, and yielded an ounce to two ounces per plant of dried manicured buds. That can be done in 8 weeks and there is nothing wrong with that. But I want more.


Let me add here, I suggest you do not change to Flowering Nutes the first day you start 12/12. I always wait 3 or 4 days to change nutes from VEG nutes to BLOOM nutes.
 
Re: -------'s Deep Water Culture Tutorial, SH Kit & DIY

I figure today is very close to 5 and half weeks of VEGGING, so today I am starting these on 12/12 Light today, 10-8-09.

I did a Replenish of a gallon of pH Balanced water to each container and adjusted the reservoirs from the daily 7.0 back to 6.0. I added 1/6 packet of nutes to each reservoir, and two teaspoons of Cal-Mag just because it was sitting on my shelf and not being used.
I checked my clamps on my light reflectors and tightened them again.
I checked that my window covering was secure and all light is blocked out. Then I turned all the lights out, closed the door and looked for Light Leaks. I had no leaks. To begin a successful 12/12 period, you have to have 100% complete darkness. It is not the nutes but the change in the light cycle that forces the BLOOM cycle to begin. I am still using the VEG nutes and I will for two more days. The BLOOM nutes are heavy on phosphorus and short on nitrogen. Phosphorus encourages more blooms, but does not force them. Nitrogen will encourage a stronger plant with stronger stems and also encourage more growth. I will do a Drain and Replenish this Saturday, (in two days) and then change to Bloom Nutes.

This Saturday when I have plenty of time, I will also add some additional 2700K bulbs.
It is finally getting cooler in my area, and I no longer have any HEAT issues. I was running the Central Air Conditioner often, and all and every trick I knew to successfully cool my reservoir and grow area. This many watts in that closet did generate SOME heat, although nothing like HID Lights (High Intensity Discharge). I got up to 86 degrees in the grow area and up to 74 degrees in the tank one time. I averaged 82 degrees and 52% humidity during the hot days. I was always able to keep humidity at least 50%, very desirable in the VEG Cycle.
Temps and Humdity look great now! 79 Degrees and 62% Humidity is very good to me!

2009_Grow_00417.jpg

You can sucessfully do a grow without a pH meter or a ppm meter. But an electronic themometer that will show HIGH and LOW temps is an absolute necessity. You have to know what is going on in the grow area while you are away and at night in the darkness of 12/12.
 
Re: -------'s Deep Water Culture Tutorial, SH Kit & DIY

I want to show you how I prepare and do my daily maintenance. My closet is neat, clean and orderly, but my room is sloppy. No one sees it but me and my wife.

Daily, I get home in the evenings and I bring three gallons of water to my closet. Each tank is drinking a full gallon daily, and the bucket drinks about 3/4 gallon daily. I used to prepare my water at the kitchen sink, but I have found this way much easier. I keep a towel and a paper towel handy at all times. I also keep a plastic bag for dead leaves and an empty bucket nearby to put water I might drain out in. And I have a trash can near by too.

2009_Grow_00133.jpg


Here you see my home made prop to hold my lid up, my pH Down, my little yellow plastic measuring spooon, my quart mixing jar, my small glass for taking water samples, my half of a styrafoam cup to hold the wet glass i so it doesn't stain the carpet, my pH meter and the 3% peroxide if I see I might need any. I take water samples in the small glass, about a 1/3 glass full, then I sit the glass in the strafoam cup. The cup catches the leaks from the wet glass to prevent soaking the carpet, and it helps prevent the glass from falling over when I rest my pH meter in it to take a reading.
2009_Grow_00223.jpg


I took these pics just to show you the pics and not while I was really doing my testing.


2009_Grow_00321.jpg


2009_Grow_00515.jpg

Here you see my handy dandy little yellow measurer, it holds exactly a teaspoon. I got it from Stealth Hydro in 2007 when I bought some Foilage Spray and a Spray Bottle. I loaned the spray bottle to a friend when I also loaned him my kits and I never got the spray bottle back.

2009_Grow_00610.jpg


This is the rest of the sloppy messy room.

2009_Grow_0088.jpg

Here above you see my large oscilating fan on a stand about 3 feet tall, that runs 24/7 on low speed that is in the center of the room. I also have a very small oscilating fan in the floor in front of the tanks. I unplug the large fan while I am working in there.
The ceiling fan also runs 24/7. Air circulation and air movement are both very important for healthy plants and a breeeze on the plants strenghtens them.

You also see my messy room, full of grow equipment. I am not proud of the mess and clutter, but I wanted you to see that I do use two fans. You also see some useless Odor Control Air Filters that will go in a yard sale. The Ona Bucket works great for odor. We have had company visit and we asked them if they smelled the ferret or anything strange and they said no, they only smelled fresh linens or fresh laundry. (the Ona)
 
Re: Roseman's Deep Water Culture Tutorial, SH Kit & DIY

My routine is I get home in the evening and find the tanks a gallon of water short. A missing gallon of water is a good sign, you do not want to find they did not drink a gallon after drinking a gallon everyday. 5 or 6 plants will drink very close to a gallon after the first two weeks, depending on the temperature of the room and water. The 3 plants in the bucket drink 3/4 gallon daily. Once when it got very hot, they drank a full gallon.
I get home, I take 3 gallons of water to the closet and then I can sit down in front of my plants.
I remove a few dead leaves from the tank lid and lower parts of the plant. Going in and out of the tank ocasionally pulls a root off and that causes a small leaf to die. An ocasional large fan leaf yellowing and dying is normal and to be expected too.
I look in the tank, and find a gallon of water missing. I take a water sample in my small glass, sit the glass in the cup, and take a pH reading. Normally everyday, it is 6.8 to 7.1. I have learned that a level 3/4 to 5/6 teaspoon of pH Down will take the tank to 6.0 on average. To gradually adjust it, I fill my little measuerer almost half full with pH Down, put it in the quart jar, fill the jar with water, stir it, and pour it in the tank. Then I add a 2nd quart jar of plain water.

NEVER ADD ANYTHING TO THE TANK WITHOUT FIRST DILUTING IT. NEVER MADE ANY DRASTIC ADJUSTMENT THAT CAN BE DONE GRADUALLY.

Then I add a 2nd almost half a teaspoon of pH Down to the 3rd jar, stir and pour it into the tank, leaving me a jar short to make up the full gallon. Then I do a 2nd pH test, and find it close to 5.9 to 6.2. My plain water is 7.0 out of the faucet. Then I add a pinch, like a 1/6 teaspoon of pH Down to the 4th jar of water and pour it in, test it again and I get 5.8 to 6.1 everytime. If it read a little low, like 5.6, I add a 4th jar of plain water. If the pH went too low, like to 5.2 I drain a quart to two quarts of water out and replace it with plain 7.0 water.

If I have time to check it in the mornings, it will be about 6.2 to 6.4. Time I get home in the evening, it is 6.8 to 7.1. Today it was at the highest it has every been, 7.4, and I did find some tiny pieces of dead leaves and dead roots in the tank, that I removed. I added 6 teaspoons of 3% peroxide to that tank.
Tomorrow will be another Drain and Replenish day. I always get a tremendous growth spurt after a Drain and Replinish.
 
Re: Roseman's Deep Water Culture Tutorial, SH Kit & DIY

A couple months ago as I prepared for this grow, I went to the attic to get my equipment and I realized I had a very large collection of bulbs, some almost three years old that had gone through 4 grows. I had a bunch of 65 watt bulbs that I knew were very old so I tossed them. I had 8 42 watt 2700k bulbs, that I knew were only one year old and had only done one grow. I set them to the side and saved them for the Blooming cycle.

Then I had remaining 6 6500k 85 watt bulbs that had only been through one grow. I had two 105 watt 6500 k spiral bulbs too. I figured I had enough cool white 6500k bulbs for Vegging so I ordered some mid-range 4100K 105 watt bulbs I found very cheap. I ordered two 200 watt 6500k bulbs and I hated them, they got too hot for me and my unvented closet. I took them down after the first two days.

Hanging now:
3 6500k 85 watt bulbs
1 6500k 105 watt bulb
1 5000k 105 watt bulb
2 4100k 105 watt bulbs
2 3000k 105 watt bulbs
over three containers, over 14 plants.

I will add 4 2700 k bulbs soon.

YOU DO NOT NEED NEARLY AS MANY LIGHTS AS I AM USING.
 
Re: Roseman's Deep Water Culture Tutorial, SH Kit & DIY

Two days after starting 12/12 I replaced two gallons of water with two new gallons with BLOOM nutes in the water. I plan to do that daily now that I am on 12/12.

I did the change to 12/12 lights in one quick step, but I am graduating from VEG nutes to Flowering nutes and will make the transistion over 5 days.

Many growers do suggest a 24 hour, 36 hour to 48 hour total dark period when changing to 12/12. I do not do that. I have only read that some try it and claim it makes the change faster or claim they see flowers (sex) faster. I expect to see male flowers first and within ten days ffrom starting 12/12.

The DARK period is recommended if your plants are not fully mature when you change them to 12/12 and Flowering. These are mature plants. I can tell by the alternating nodes. When a plant is young, the new leaves appear in pairs, one leaf directly across from the other leaf. when it is an ADULT plant, the new leaves are staggered or alternating.
 
Re: Roseman's Deep Water Culture Tutorial, SH Kit & DIY

These plants are just growing like crazy!

I do not believe any Indica can double in size in the Flowering Cycle as some growers say or claim. I have never experienced it. I seldom get another foot taller in the BLOOM cycle, but we will soon see.
I'll be up Fecal Matter Creek if they do get over a foot taller. I'll have to take the closet shelf out!

2009_Grow_00135.jpg


2009_Grow_00323.jpg

The giant in the center bucket is bent over, trained to grow sideways.
2009_Grow_00225.jpg
 
Re: Roseman's Deep Water Culture Tutorial, SH Kit & DIY

All Topping should be done before you start 12/12. But an old friend from a closed down site (O.G.) and a couple of other active grow sites, her name is MOGIE, she just emailed me these pics and told me I could and should add them to my Tutorial. I wish I could go back and add them in the proper place, but due to EDITING Restrictions, I can't. So here you go.


Topping a Plant

1. Locate the very top of your plant and cut through the main stem just below the newest growth. This should be done after the 3rd or 4th leaf set but can be done at any time after the 3rd leaf set.

2. Shows Plant Top cut off and where the 2 new Branches that will form a "Y" in the main stem will grow from.

3. Shows the newly topped plant after 2 days of growth, notice the Y in the Stem Forming.

Mogies_Topping_pic.jpg


FIMMING A PLANT!

Fimming is actually no different that topping, what fimming does is virtually the exact same thing only your leaving part of the new growth. This only takes of part of the new growth and actually topping the very very new growth which is very hard to see.

What this ends up doing is making it seem as if your getting 4 new tops right next to eachother when its actually only 2 at the very top (like topping) but since it was cut so closely to the next newest set of fanleaves 2 branches which would have formed there anyways seems to make it look like there is 4 new tops.

This is how you go about doing this.

1. Locate the very top of the new growth


Mogies_Pic_2.jpg


2. With a clean sterilized scissors, Fold the fan leafs over and cut approximately 80% of the new growth off the plant.

Mogie_Pic_3.jpg


3. View from the top showing the Cut
Mogie_Pic_4.jpg


4. View of the Cut section after 2 days growth, showing the 4 new growth shoots (branches)
Mogie_Pic_5.jpg
 
no offence roseman!

ok man very nice grow!:popcorn:
cfl light's i see are good for vegging stage!
tell me why you don't set in your growbox, COOLTUBE with 250 watt or 400 watt HPS light??!
you should not expect large & thc potent buds with this CFL lights!:smokin:

:scratchinghead:
[250watt hps complete with ballast&starter cost less than 60$![33.000 lumen]
400watt hps complet with ballast&starter cost less than 90$ !][55.000 lumen]
:bitingnails: comparison 85 watt cfl bulb cost 3$ and has 3000 lumen!
 
Re: no offence roseman!

ok man very nice grow!:popcorn:
cfl light's i see are good for vegging stage!
tell me why you don't set in your growbox, COOLTUBE with 250 watt or 400 watt HPS light??!
you should not expect large & thc potent buds with this CFL lights!:smokin:

:scratchinghead:
[250watt hps complete with ballast&starter cost less than 60$![33.000 lumen]
400watt hps complet with ballast&starter cost less than 90$ !][55.000 lumen]
:bitingnails: comparison 85 watt cfl bulb cost 3$ and has 3000 lumen!


Lights and CFL questions are discussed and answered in Posts # 74 through 82.
 
Re: Roseman's Deep Water Culture Tutorial, SH Kit & DIY

Roseman..have my babies!!!

But seriously...This tutorial pulled me from the brink of quiting growing due to multiple issues. I followed this guide RELIGIOUSLY (Except I used Technaflora starter kit instead of sh nutes) and have had nothing but success. I still think this guide needs to be handed out in a pamphlet with every SH system!!

People, don't be lazy...read this entire guide and you wont regret it. Thanks for all your contributions Man of Roses!!

:420: 4 LIFE
 
you know what u doin

ok man sorry i see it now:thedoubletake:! it's the budget question!:ganjamon:
good luck!:thumb:

btw: 1ooo watt HPS[sylvania gro-lux] = 195.000 lumen
6oo watt HPS [sylvania gro-lux] = 95.000 lumen
 
Re: Roseman's Deep Water Culture Tutorial, SH Kit & DIY

ok heres the PPM Major question.
My plants drink 3/4 a gal a day and the PPM goes down from 400 to 360 so i figured they can only drink 3/4 a gal and in that 3/4 a gal there is 40 PPM's OR there is more PPM's of nutes in that 3/4 gal but they only wanted 40PPM's.

So I guess ill add more nutes till the nute PPM fail's to drop, eventhough the buts are CRAZY Trichenomed covered.
What u think is this correct or no?
some people think that if the nute lvl stays the same after u read ur plants drank water then ur good, I feel and logically think that if ur PPMs are the same after u add ur plants drank water that if ur PPMs are the same that means ur plants didnt eat any nutes or ur PPMs would lower, but I see this by peps saying that this is the way u want ur plants to feed, Im thinking that this is unilaterally wrong and false.
Post if u agree or ur if u rebut my comments.
 
Re: Roseman's Deep Water Culture Tutorial, SH Kit & DIY

Let me share something I saw this week.

A grower had a 4 by 4 sq ft grow space, = 16 sq ft.

He needed a bare minimum of 3000 lumens per sq ft, to a max of 10,000 per sq ft, and 6000 or 7000 lumens per sq ft would be PERFECT, ample and ideal enough.

At bare minimum of 3000 lumens per sq ft, (less than half what the sun gives) he needed at least 48,000 lumens total. AT LEAST, BARE MINIMUM.

With CFLs, at 70 lumens per watt, he needed AT LEAST A BARE MINIMUM of 685 watts. He was growing with ten 26 watt bulbs, or 260 watts, much less than half of the bare minimum needed.

Let me repeat, he had 10 bulbs, (sounds like a lot) but he really had less than half the bare minimum needed. His ten bulbs were pretty in a DIY Reflector fixture and they looked like a lot of light, although they were much less than needed.
His plants were growing too, and were ten inches tall, after 3 weeks of VEgging in Hydro. They were ten inches tall, yea, but they were very, very stretched, looking for additional light. AND, they were not lush looking, they were very yellowed, leaves all twisted and curled and they were seriously nute burned. He could not understand why he had nute burn. He was following the directions perfectly on his nutes, was at a 550 - 600 ppm, but those directions were for someone with adeguate light.

WITHOUT ADEQUATE LIGHT, YOU HAVE TO REDUCE THE PPM AND AMOUNT OF NUTRIENTS FED TO THE PLANTS OR YOU WILL GET NUTE BURN.
Most instructions for feedings rely on you having adequate light!

AGAIN, WITHOUT ADEQUATE LIGHT, YOU HAVE TO REDUCE THE PPM AND AMOUNT OF NUTRIENTS FED TO THE PLANTS OR YOU WILL GET NUTE BURN.
 
Re: Roseman's Deep Water Culture Tutorial, SH Kit & DIY

Time to start the SEX Lessons. LOL, just kidding. Maybe I should say GENDER Lessons.

In this pic, at the upper top node, you should be able to see two little white hairs, called pistals sticking out of a little caylx. The calyx looks something like an upside down bulb or a very tight tulip bloom. These indicate that this is a female plant. What we see, and I will show you more pics later, but these are called "pre-flowers".

2009_Grow_00136.jpg


I could easily see them with my magnifiying glass.
Let me tell you that I own 14 books on marijuana growing, and all of them and everything else I have ever read says that the males show sex, or gender, first. Maybe I don't have any males, but that would just be wishful thinking. You can always expect 50-50% or 60-40% male-female ratio everytime when you start with seeds. For a high price, "feminized seeds" are available on the Internet for sale.
 
Re: Roseman's Deep Water Culture Tutorial, SH Kit & DIY

The Pre-Flower Female stigmas, or pistils (name varies from book to book) also known as "the hairs" for slang, they grow from a tiny 1/32 inch to 1/4 inch in lenght in one day, maybe even to 3/8 inch. They are clearly visiable in this pic. I think it is called a pistil in a "pre-flower" and a stigma after it is a flower, but the books do not agree on what they are called, that I have. We all call them "the hairs".

These Pre-Flowers showed after Vegging 5 weeks, 4 days, then Flowering for Thursday until Tuesday, 5 or 6 days. I have a book that says ALL Indicas show sex if it is a Mature Plant and Vegged over 5 weeks. That is even before being placed on 12/12, the book says. A Mature Plant is one showing new alternating leaves instead of symetrical opposing leaves.


At the 2nd node from the top, you can clearly see 2 curly pistils, almost white in color, almost half an inch long. They are the thickness of very fine hairs.


2009_Grow_00226.jpg


I have some runts, I mean some very runty runts in that closet. But I got some GIANTS, VERY Bushy, very healthy, many upward limbs or branches, lots of top sites that are definitely female. I have found 2 large females in the oldest tank to the right of the closet. The tank to the far right is about 6 days ahead of the the tank to the left.

The Bucket and the tank to the far right is NOT showing sex yet. I wish they would hurry up so I can toss the males and get more light to the lower females branches and leaves.


2009_Grow_00324.jpg
 
Re: Roseman's Deep Water Culture Tutorial, SH Kit & DIY

I figured out that I am half way there now.
Half way is a time to clean up, re-evaluate and fix things that need fixing.
Daily, when I get home, my pH is 7 and I reduce it back to 6, except for the bucket. I find it at 7.4 and 7.5 almost every evening, it is really too small for three big hungry plants. Anf when I removed the pump, I slightly damaged some roots, tearing them into small pieces that needed removing.
I drug the bucket out into the center of the room, and sat the lid on a new empty bucket so I could clean the old bucket. I actually carried the lid with the 3 plants to the bathroom and rinsed the roots off clean in the shower.

I thought it made an interesting picture. The tallest one in the bucket is 34 inches tall, and I have three other plants the same height. 34 inches in 5 weeks is some very rapid growth!


2009_Grow_00137.jpg


2009_Grow_00227.jpg
 
Re: Roseman's Deep Water Culture Tutorial, SH Kit & DIY

I had to do some serious BENDING OVER of some of the taller plants today. I did it to open up some space and allow some light to penetrate down into the plats. They call it LST, or Low Stress Training. Normally, LST also means tying them down or tying them over, or tying weights to the tops to bend them over, but I did not tie them, I only tilted two of the grow cups sideways. I lifted up the gorw cups oe inch, then tilted them diagonally.

Back to Sexing, or Gender

A Plant can be FORCED to show "pre-flowers" by reducing the light, or by changing the light cycle to 12/12. Tht is called "forced flowering". This happens naturally, outside, when the days become shorter, at the end of summer. It also happens naturally when the plant becomes a mature adult plant. You can tell the plant is becoming an adult when the new leaves are no longer starting in pairs, or when one NEW leaf is staggered a little higher up from an opossing NEW leaf. A Male preflower looks like a nut, or a bulb, or a crab claw with tightly clinched parts. It ceases to be a pre-flower, and becomes a real flower, when it opens up. Sort of like when a tulip bulb opens up.
A Female pre-flower will be a very small bulb looking thing called a caylx with the two little white hairs growing from it. When it opens up and more hairs (pistals) are seen, then it ceases to be a pre-flower and is a full flower.
Let me show you some pics I have collected over the years of some males and female flowers and pre-flowers and even a hermaphrodite. A hermaphrodite is a mix, a plant with both male and female flowers on the same plant. Hermaphrodites ususally appear AFTER the males are removed and a female then tries to grow male flowers so it can reproduce and make seeds.
 
Back
Top Bottom