Deep Water Culture Tutorial, SH Kit & DIY

Re: Roseman's Deep Water Culture Tutorial, SH Kit & DIY

I completed the Deliberate Stretch.

I kept my LIGHTS about 18 inches higher up above the plants for about 20 hours, and they grew two inches taller at least, maybe three. I think the ones in the bucket may of grown 4 inches taller.

I am amazed.

I am bending them over now, tilting the cups some, (LST - Low Stress Training - but no wires or bondage, I am not into tying them up) to allow more light to penetrate in. I have at least 5 plants that are going to be Monsters, with a dozen UPWARD main or major branches, and I have topped and fimmed them twice already, too, and I mean all of them.
They are BUSHES! VERY FULL BUSHES, and I had to do something to OPEN them up and let the light in. The Canopy of each reservoir is SOLID THICK new growth. I have no nute burn, no yellowing and only one leaf tip burnt by a bulb so far.
 
Re: Roseman's Deep Water Culture Tutorial, SH Kit & DIY

Let me go over a few things I do not do, that I have not used or have not even mentioned.

I do not have algae, gnats, spider mites, pythium,(root rot) yellowing, leaf curling, larvae, mold, nute burn, or other most undesirable critters or undesirable conditions for a very good reason. I did my homework and studied, I took the precautions, I listened to experiecned growers, and I did the proper planning up front.
I have not mentioned or used peroxide as an additive, I do not need it.

I have not mentioned SM-90, Hygrozyme, Root66, Physan20, Prozyme, Magi-Cal, Cal-Mag, Superthrive, Neem oil, and another hundred supplements, because my plants are not sick, my roots are not sick, my water is not sick and nothing is going to make my plants grow any faster. My nutrients are sufficient enough!

I have not mentioned Mollasses, Cat Urine, Epsom Salts, Human Urine, Baking Soda, Iron, Sulphur, Maganese, Peroxide and a hundred other additives and supplements because I have not needed them, and they are a big waste of money and time to use or even discuss.

You do not need Mollasses, Urine, Epsom Salts, Baking Soda, or extra Iron, Sulphur, Maganese, and Peroxide in your tank if oyu do not make a mistake.

A few of the above mentioned additives MIGHT become necessary if I made a mistake and did not properly plan, or did not take the proper precautions.

I'll discuss plant problems and the above mentioned remedies later.

If you read all I've submitted here, you will not need them either.
 
Re: Roseman's Deep Water Culture Tutorial, SH Kit & DIY

Remember that there are two tanks, one at each end of the closet.
Both reservoir tanks drank one gallon each today. The plants in the bucket drink about 3/4 gallon a day. I replace the one gallon of missing water plus feed them a little less than 1/6 packet of Grow Nutes daily, on average. If 1/6 of the water is gone, then as a rule of thumb, 1/6 of the nutes were absorbed. The pH was 6.8 to 7.2 in all 3 containers, and I lowered it to 6.3 to 6.5. I will lower it again in 4 hours, attempting to avearage 5.9 to 6.0. Drastic changes within 12 hours are not wise.


This is the oldest tank, seeds were put in the rockwool 3 weeks and 4 days ago, today. There are 6 N/L in that reservoir.


2009_Grow_00129.jpg


2009_Grow_00219.jpg


This tank has 5 plants, about one week behind the other tank, but almost as big.
2009_Grow_00318.jpg


The bucket grow grew 3 or 4 inches taller during the STRETCH. It is as tall as the Air Pump hanging on the wall behind it. It was 3 or 4 inches lower two days ago. Flip back and look at the pics.

2009_Grow_00413.jpg


2009_Grow_00513.jpg


It is near the end of the hot summer here in the deep south, and I keep that small fan blowing on the reservoirs. I also have a very large oscilating fan blowing on the plants, higher up and farther away, that you can not see in the pics.

It is so much easier to do a grow in the colder months than in the warmer months.
 
Re: Roseman's Deep Water Culture Tutorial, SH Kit & DIY

Stuff Happens.

Around the 2nd week, you might start seeing little tiny white specs on your rockwool. Do not panic, that is salts, mineral salts also called water salts. They are harmless.


Around the 2nd week, you are going to find a dead leaf or two at the very bottom of the plant. The cotyledons, those first two round leaves you saw, they are going to die off. You will also find a dead leaf or two almost every day at the bottom of the plant by the third week. That too is normal. It just happens.


Remember that each and every leaf has a corresponding root, and visa versa. Every root has a corresponding leaf. As I go in and out of the tank taking a daily water sample to check pH, I am going to damage a baby root, and that just might cause a leaf tip to curl up, or yellow, or crisp. That is normal too. And as you throw some cold water into a warm tank, or as you throw some 4.0 pH water into a 7.0 pH tank, the roots and leaves are going to respond. You are going to do it, it will happen.
I am trying to tell you to not panic as you see normal natural leaves dying and crisping and drying up.


By the end of the third week, you should daily look at the bottom of the canopy for dead leaves and gather them up and keep the lid top neat and clean. Dead leaves make great homes for critters and mold. Throw those dried dead leaves away, they are not good for anything. I will let you know when it is time to start saving them.


And one more thing. I've never heard of a grower not dropping a LIGHT and breaking a branch with a fallen bulb, and possibly breaking a bulb too. It is going to happen. Repair the broken limb with some good masking tape by just wrapping it up good, it will heal and thrive.


IF you break a CFL

IF YOU BREAK A BULB...
1) Open a window before cleaning up, and turn off any forced-air heating or air conditioning.

2) Instead of sweeping or vacuuming, which can spread the mercury around, scoop up the glass fragments and powder. Use sticky tape to pick up remaining glass fragments or powder. Wipe the area clean with a damp paper towel or wet wipes.

3) Dispose of the broken bulb through your local household hazardous waste program or recycling program. If that service is unavailable in your area, place all clean-up materials in a trash container outside the building.

4) Wash your hands after cleaning up.

5) If vacuuming is needed afterwards, when all visible materials have been removed, vacuum the area and dispose of the vacuum bag in a sealed plastic bag. For the next few times you vacuum, turn off any forced-air heating or air conditioning and open a window before doing so.

This is a copy andf paste from a newsletter I get.
 
Re: Roseman's Deep Water Culture Tutorial, SH Kit & DIY

I am daily cleaning up a few dead leaves from my lid top. If they are already wilted and yellowing and crispy dry, then remove them and dispose of them. But if they are at least half healthy green, do not remove them. I keep a plastic trash bag handy to put them in. You may have seen it hanging on the door.

I found a bug in my closet. A dead bug. The lights and humidity and water attracts them but because I sprayed my closet first with a good pesticide, he did not have time to do any harm. I can not caution you enough about insect control. You can't see them, but I have sticky pest strips hanging in the closet just in case.

Daily I am adding one gallon of water, adjusting the pH, and almost everyday I add 1/6 packet of nutrients, Grow and Micro nutes. I normally do it everyday when I replace a gallon of water, but I am being extra careful on this grow, and skipping the additional nutes every third day.


This being the end of the 4th week, I am disconnecting my irragation hub from the water pump. The tubes are clogged with roots, and my roots are into the deep water. I did keep my water pumps running. They are shooting cool water up in the air, and helping add oxygen to the water and stir it around, and I use my pump to drain the tank.

Let me add I have about $200 invested in this crop, for new air stones, a couple of new 65 watt 2700K light bulbs and nutrients.

I collect bulbs. This is my 8th grow and with every grow I have bought a few more lights. I am fully aware that a few of them are too old or been used too often to be much help, but I still have them anyway. You know know when you will break one and need an extra one.
 
Re: Roseman's Deep Water Culture Tutorial, SH Kit & DIY

A Re-Cap:

When I first got started with this grow, I started with 1/4 dose nutes to be safe. A day or two after I saw the second node or 4th leaf, (two sets of two leaves, not counting those first two round leaves), I introduced 1/4 strenght nutes. I increased them to half strenght, or a 2nd dose of 1/4 strenght nutes two days later when I saw the 3rd node. I could safely do this with the Stealth Hydro Nutes. They are not too strong to cause damage at that strenght, especially using CFLS to grow. HID light users can use higher NPK nutes, or stronger strenght nutes.
A day or two later, I saw a 4th node, and increased the strenght of the nutes again by adding another 1/4 dose, bringing me to FULL-Strenght nutes.
That is when I measured my ppm, but by then, the plants were eating the nutes too. My ppm was only 550 then, and 75 to 100 of that was my well water. In no way am I saying that is what your ppm should be too. I am just telling you what mine was. I was trying for a weaker strenght feeding to make sure I did not burn them up and be emabarrassed. In past grows, I did use more nutes, strongers doses, more often. And, I got nute burn too.
(Nute burn is not good, they get angry and get yellow tips adn quit eating and growing with Nute Burn)

After the first ten days passed, I did a Drain and Replenish. I added back a full dose of nutes and my ppm was 500 that day, telling me my target ppm to stay at the same level during the early VEG or GROW cycle.
As I daily added a half of gallon of water, and a 1/12 packet of nutes, my ppm grew to 430, or bounced between 420 and 540 as they ate. (Before the feeding, it was 420, after the feeding it was up to 540)

By the time I was in my 3rd week, and they were drinking a full gallon of water a day, and I was adding back 1/6 dose of nutes, my ppm was between 560 to 640 daily. REMEMBER 100 of that is my water. But that number is not important to me or you. What is important is tracking it, writing it down daily, to determine how much more nutes I should add or not add.

Let me rephrase this.
Do not worry about the exact number, or any number from a chart or from me and my grow. Instead watch, record, and track how it rises or falls from day to day. The differences between what you have in there on one day, and the readings you get the next day will tell you how much your plants are eating. Of course, you do this daily, at the same time of day.

And remember, just because a gallon of water is gone, does not mean they necasarily also ate 1/6 of the nutes. Maybe you had HIGH HEAT and they were very thirsty but not as hungry.

First, determine the ppm of your water sourse. Say it is 100 ppm. Then fill the tank with the proper amount of water and a complete dose of nutes and read the ppm. Say it is 550 for example. If tomorrow a gallon of water is gone, and the ppm says higher than 450, or is still close to 550, then they did not eat and they do not need more nutes, they only need more water. Your reservoir's water and nute solution is more concentrated, telling you to add more water only.

If the ppm went down to say 350 from 450, and a gallon of water is gone, they need a gallon of water, plus enough additonal nutes to bring the ppm back up to 450. And that is the real purpose and use of a ppm meter, to determine that need and how much.

No one can tell you what your ppm should be. It will vary from garden to garden, and vary from different nutrients too.

If your plants are very happy, and drinking and eating at the same level, then the ppm will remain the same daily.
If for example, 1/8 of the water is gone, and 1/8 the nutes are gone, then the concentration remains the same and the ppm will remain the same.

I would like to offer a ppm chart as a rule of thumb or ball park target ppm, but each grow or garden is going to be different.

These numbers are based on EC readings, .500 readings, TDS readings converted from EC or the common Hannah Chart:


Seedlings, Early Sprouts 100 to 250

Early Vegging 300 to 400

Full Vegetation 450 to 700

Early Blooming 750 to 950

Full Mature Blooms 1000 to 1600

(this excludes the ppm of your water)

According to the chart, I am under feeding them and my grow could handle a stronger dose of nutes. But I am playing it safe as an example and as a demonstration.


REMEMBER: Underfed = No Big Problem
Overfed = BIG Problem
My grow is 28 days old today, from seeds being introduced to the system, until today. My Bucket Grow plants are 25 inches tall and the oldest tank's plants are 26 inches tall. The 2nd tank's plants are 22 inches tall. I am very proud and happy with that growth.
I admit I normally push them harder, but playing it safe has been much easier.
 
Re: Roseman's Deep Water Culture Tutorial, SH Kit & DIY

QUESTION: Aren't they getting cramped? Don't they need more room?

ANSWER:


That is really a deep question about this system and a question I would like to answer or address. The direct answer is you play the odds or go by the probablility of a maximum yield.

Let me start with I am sure you are familiar with the term SOG, Sea of Green. It is based on a grow procedure or the theory of harvesting lots of small plants, matured early to get the fastest production of buds available. In a SOG, you start plants very closely cramped together, and you do not let them mature before starting 12/12, or Flowering. You VEG for only a few days or one week, and BLOOM or FLOWER for 8 weeks, giving you a harvest in less than 9 weeks. If you repeat the process, over a year's time, you harvest 6 times. The theory is over the 54 weeks, you get 6 crops, and you havest more often, giving a larger yield over a year's time. If I VEG for 6 weeks, and Bloom for 8 weeks, I get a larger yield per crop, but I only harvest about 4 times in 56 weeks. Growers theorize that over a year's time of 56 weeks, the 6 crops will give a total yield larger than the 4 crops or 4 harvests.
Well,that is all a theory to be tried and tested. I am not 100% certain that theory is a fact but it sounds good.

Well, the same theory applies to growing them cramped in that 6 cup reservoir container.........or the three in that 5 gallon bucket.
To start with, the three in the 5 gallon bucket compared to the 6 in the tank is a bust or not the wisest way to go, price wise. I have half the number of plants in the bucket than I do in the tank, but I am not using half the nutes or half the time, half the expense, half the work, or half the worry and efforts. Consequently, the 3 plants in the 5 gallon bucket is not the wisest way to go for sure. BUT, if you are on a limited budget and have limited resources for equipment, and if you want to buy your equipment at Walmart, Lowes and Home Depot, and want to do a DIY grow, and learn hydroponics and Deep Water Culture growing, it is a great and thrifty way to do it.

The 6 plants in the reservoir, well, the same theory applies. Yes, the 6 plants are very cramped today in that reservoir. I am sure the cramping and shading makes them smaller to some small degree, compared to having them in 6 separate buckets, be it one gallon, three gallons or 5 gallon buckets.
BUT, also consider and compare the expense of multiple buckets, more lights, more nutes, and the space used for separate or multiple buckets. When price, work efforts and yield are all compared, the 6 cup reservoir container is the best, most efficient way and most economical way to grow compared to multiple buckets.

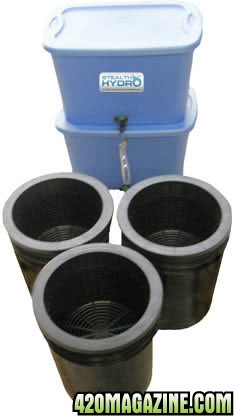
Let me also state here, the 6 cup reservoir is marketed as a Starter Kit. It is an excellent way to get started growing, and to learn hydroponic growing. It is economical too compared to the more expensive systems. The KIT is complete with rockwool cubes, hydroton, grow cups, reservoir tank, nutrients, pH test Strips, pH Up and Down, air and water pumps, a 12 inch air stone, a timer and even the lights and reflectors. You get everything you need except for the seeds, water and a small fan. And although it is designed as a STARTER KIT, I have grown 46 inch tall plants in it and I always grow three mature adult females after removing three males from the tank.
If I wanted to do a commercial grow, there is a way to hook up multiple tanks that I would consider.
 
Re: Roseman's Deep Water Culture Tutorial, SH Kit & DIY

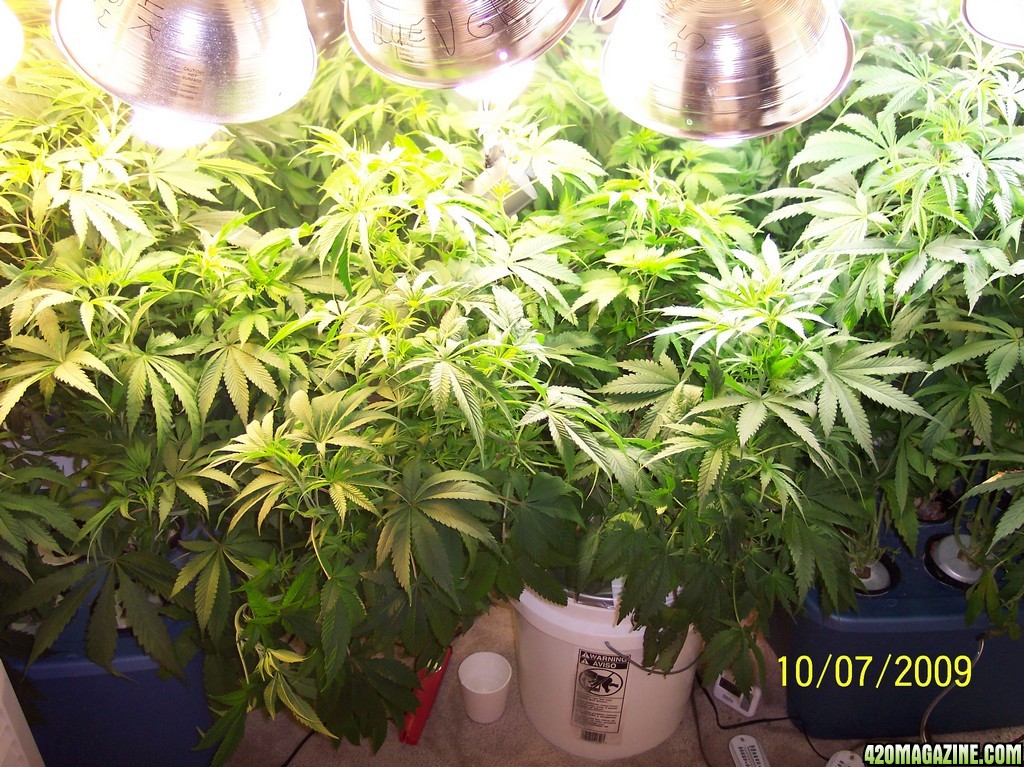
Here are some new pics. Do they look larger and taller?
I moved them closer together to share the lights.

I LSTed, Low Stress Trained, the biggest one in the bucket, and had it leaning over much farther, and had it tied over. But this evening, I am 90% sure I saw some male pre-flowers on it. I 'll go over Male-female later, but let me tell you here, the fastest growing tallest one is always a male, if you plant a few seed. I was just too tired to worry about it this evening. I did untie it until I am sure.


2009_Grow_00130.jpg


See the plastic trash bag hanging on the door with a collection of dead leaves in it. They are not good for anything worthwhile.

2009_Grow_00220.jpg


2009_Grow_00319.jpg


There is not any difference between the two tanks now, the plants in both look about the same height and size.
2009_Grow_00414.jpg


I am at the end of 4 weeks of VEGGING, (30 days) and I want to VEG 5 weeks total, so the VEGGING Cycle is almost over.
 
Re: Roseman's Deep Water Culture Tutorial, SH Kit & DIY

I am often asked about removing Fan Leaves to allow more light to penetrate in the Blooming cycle.

DO NOT CUT THEM.

IF you think they are blocking some lights, then get some paperclips and hold them back, if you insist on doing anything, but DO NOT CUT THE FAN LEAVES OFF.

IN MY HUMBLE OPINION, When a large FAN leaf starts yellowing, say it is half yellow, that means in the photosynthesis process, that leaf has ate nutrients, absorbed some LIGHT and made food for the plant and buds and NOW, half of that is gone, or used or consumed. Well, what about the other half? Can not it's energy still be used or consumed?
AND when it is ALL consumed or used, that leaf will naturally just fall off.

AND you say it is blocking LIGHT?
GREAT and GOOD, that means it is getting the LIGHT it needs and deserves more than the other leaves do, to do it's job, to make food and grow.


Years ago I tried removing lower fan leaves to allow more Light to penetrate in. When I did remove more than a couple, the plant went into shock for a day or two, and quit eating or only ate half as much, and just went on "stand by" mode. Then, after a day or two, suddenly I saw that big fan leaf replaced by a new leaf, and I saw my plant use the energy to replace that leaf and grow it back FAST to the size it was, more than it used that energy to grow the plant bigger and make more buds or bigger buds.

I now believe that removing fan leaves is pointless, and that a leaf has a purpose and will serve that purpose until it is dead. Then it will naturally fall off. You will have small and large lower leaves just naturally wilt and fall off daily.


Don't ever remove fan leaves before harvest for several reasons.

1. The fan leaves MAKE AND STORE energy for the plant. The fan leaves are doing a process called photosynthsis, and it is the most important part or task or job the plant does, to make it grow. They make the FOOD, the sugars and carbs needed to grow.

If you remove a FAN leaf, the plant will stop growing taller until it can replace that removed fan leaf.

Removing a healthy fan leaf is a big waste of time..they are rapided replaced, unless you are in the last 2 or 3 weeks of flowering.


2. Even if the fan leaves are yellowing in late bloom I do not remove them until they are almost ready to fall off. The yellowing in the fan leaves at late harvest is the plants metabolism at work. She is transferring all stored energy in the fan leaf to bud production. It is the easiest source of energy she has late in life. Let that leaf do its job.

The Wrong reasoning is like "I could run faster if I was lighter and weighted less, so I am going to cut my legs off".


From the Growers Bible by Jorge Cervantes:
Leave leaves alone! Removal of healthy leave hacks up a healthy plant. Removing large or shade leaves DOES NOT make plants more productive. This practice DOES NOT supply more light to smaller leaves and growing tips. Plants need all their leaves to produce the maximum amount of chlorophyll and food. Removing leaves slows chlorophyll production, stresses the plant, and stunts its growth. Stress is a growth inhibitor. Remove only dead leaves or leaves that are more than 50 percent damaged.
 
Re: Roseman's Deep Water Culture Tutorial, SH Kit & DIY

I will go over SEXing (determining sex) when or after I start the 12/12 Bloom or Flowering Cycle. (12 hours of darkness, 12 hours of light) let me say here that introducing the BLOOM nutes is NOT what starts the flowering process. It is the change in the LIGHT Cycle.

Naturally, outdoors, when the days or daylight starts getting shorter, about late June, the plant is alerted to its days are growing shorter and fewer. It knows then it is time to start the reproduction period, and it does it by making male and female plants, that have sex or the male flower polinates the female flower, and seeds are made. This is THE CHANGE, also brought about my a plant becoming MATURE.

Most new growers determine sex about ten days, sometimes up to 14 days after starting 12/12 by actually seeing the male and female flowers. By changing the light cycle from light 24 hours a day, to light 12 hours a day, we "force flowering". I will show pics later of what those flowers look like.
But very experienced growers can determine sex during the 4th to 6th week of Vegging by observing the "pre-flowers". MALES show first. Some old timers even claim to be able to determine sex by smell and appearance. I can not do that, I am not sure it is even true. But I have learned that 90% of the time, not always, but most of the time, the male is the tallest, fastest growing plant of the two genders. And I have learned to look for "pre-flowers". My eyes are not as sharp as they used to be, and the male pre-flowers are easier for me to see. They appear betwen the 4th and 5th week of Vegging and look like spikes, or spears to me. They also look like bananas or crab claws.


Here is a pic of MALE pre-flowers.


male_preflower1.jpg
 
Re: Roseman's Deep Water Culture Tutorial, SH Kit & DIY

Let me disuss a few problems you might encounter and offer a few solutions. You need to refer to this section often..


Roseman's Tips, Tricks and Troubleshooting Guide, Revised 10-1-09

Reading the Instructions
Every time I hear, read or receive a complaint about a problem with the Deep Water Culture System, it was because the person did not read and fully understand all of the instructions, or they did not understand what the system is all about. This TIPS, TRICKS and TROUBLESHOOTING GUIDE should answer and help you with just about any problem you might encounter.


Keeping Size in Perspective
This system was not designed to grow six 6-foot tall Christmas Trees. (Although I have grown 4 plants, 3, 4 and 5 feet tall in one tank.) I have heard a few growers tell us "I just realized that the 6 plants are going to get very crowded after they get 3 or 4 feet tall". This system was not designed for 6 giant plants. There is a reason that the tank is 21 and a half inches long. When this system was originally designed, many factors went into deciding what size tank and size pumps to use. The main factors were economy, costs, simplicity, stealthness, and making sure the tank would fit into the end of a small closet, out of the way and out of sight. I've heard of a few growers that try to change to a much larger tank, and realize how much more work and trouble is involved in using a larger tank and moving larger quantities of water. Draining and replenishing the water can be a major task in a much larger tank. Not only are more larger and expensive air and water pumps needed for a larger tank, but larger pumps make more noise. Draining and cleaning a larger tank is a ton of work and trouble too. If you want to go with a bigger system, then connect two tanks together. And if you want to grow large plants, then start them in the Deep Water Culture System, then transfer them into the Bucketeer Large Bucket DWC system. Or do like most growers do and just grow 2 or 3 large plants in one tank by selecting and keeping the more desirable three plants and disposing of the other three. I start 6 seeds and always get three males and three females, so it works out just fine. Those empty holes make it easier to service the inside ane take water samples and pour water back in it.

Growing the Stealth Hydro Way
The StealthHydro Deep Water Culture System was designed to be "stealth" and to be very efficient, quiet, small, simple, easy to use, and inexpensive. The designer of this system had the beginner or novice in mind, because it is so simple and easy to use. But as we have continued to grow with the system and grow in experience, we've come to know you can not improve on it. The system is designed to grow six small plants very fast and easy, under the umbrella of two Dual Spectrum lights, in a two square foot space.

Dirty Water?
We hear from a few growers having trouble with the water becoming cloudy or brown. Upon asking questions, we learn they did not rinse the hydroton rocks as completely as they should have. You should put the hydroton rocks in a large mixing bowl full of water, and pour them through a colander five or six times until the water pours out crystal clear and clean of hydroton dust. You should also pour water over and through the rocks several times in the colander.

Algae Prevention
We also hear from a few growers allowing algae to grow in their tank and becoming a problem. This can happen from several mistakes but can easily be remedied. (see our 8 Step Remedy) You can not allow a dead root or fallen leaf to stay in the tank and decay. It will really riun the pH balance. You can not allow the lights to shine into the water through the rocks. That is why I use cup covers. If the grow cup is full of rocks and covered, the lights can not penetrate through the cups. And most important, you have to start with clean, pure water. You can not use rain water, or water from a stream, river or lake. You should exchange the water after the first ten days, and then every 10 days as you grow. As the plants get over 12 inches tall, exchanging the water every 7 days is more efficient. Your water should smell like clean green alfalfa sprouts or fresh cut lettuce. With added SH GROW nutrients, it has a slightly green tint. If you detect an unpleasant odor, you have waited too long to drain and exchange the water. When you do replenish the water and nutrients, you should look for and remove any dead roots that were accidentally torn from the plant. You can use chlorinated city tap water. Some growers even recommend it for it's purity and to prevent algae. The chlorine dissipates fast and is never a problem. You can use RH filtered water, or store bought distilled or spring water. If you use well water or detect algae growing in your tank, you can add 1 teaspoon of 3% Hydrogen Peroxide per gallon of water to your tank as a preventative or 2 full teaspoons per gallon as a cure. Never use more than 2 level teaspoons per gallon of water.

We have seen books that advised allowing chlorinated water to first sit for 24 hours. Not only is this not necessary, this is bad advise, and encourages algae to start growing in your water. We have done tests and the chlorine dissipate within minutes from the tap. Do not use water that sat out uncovered or was stored a long period of time.
.
pH Problems
If you have a PH problem, you simply did something wrong. You should make sure that the PH of the water going into the tank is very close to 6.0. Pure water will test at 7.0 pH. Impurities or additives will raise or lower the pH of water. Anything between 5.6 and 6.8 is OK for your growing, but 6.0 works best. When you first set up your tank, you should do a PH test on your water before adding the water to the tank, using the enclosed PH test strips or a pH meter. Then adjust the water with PH UP or PH DOWN before it goes into the tank. That way, the PH perfect nutrients will work best. It can be dangerous to adjust the PH in the tank, especially if you overly adjust it. It is also dangerous to adjust it frequently. A very slight adjustment is OK, but if you change it drastically in the tank by using a large amount of PH UP or PH DOWN, you are taking a big risk of seriously harming your plants. If you do a test on your tank's water and it is extremely out of range from 5.8 to 6.8, then it is best to drain it and replenish it with PH corrected water and nutrients. (see the 8 Step Remedy) Let me repeat, you should add the nutrients to PH perfect water to start with. If you insist on adjusting it in the tank slightly, then use no more than 1/2 level teaspoon of PH UP or PH DOWN diluted in a quart of water to the tank, and no more frequently than 4 hours apart. Plants do not adjust well to rapid changes in PH levels. The results can be Nutritional Lockout. Remember, if you make a mistake then you can easily and rapidly correct it, by using the 8 Step Remedy.

Mixing and Feeding the Nutrients
We have had growers tell us "when I throw in a packet of nutrients into my tank, they just settle to the bottom and don't dissolve". That is not the proper way to introduce the nutrients and feed your plants. These nutrients contain some natural elements and not made to perfectly dissolve in water. There are aded pH buffers that do not readily disolve. For example, seashells and bone meal are not ever going to completely dissolve in water, no matter how much they are pulverized, but are an excellent source of calcium. You should add the packets to a quart jar half full of luke warm water and stir them rapidly, mixing them as well as possible in the water. Then pour them through a tea strainer or some kind of mesh screen or filter, to filter out the small particles that did not dissolve. You can crush those undisolved nutes in the tea strainer and should still use them. Then add the nutrient water mix to the tank.

Always remember when you first start and set up your system, you should start with 1/4 of a packet of GROW and Micro nutes, if you are starting with seeds, sprouts or baby seedlings. If you started with clones or baby plants, then start with half a packet of Grow nutes. Your plants should be about 3 to 4 inches tall, with three full nodes, before you use the nutrients full strength. Then stand back and watch for a growth explosion!

Nutrient and Water Flow
We hear concerns from new growers that the water is not flowing rapidly or strongly from the ends of the tubes into the rockwool cubes. A strong flow is not necessary or desirable at all. A slight trickle (bubbling) is all that is needed to keep the rockwool cube moist and the baby roots fed until they reach into the deep water. You do need to occasionally check for crimps and folds in the water tubes, especially when you first set up your system.

Keeping It Simple
The biggest mistake that I have seen anyone make starts with "I wonder what will happen if I add miracle nutrients, or cat urine, or molasses" or a dozen other crazy things that I have heard growers try. If you do not know what will happen, don't try it unless you are prepared to start all over because you killed your plants. Experimentation is great, but caution and moderation are the keys to success.

Oxygen Is the Most Important Aspect of Deep Water Culture
The best tip we can offer from experience is the importance of air or oxygen in the water. It is not required or necessary for good health of plants, but the addition of a 2nd air stone can make a difference in the speed of growth. You can use a plastic T-coupler so you can add a second stone to the one air pump. You can force growth spurts by draining the tank, waiting five or ten minutes to allow the roots to "air out" and then replenishing the water, even if you add back the same water and nutrient mix that you just drained out. Try it!

There are several ways to drain your tank by the way. One is by adding the drain plug or faucet. Or you can obtain a plastic hose like you can get at the aquarium store to drain your aquarium, and siphon the water out. Another way is to attach the hose to the submersible pump, using your fist as a coupling, and simply allow the pump to pump it out into a bucket. Or lower the removed pump back into the water, with the filter removed and pump it out.


Diagnosis and Recuperation Guide

We'll discuss some signs of illness first, then offer remedies for Recuperation and Recovery.

Both new leaves and mature leaves are the best indicators to determine how healthy your plants are. Any problem or illness will first manifest itself in the appearance of your upper leaves. These problems almost always originate from the plant's environment, PH imbalance or over-feeding or under feeding. These problems always result in what is called "nutritional lock-out".

Nutritional Lockout
Allow me to GIVE you a simplified definition of NUTRIONAL LOCKOUT.Can you imagine sitting a plate before a child at dinner time, with his most favorite food, hot dogs, ketchup and french fries? But also on the plate is a major portion of steamed broccoli, which he is just not fond of and insists on nibbling on. Now imagine telling that child, "you can not eat the hot dog and fries if you do not eat all the broccoli too". NUTRITIONAL LOCKOUT is when the child responds with "well then, I just won't eat!"

Stealth-Hydro's nutrients are both nutritionally and PH balanced. But after being in your tank for 5 or 6 days, and being eaten from for 5 or 6 days, they become imbalanced. Perhaps you are growing plants that ate all the nitrogen first and just snacked around the iron, magnesium and calcium, or visa versa. The results are discoloration in the leaves, yellowing or rust spots, or curling of leaf tips. It also becomes apparent when your plants were consuming a half gallon or gallon of water every day, and then suddenly when you check the levels the next day, they did not drink any water at all. This is NUTRITIONAL LOCKOUT.

Instead of giving lengthy descriptions of indications of overfeeding, underfeeding, ph imbalance, environmental problems and Nutritional Lockout here, it is easier to just give the remedy. Here we will refer to this remedy as THE 8 Step RECUPERATION AND RECOVERY REMEDY.


THE 8 STEP RECUPERATION AND RECOVERY REMEDY

1. Check the roots. If they are discolored, reddish or brown, or present an unpleasant odor, you have a problem. If they are weak, soft or mushy, you have a problem. Also while checking the roots, observe the temperature of the water. If it is warmer than "luke warm" you have a problem. This problem is probably what is referred to as "root rot" or a disease known as PYTHIUM. Remove the dead brown roots by trimming them away with sharp scissors. Do not leave them in the tank. 2 teaspoons of 3% Peroxide per gallon of water will cure them in a few days.
2. Check the humidity and temperature of the grow area below the lights in the "growing zone" when the lights are on. A temperature of above 87 degrees or below 67 degrees will slow growth, but it is not a serious problem that will kill your plants. Temperatures below 62 degrees or above 92 degrees will stop growth. An extremely constant high temperature in the upper 90s or below 58 degrees can slowly result in death of your plants. The most efficient temps for growth are between 72 to 84 degrees. Any Humidity between 40 and 60 percent is acceptable and desirable for the Veg Cycle. You need lower humidity for the BLOOM cycle. .
3. Check the "lights off, nighttime" temperature. Most desirable is ten to 15 degrees cooler than the daytime "lights on" temperature, averaging 66 to 72 degrees.
4. Check the distance between the tips of the plant and the tip of the light bulb. If you observe yellowing or leaf curling tips, then move the lights one inch further away. A good rule of thumb if you use HID lights, is hold the soft palm of your hand at the leaf tip and see if the bulb is too warm to your hand. If you use compact fluorescent bulbs, I recommend a distance of two or three inches for the 65 and 85 watt bulbs and 4 inches to five inches for the 105 watt bulbs. More mature plants can handle the bulbs slightly closer.
5. Check the position of your fans. Air movement is very necessary for the health of your plants, but too strong of a fan can cause wind burn. Direct your fan toward the tops of the plants and toward the lights. Never position the fan blowing strongly downward on the leaves. If you have varible speeds, use the SLOW speed.
6. Add 2 teaspoons of hydrogen peroxide to a quart of water per gallon, and add it to the tank of six gallons already in the tank. Wait ten minutes and then turn the water and nutrition solution pump off to prepare to drain the tank. Poor at least a cup of clean pH balanced water through each grow cup, onto each rockwool cube and through the hydroton rocks.
7.Drain or pump the tank empty as possible without damaging the pump by running it dry. Add two gallons of additional clean water with 1 teaspoon of hydrogen peroxide again and then drain it away too. Again, empty the tank as empty as possible without burning up your pump.
8. Add fresh PH balanced water and nutritional packets as prescribed. PH test it again.

The above 8 steps should repair and remedy any health problems that your plants experienced within the next two or three days. Now is the time to try and determine what caused the problem to start with, by investigating and researching typical hydroponics problems and illnesses.

Here are a few DIAGNOSIS TIPS.


Typical Hydroponics Problems and Illnesses


Underfeeding and Weak Nutrition
The entire plant, both upper and lower leaves, will show lime or light green in color.
The plant will not eat, drink or show growth.
It is time to follow the 8 Step Remedy.

Overfeeding, Use of Too Strong Nutrients
The leaves will curl downward. They grow very dark dull flat green and then the tips show signs of burn and yellow.
It is time to follow the 8 Step Remedy.

Nutritional Lockout
You know that you have made recent PH adjustments. You might know you may have used too much of the PH Adjustment Solution. You may have failed to test the PH often enough. You notice the plants did not eat or drink because they did not consume the same amount of water they used yesterday. You see rust spots. The large lower leaves are prematurely dying and you are not in the BLOOMING or FLOWERING stage.
It is time to follow the 8 Step Remedy.

Wind Burn
You had the fan blowing downward toward the upper side of the leaves, instead of blowing up through the node spaces or toward the lights. You observe the leaves becoming dry or even crispy, perhaps shriveling, and the tips curling upward. The leaves do not appear glossy, moist and vibrant.
It is time to follow the 8 Step Remedy.

Water, Nutrition Solution or Roots Are Discolored Brown Or Have an Unpleasant Odor
You notice your water is becoming brownish in color, or smells distasteful. Your solution does not smell pleasant and appetizing like fresh lettuce. Your roots are not the same shade of white that they once were a week ago.
It is time to follow the 8 Step Remedy.
 
Re: Roseman's Deep Water Culture Tutorial, SH Kit & DIY

HOW DO I DEAL WITH ALGAE BUILD UP IN MY HYDROPONIC SYSTEM?
Answer: The best method is prevention.
If you keep the solution away from light, i.e. keep the lids closed and all openings sealed, and use cup covers, you can prevent algae from growing. ALGAE HAS TO HAVE LIGHT, TO GROW.
If you already have algae in the system you can remove it with a SCRUB-brush, or use hydrogen peroxide (3ml or two teaspoons of 3% H2O2 per gallon of solution) to remove it.(I have used two tablespoons) If there are particles floating in the nutrient solution, be sure to flush the reservoir and growing chamber with ample water, and then start with a new batch of nutrient and pH balanced water. If the problem is severe, make sure you have the algae completely flushed out to avoid the risk of clogging some of the flow lines in the system.
After you use the peroxide, refill the tank with clean water and DRAIN AND REPLENISH AGAIN to rinse it good.
Some info i some books says peroxide will not help or work, and will kill the plants like it kills the algae. Use common sense and don't flood the plants with peroxide, and rinse the tank throughly and it WILL work.


All hydroponic growers know what algae looks like - it is often green, but can be brown, reddish or black, it clings to channels, gullies or pumps or oozes over the top of damp media. Algae often has an 'earthy' or 'mouldy' smell, is slimey, or gooey, particularly when large numbers are decomposing in the nutrient. It has the ability to block drippers, emitters, pumps, return channels, and heavy infestations can actually 'seal' off the surface of the media or substrate. It can ruin a pump or stop up a feeder tube in DRIP or Deep Water Culture SYSTEMS.

The problem with algae, apart from the appearance and smell problems it creates, is not so much that it uses up nutrients from the solution, but as it blooms, dies and decomposes, it removes dissolved oxygen from the hydroponic system. This increases the biological oxygen demand (BOD) on the system and the plant's roots may suffocate from a lack of Oxygen. Decomposing algae may also release toxins as it breaks down and provides a food source for plant pathogenic fungi which may then multiply to high levels in the system. Algae on plant root systems can suffocate the roots, making the plants prone to attack by opportunist pathogens such as Pythium, (root rot).
Algae, is a form of plant life, it is a natural consequence of exposing water with nutrients dissolved in it to a light source. Where there is no light, algae can not grow, so the most obvious solution to preventing algae growth is to stop light from reaching the nutrient solution where ever possible. Cups should have light proof covers, tubes should not be exposed to light, large media beds can also be covered with either plastic film or a layer of substrate which is designed to act as a 'dry mulch' since algae can not grow on dry surfaces. In aeroponic systems, the root chamber must be light proof and media based pot or container systems can have plastic or rigid collars made which cover the surface of the media.
Control of algae, once in a hydroponic system can be difficult - some DWC growers tolerate small amounts of algae in the system, provided it does not become excessive and this usually causes no problems. Where algae growth has become thick and widespread, often the best option is to clean up the whole system after crop removal and start again with a clean system.
YES, I SAID REMOVE THE PLANTS AND GET ANOTHER CONTAINER.
Some growers add algicide products into the nutrient to kill off algae and there are a number of these products on the market. However, since any product which kills algae, a form of plant life, can also damage young or sensitive root systems, care must be taken with the dose and damage has been known to occur. Algae will also regrow, very quickly after applications of most algaecide products, requiring more and more of the chemical to get good control. In a study carried out in Belgium on Algae Control in hydroponic systems, it was found that many of the products tested for control of algae in nutrient solutions (Diazinon, Endosulfan, Propiconazole, Thiram, Ziram, Quinomanid, Hygrozyme, Irgarol-1051, SM-90, ) were either totally ineffective in killing algae, or killed off much of the algae but were also very phytotoxic to the plants and causes considerable root damage. Plus theY play havoc with the pH. It was also found that dose levels of 4 Tablespoons of of hydrogen peroxide per gallon of water was requited to control algae, but that this dose was too phytotoxic for young plants, although older plants survived this dose rate. Therefore, careful and selective use of H2O2 (Peroxide) could be used on older, more resistant plants, but since H2O2 is a 'biocide' rather than an 'algicide' there is always a risk of root damage.
Other studies have found 'organic' algae control methods such as adding certain 'grapefruit seed extracts' to the nutrient will kill algae without harming the plants - this is a method used in drinking water, fish ponds, lakes etc and appears to work well. There could be the potential, in larger hydroponic tanks to use 'Barley straw rafts' as a means of algae control as has been proven to work in ponds, lakes and other water ways.
However the best method of algae control will still always be prevention of the problem, so excluding light should be the main emphasis in systems with algae problems.


Let's look at what Ed Rosenthal says about peroxide.

I found this article very interesting. It was written by Ed Rosenthal. I see a lot of mis-information about peroxide, and debate too, so I wanted to show you what he says.

by Ed Rosenthal.
How much hydrogen peroxide should be used?
When and how much hydrogen peroxide should I use in my hydroponic solution?

Hydrogen peroxide is a powerful oxidizer that can be used to destroy fungi, molds, bacteria and other infectious agents as well as some pollutants. Adding it to your water helps plants by destroying infectious agents and by adding oxygen to the roots' environment.
Hydrogen peroxide is an essential ingredient in maintaining a clean growing room. It replaces chlorine bleach, which is antiseptic but harmful to breathe. When added to reservoirs, hydrogen peroxide slows the growth of algae and other water organisms so that trays and utensils need to be cleaned less frequently. Soil and water borne diseases such as pythium and other stem and root rots occur at much lower rates in hydrogen peroxide-enriched water. Hydrogen peroxide works because of the oxidative reaction, so micro-organisms are unlikely to develop a tolerance.
There are many ways to add hydrogen peroxide to the water. A measured amount every three days is the crudest method, but still effectively enriches the water. A smaller measured amount daily would even out the peaks and valleys of oxygen in the water. Another method is to use a drip similar to an IV bag, which continuously adds a regulated amount. The most sophisticated method is a probe which measures the oxygen content of the water as an indirect means of measuring the hydrogen peroxide, and adds an appropriate amount as needed.
When used properly, hydrogen peroxide can keep infections in the garden to a minimum and stimulate root growth by increasing the oxygen content of the water. Hydrogen peroxide degrades into free oxygen and water over a three-day period. Some of the oxygen dissolves in the reservoir water and is used by the roots.
Different concentrations of hydrogen peroxide solution are available. It is sold diluted to 3% in drug stores. Some indoor garden shops sell 10% grade and 35% grade is sold in a few health food stores and over the Internet. The 3% hydrogen peroxide solution can be used topically to sterilize cuts and infections. Hydrogen peroxide solution at 10% burns skin. 35% hydrogen peroxide solution acts much like a concentrated acid and is handled as a hazardous, corrosive liquid.
The 10% hydrogen peroxide solution is sometimes used at rates as low as one ounce per 10 gallons water; however, enrichment using an ounce per gallon is more effective for disease control. When 35% hydrogen peroxide solution is used, it can be added at the rate of three ounces per 10 gallons of water. If a 3% solution is used, use three ounces per gallon of water as a cure.
 
Re: Roseman's Deep Water Culture Tutorial, SH Kit & DIY

ROOT ROT - PYTHIUM
One main point to remember, Root Rot STINKS, and Healthy Roots smell like fresh lettuce or alfalfa sprouts.

Thick, fat, white furry roots are what you most want to see - they are absolutely indicative of healthy root growth. Be aware however that the color of a nutrient solution will stain the roots, turning them yellow or brown. This is also true of many nutrient additives. Older, more mature plants will have a darker cream-colored root system, and some plants just tend to have a natural cream colored color pigment. My SH Bloom nutes stain the roots pink.

Root Zone Temperature
The temperature of the root zone and the temperature of the nutrient water solution can have a major effect on the healthy growth and appearance of the root system. In general the temperature should be between 62 and 67 degrees farenheit. Anywhere between 60 and 68 will be OK, even 70 will work, BUT NO WARMER. Colder or warmer conditions can cause poor and stunted root growth, as the roots don't want to grow into the unhospitable nutrient solution. Major root death can occur in even brief periods of cold or heat stress. Poor temperature conditions leave the door open to root disease.

Some would argue that one of the strengths of hydroponics is its sterile environment, and the notion of exposing growing systems to bacterial and fungal organisms would be self-defeating, if not sacrilegious. These growers rely on sterile growing environments, strong disinfectants and a product like SM-90, OR HYGROZYME. Another option is Peroxide. Each of these offer their own protection and benefits. But NEITHER HYGROZYME, SM-90 or Hydrogen Peroxide works well with organic nutes or organic additives in the reservoir. You can not try to kill the organic algae or pythium and add organic materials back. That just won't work!
They do not work well together and SM-90 AND HYGROZYME has also been known to react poorly with Superthrive.
In a sterile growing environment, your goal is to have a super clean reservoir. This is harder than it sounds. Folks who have been growing in the same area with the same equipment for years might find that they are suddenly having root problems when they never had them before. Or a new grower might begin having problems right from the beginning because of his water or temperatures.
Keeping your reservoir totally sterile can work very well, but once you get a population of icky badness it will keep coming back again and again. Some pathogens such as pythium are almost impossible to get rid of completely. No matter how many times you sterilize everything with a bleach or peroxide solution, the problem returns. It can get very frustrating and expensive to constanly be battling. More and more innovative growers are moving toward a more wholistic approach of using good microbes in the reservoir with organic nutes or staying with strickly chemical nutes. And Many growers do get good results with SM-90 or HYGROZYME WHEN USED EARLY.

One option is to use no organic additives at all and to rely strictly on chemical nutrients based on fertilizer salts. We think a better choice is to continue using organic material, but also using an enzymatic addtive like Hygrozyme that will break down the unwanted organic matter in the reservoir. Let me warn you that SM-90 and Hygrozyme are medicines for very sick plants and are not to be used lightely or often. One, they wreck pH. Two, you do not want your child to enjoy drinking cough syurp when the child is not even coughing and sick. Same goes for SM-90, Hygrozyme and even Peroxide. Please use them sparingly and only when needed.
The only time to constantly use Peroxide, is when it is impossible to get the temp of the water down, then you can use two teaspoons per gallon of water daily, as a root rot preventative.
AND let me add, I have seen many growers say I KILLED MY CROP WITH HYGROZYME OR SM-90.......and I SAVED MY PLANTS WITH SM-90 OR HYGROZYME.
 
Re: Roseman's Deep Water Culture Tutorial, SH Kit & DIY

PLANT MOISTURE STRESS - Symptoms and Solutions


Quite often I hear groans from folks having leaf problems -> "Help, my leaves are cupping and the leaf edges are turning brown!", or, "My plant's leaf tips are curling down and turning black ....what's wrong?" Unless insect damage has occurred or the plant is suffering from a severe case of calcium deficiency, the plant is trying to tell you that it is water stressed. It's hard to tell *exactly* what the culprit is, and unfortunately the "solution" the grower chooses many times is not the right one. A mis-diagnosis only serves to make matters worse by promoting further decline. I'll try to cover some of the more common causes that can induce these common symptoms and try to offer a few simple solutions. The ultimate and correct solution is in the hands of the grower.

1. Over-fertilizing - the most common cause of leaf cupping aka leaf margin rolling, leaf margin burn, and leaf tip curl/burn is the overzealous use of too much plant food in relationship to factors such as plant size, vigor and rate of growth. The first unit of a plant to show moisture stress is the leaf at its margins and/or tips, reflected by margin rolling (cupping) or burning. Sometimes copper colored necrotic spots show in the leaf also. A hard, crispy feel to the leaf frequently occurs as well, as opposed to a soft and cool feel of a happy leaf. When you have a high concentration of salts in solution (or in the root medium) compared to lower salinity levels found in the plant's tissue, water is actually drawn out of the plant across the root gradient in order to fix the ppm imbalance. IOW, this is a natural, osmotic response that serves to equalize salinity levels on both sides of the root's epidermal gradient. Back off on the amount and/or frequency of plant food. Too much plant food can also burn the roots, especially the sensitive root tips and hairs, which then creates another set of problems such as nutrient deficiencies. A note for the bio folks - as soil dries, the concentration of the remaining salts rises further exacerbating the problem. Leach (flush) your pots once in a while to get rid of excess salts.

2. High Heat - the plant is losing water via it's leaves faster than what can be replaced by the root system. The leaf responds by leaf margin cupping or rolling (up or down) in order to conserve moisture. A good example is reflected by the appearance of broad-bladed turf grass on a hot summer day, high noon, with low soil moisture levels - the leaf blade will roll in and the grass will take on a dull, greyish-green appearance. Upon sunrise when moisture levels have returned to normal, the leaf blade will be flat. Lower the heat and concentrate on developing a large, robust root system by practicing sound plant culture. An efficient and effective root system will go a long way to prevent heat induced leaf dessication and leaf margin curling by supplying sufficient moisture for good plant health. One short episode of high heat is enough to permanently destroy leaf tissue and cause a general decline in the leaves affected, which often occurs to leaves found at the top of the plant located near HID lamps. The damaged leaf (usually) does not recover, no matter what you do. Bummer in the summer. One can only look to new growth for indications that the problem has been corrected.

3. High Light - yes, it's true, you can give our faves too much light. Cannabis does not receive full sun from sunrise to sunset in its natural state. It is shaded or given reduced light levels because of adjacent plant material, cloudy conditions, rain, debris and dust collection on the leaf surface, twilight periods of early morning and late afternoon, and light intensity changes caused by a change in the seasons. Too much light mainly serves to bleach out and destroy chlorophyll as opposed to causing leaf cupping, but it often goes hand-in-hand with high heat for indoor growers. Again, back off on the light and concentrate on developing/maintaining an efficient and robust root system. Keep in mind that all but equatorial material receive less light during flowering than during the vegetative stage.

4. Overwatering - this practice only serves to weaken the root system by depriving the roots of proper gas exchange. IOW, the roots are not getting enough oxygen which creates an anerobic condition causing root decline and root rot with the end result showing up as leaf stress, stunted growth, and in severe cases, death. <gasp!> Alot of times folks think the plant is not getting enough plant food (which it can't under such adverse conditions), they add more nutes for a "curative", and just add insult to injury.

5. Underwatering - not only is the plant now stressed due to a low supply of adequate moisture, but carbohydrate production has been greatly compromised (screwed up). Step up the watering frequency, and if need be, organic growers may need to soak the pot from the bottom up until moisture levels reach an even consistency throughout the medium especially with mixes that are heavy in peat. If severe, a little surfactant (liquid Ivory dish soap) added to the drench will help return the organics back to a normal moisture retentive state. If the pot feels light to the lift - it's time to water. Don't wait until the soil pulls away from the sides of the pot or leaves droop before you water.

(Contributed by Uncle Ben)
 
Re: Roseman's Deep Water Culture Tutorial, SH Kit & DIY

Other Problems


Nutrient Deficiencies - Nutrient deficiencies in modern gardens are really rare. What most people see as a 'Nutrient Deficiency' is, 9 times out of 10, a pH problem. A pH that is too high or too low 'locks out' your plants ability to uptake nutrients. Since the plant can not uptake those nutrients they appear to be deficient. When in fact, there are plenty of nutrients in the solution/soil but, due to pH Lock-out, they are unavailable to the plant. Adding supplements or more nutrients (which is what most do) will only compound this problem by throwing the pH off even more and further raising the nutrient PPM.

Solution:
The best thing to do if you suspect ANY form of nutrient deficiency is to check and adjust the pH as necessary.


Over Feeding- Signs of over feeding include: dead/burnt leaf tips/margins and leaves curling under.

Solution - Check and adjust the pH level as necessary. Flush and decrease the fertilizer/nutrient level. Do the 8 Step Recovery.

Heat Stress - Signs of heat stress can look a lot like nutrient burn, except it occurs only on the top of the plant closest to the lamps. A yellowing of the upper leaves is usually a bleaching from being too close to HID lights.

Solution - A good test to see if your lights are too close is to put your hand between the light and the plant. If your hand gets too hot for comfort, the light is too close and needs to be moved up higher.

Yellowing (Chlorosis) - Chlorosis is a yellowing of leaf tissue due to a lack of chlorophyll. Possible causes of chlorosis include high alkalinity,high pH, and nutrient deficiencies. Nutrient deficiencies may occur because there is an insufficient amount in the nutrient solution or because the nutrients are unavailable due to a high pH. **Note- Always check the pH before increasing nutrient level. In the last few weeks of flowering a yellowing of the leaves is completely normal as the plant uses up all stored nutrients.


Yellowing - Lower/Middle Leaves - Yellowing of the lower leaves/older growth is a sign of a possible Nitrogen (N) deficiency. Nitrogen is a transferable element (this means the plant can move it around as needed). If a plant is not receiving enough Nitrogen from the roots then it will rob Nitrogen from the older growth. Plants that are Nitrogen deficient will exhibit a lack of vigor and grow slowly resulting in a weak and stunted plant that is significantly reduced in quality and yield. In a Hydroponic system, usually the pH is too high and has locked out the available Nitrogen.

Solution - First, check the pH, and adjust if necessary. The correct pH is 5.6 - 6.1 in a hydroponic system. I like 5.9. Second, make sure you are giving the correct amount/type of fertilizer/nutrients. For the vegetative stage of growth, your plants need a nutrient with a high Nitrogen (N) content like 2-1-1 (or 20-10-10).


Yellowing - Upper (New Growth) - Yellowing of the upper (new growth) of the plants could be a sign of a Sulphur (S) deficiency. Sulphur deficiency is pretty rare but usually start off as a yellowing of the entire 'younger' leaf including the veins. Other signs of sulfur deficiency are: Elongated roots, woody stems, and Leaf tips curling downward. **Note- Most yellowing of the upper leaves is a bleaching from being too close to the lights.

Solution - Check and adjust the pH level as necessary. Check your nutrient levels and make sure you are giving the correct amount/type for you particular stage of growth. Also a good test to see if your lights are too close is to put your hand between the light and the plant. If your hand gets too hot for comfort, the light is too close and needs to be moved up higher.


Leaf Curling Up - Leaf curling up can be a sign of a Magnesium deficiency caused by too low of a pH level. Magnesium deficiency will show as a yellowing (which may turn brown and crispy) and interveinal (in between the veins) yellowing beginning in the older leaves. Interveinal chlorosis (yellowing) will start at the leaf tip and progressing inward between the veins. It could also be a sign of excess heat and humidity in the grow room.

Solution - Check and adjust the pH level as necessary. When the pH is not at the proper level your plant will lose its ability to absorb some of the essential elements required for healthy growth. If you're growing in hydro it starts at 5.8 and below. If the pH is correct, then add 1 teaspoon of Epsom salts per each gallon to your water. Or, to foliar feed them, add a ½ teaspoon per quart to a spray bottle. **Note- If your tap water is over 200 ppm Magnesium will be locked out due to the calcium in the water. Magnesium can get locked out by too much Calcium, Chlorine or Ammonium Nitrogen. If this is your problem we suggest using bottled or RO (reverse osmosis) water.


Leaf Curling Down - When the leaves curl under and burn at the tips and margins it's usually a sign that the nutrient level is too high.

Solution - Check and adjust the pH level as necessary. Flush, do the 8 Step Recovery and decrease the nutrient level.

Droopy Leaves - Leaves that are drooping are most likely caused by under watering or lack of light.

Solution - Check the waer level and add more lights.

Spider Mites - Spider mites are not insects but are more closely related to spiders. These arachnids have four pairs of legs, no antennae and a single, oval body region. Most spider mites have the ability to produce a fine silk webbing. Spider mites are very tiny, being less than 1/50 inch (0.4mm) long when adults. Spider mites have tiny mouthparts modified for piercing individual plant cells and removing the contents. This results in tiny yellow or white speckles. When many of these feeding spots occur near each other, the foliage takes on a yellow or bronzed cast. Once the foliage of a plant becomes bronzed, it often drops prematurely. Heavily infested plants may be discolored, stunted or even killed. Web producing spider mites may coat the foliage with the fine silk which collects dust and looks dirty. Spider mite species seem to be warm weather or cool weather active pests. Adult females usually lay eggs on their host plants. The eggs hatch in days to weeks into the first stage, called a larva. Larvae are round bodied and have only three pairs of legs. The larvae feed for a few days, seek a sheltered spot to rest and then molt into the first nymphal stage. The first nymph now has four pairs of legs. The first nymphs feed a few days, rest and molt into the second nymph. The second nymphs feed, rest and molt into the adult stage. The males are usually the size of the second nymph and have pointed abdomens. The females have rounded abdomens and are the largest mites present. Most spider mites spend the winter in the egg stage but the twospotted spider mite over winters as adult females resting in protected places.

Solution - Early detection of spider mites, before damage is noticed, is VERY important. The tiny spider mites can be detected only by a full and thorough leaf inspection (on both sides of the leaf). If you find Spider Mites you must act fast and hit them hard with either a bleach solution (1 tablespoon of bleach to 1 gallon of very hot 95°F, pH balanced, water in a spray bottle.) Hydroponics Stores also sell Neem Oil and other remedies for spider mites.

Or one of the best things to do is get a bucket of HOT water and make a combination of neem oil and safer soap or additive free dish washing soap. You want the water to be warm so that the neem oil will break apart and mix throughout the water. DO NOT dunk your plants in until the water has safely come back to room temperature.
The safer soap will not only act as a wetting agent to help coat the plant but also weakens the exoskeletons of the lil buggers. The neem oil will make them immobile so they cannot move and suffocate them.
Dunking is the most effective method while they are smaller because it coats everything from the ground up, but this is a very effective spray. You should spray every three days, the undersides of the leaves or dunk every three days depending on size. This is the most eco friendly and safest method of treatment. This is what you should try first.
 
Re: -------'s Deep Water Culture Tutorial, SH Kit & DIY

I have to share this with you. I did a complete Drain and Replinish today. I was not 100% happy with the smell from one of my tanks. It should smell like fresh cut iceburg lettuce, or fresh alfalfa sprouts. It smelled like an old used stinky used floor mop. My roots were not discolored, but they were not perfectly snowy white either. My water was not slimey or discolored, so I am certain I do not have a problem YET, but I am not taking any chances. This is why we must do a Drain and Replinish weekly. It is Saturday and I do love spending time with my plants. So I decided to do a complete drain and rinse, as much as I could, and I filled them back up with fresh water, and three tablespoons of peroxide per gallon of water. (a high dose, only safe for large plants with a large root system) I then let them sit 5 minutes, and I Drained them again, and added back 5.9 pH balanced water and a full dose of nutes.


Yesterday, I stopped by Lowes and bought a new 5 foot lenght of 3/4 inch clear plastic tubing, for 40 cents a foot. My old one had some mold in it and I was not comfortable sticking that in my reservoir.

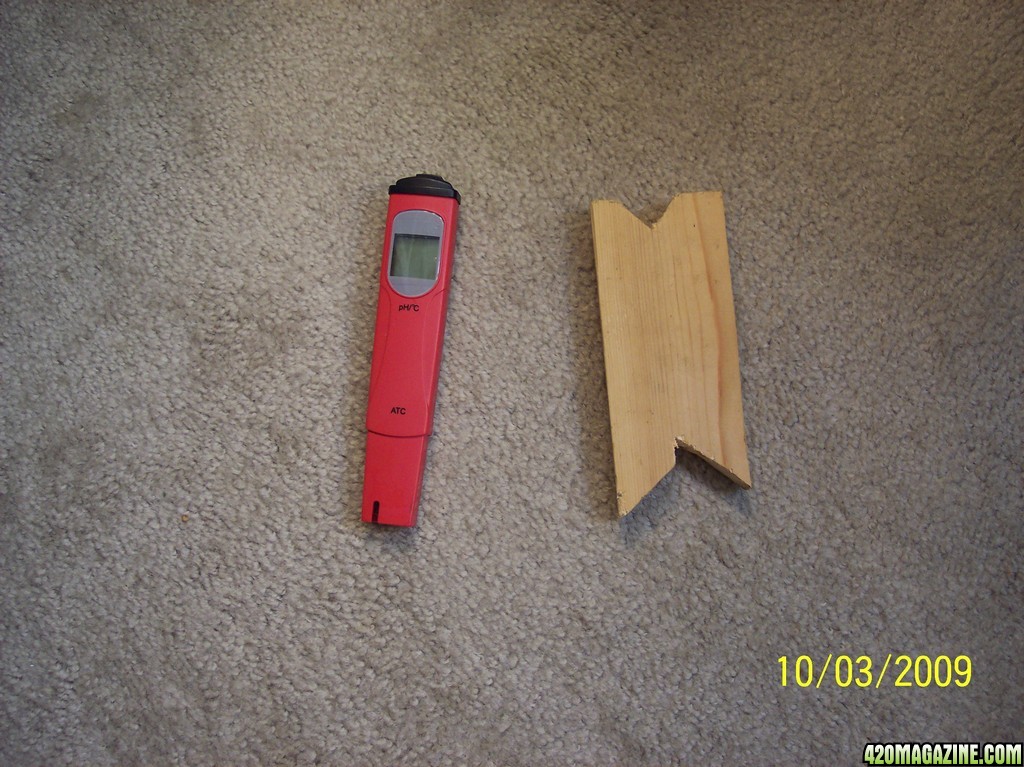
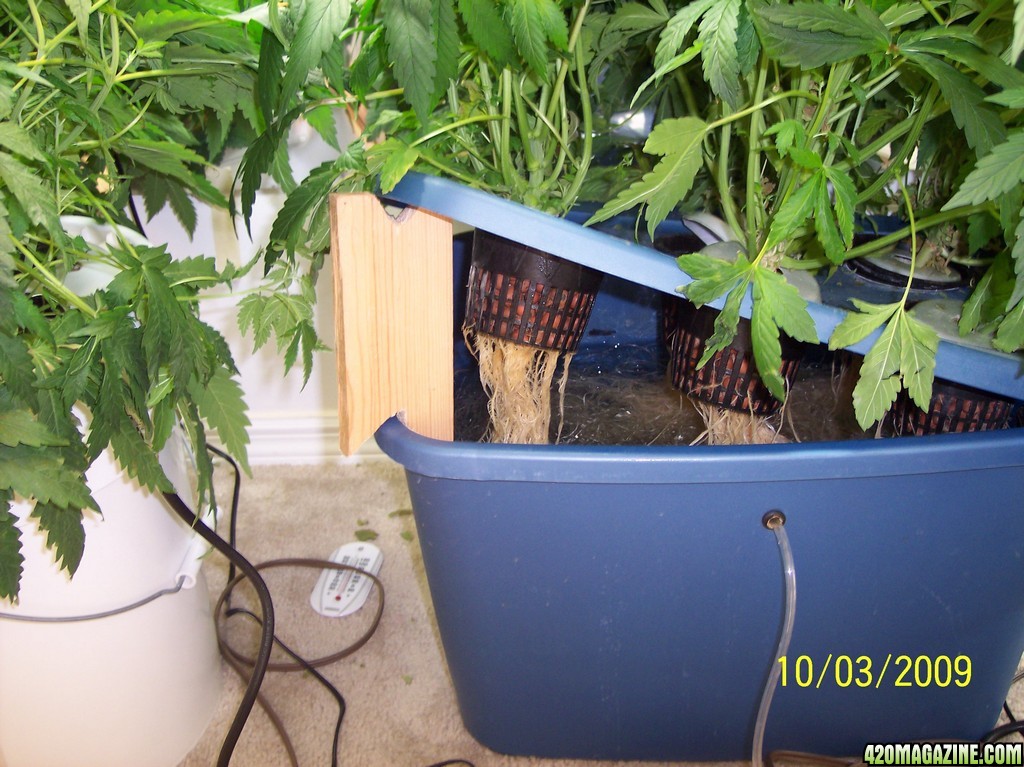
Today I took a one by four board, about 7 inches long, and made me a prop to hold my lid up while I had my hand and arm in the tank. My roots are large, my plants are large, so I am removig the feeder tubes and hub today. I normally do at 4 weeks of Vegging. I took the pump out, cleaned it, replaced the filter and put the pump back in.. It was nasty and I think it was the source of the bad smell. I leave it in, running, to circulate the water and cool it too. I also use it to drain the tank.
I am showing you the pH meter to show you the size of the board.


2009_Grow_00131.jpg


The board looks longer in the pic, but it worked just right.


2009_Grow_00221.jpg
 
Re: Roseman's Deep Water Culture Tutorial, SH Kit & DIY

Took these pics today. Tallest plant is 34 inches, most average 28 to 30 inches tall. The very tallest one in the bucket is bent and tied over, with the grow cup hanging 1/4 way out of the lid. I made a mistake growing three mature plants in this 5 gallon bucket. Two years ago, I put three clones in the same 5 gallon bucket and they thrived and did good, but they did not get any where near this BIG. To me, clones do not get as bag as seed plants.

The tank with 6 plants, is in this pic. Been in VEG from seed for 5 weeks, three days. The other tank lacks a day being 5 weeks of Vegging. I will start the 12/12 Flowering Light Cycle tomorrow.


2009_Grow_00132.jpg


2009_Grow_00222.jpg


2009_Grow_00320.jpg


2009_Grow_00415.jpg


2009_Grow_00514.jpg


2009_Grow_0069.jpg


For Lights I have two 6500Ks for each one 2700K bulb. In 12/12 Flowering, I will change them, and have more 2700K and less 6500K bulbs. I do have a couple 4100K and one 5000K in there that will stay. Again, I want a Dual Spectrum, or both high and low Kelvin bulbs. I want more 6500K bulbs in GROWING, and more 2700K bulbs in BLOOMING.
 
Re: Roseman's Deep Water Culture Tutorial, SH Kit & DIY

Allow me to stress or emphasize this:
A water pump can harbor dead debris, dead roots, mushy yukey slimey stuff and crap that really screws up the pH. Give your water the sniff test to determine if the water pump is spoiling the water. It should smell like fresh cut iceberg lettuce or alfalfa sprouts, and not stink bad. Most all water pumps have a filter in them that needs cleaning after two weeks, or get the pump out of there after 3 weeks.

After the first two weeks, and then daily, your pH should and will climb from 6.0 to 7.0 in about 18 to 24 hours because the plants are eating the nutes and the water is going down, and becomes more acidity. If the water jumps from 6.0 to 8.0 in a day, or worst, in 8 hours, you have a serious problem, and 99% of the time it is dead debris, dead roots, dead pieces of roots or leaves in the water. And the water pump can hold and hide that crap. Get the filter in the water pump cleaned after two weeks, or after the roots are in the deep water, or get that water pump out and the pH will be more stable.
 
Back
Top Bottom