Barneys Farm, Purple Punch, Organic Living Soil

So to report on week 2 of the veg cycle.
We have had a little miss hap earlier in the week the weather outside turned a bit nasty so had to come inside I also left the humidity dome on. Problem being is the humidity caught me out and ended up causing water droplets on the leaves and making them burn a fair bit. They are all now recovering well! Although getting a little lanky. I'm starting to think the sun isnt strong enough just yet the growth is too slow.

I have been drying them out and not watering until my pots are feather light to get the roots to chase for the water. Today I gave them a seedling compost tea that has been brewing for 72hours. I also put a top dressing of worm casts over the pots before watering in. I have found this works great to kick start the plants and get them use to eating. For the sun being too week at the end of this week they will be coming indoors in a babe tent under a 300w CFL
 

Attachments

  • 15873921656998660958960603624225.jpg
    15873921656998660958960603624225.jpg
    1.5 MB · Views: 129
  • 15873921856857486328953870946838.jpg
    15873921856857486328953870946838.jpg
    871.9 KB · Views: 113
  • 15873922107085312098214148050031.jpg
    15873922107085312098214148050031.jpg
    1.3 MB · Views: 106
  • IMG-20200420-WA0000.jpeg
    IMG-20200420-WA0000.jpeg
    627.8 KB · Views: 110
I'm starting to think the sun isnt strong enough just yet the growth is too slow.

I have to respectfully disagree. I think any sunlight or even overcast diffused sunlight is stronger than most lighting available on the market. I guess it also depends on the distance between the light and plant. I'm coming at this from a reptile keeper perspective. I would always advise new keepers that an hour or two of natural sun is far better than any lighting we could provide our animals. A part of me thinks it would be the same for a plant. I could be totally off the mark but something about the sun and trying to replicate it with manufactured lights, seems to me like we will simply never be able to replicate it.

Today I gave them a seedling compost tea that has been brewing for 72hours. I also put a top dressing of worm casts over the pots before watering in. I have found this works great to kick start the plants and get them use to eating
Would you mind sharing your seedling tea recipe? At what age do you start introducing a "traditional" compost tea? I have not put any castings on my seedlings. I did not consider that it would provide a light feeding to them. I keep reading that they don't need food but I'm not sure at which point that changes and they need some extra nutes.
 
I keep reading that they don't need food but I'm not sure at which point that changes and they need some extra nutes.
so, lets try an analogy.
A young man in high school doesn't "need" to work out or develop his muscles with exercise and protein. He can get by just fine without developing his body and he can be perfectly content and a full human being without ever lifting weights or working out and surviving on potato chips and ice cream.

His friend has a different plan and gives his body that little extra effort, and some more and better nutrition, concentrating on body building protein. This extra effort in his life was not necessary, but having chosen to go that route his body becomes bigger and stronger, he looks better, gets a better job and marries a prettier girl and produces many children.

His scrawny 98 lb weakling friend however is sickly and can barely stand up in a good wind. He never got a good job, married late in life and he and his constantly anemic wife only produced one ugly child.

The difference in these two lives? Early nutrition.
 
The difference in these two lives? Early nutrition.
Awesome analogy BTW! Haaa haa haaa. Makes 100% sense and resonates with me. FYI...I got an amazing wife, early in life if I may add! AND a good job with 3 beautiful kids. So you guess which path I took. :laughtwo: :high-five:

What I meant is that it seems people tend to lean on less nutrients than not for fear of hurting the babies. Am I being overly cautious? I have only fed the seedlings via foliar. There may be trace nutrients in the soil but I have not added any specific amendments for them to enjoy. I would definitely prefer to give them some nutrients if I can feel confident that I won't be killing them with too much of a good thing.

Seems like I need to start working on creating a better seedling and juvenile soil that will feed them until they are ready to go into bigger pots that are already breaking down nutrients and ready to feed them into adulthood.

Is there a good thread I could read up on that specifically educates on the feeding requirements for seedlings...and various growth stages for that matter?! I will do a better job of doing searches too.

Quick edit: my logic was based on when they germinate. The seed is supposed to have all the energy they need correct? But until what day (on average)? I will incorporate a better soil in the future and will start introduces nutes ASAP. Just curious how much time you give seedling fresh out of the soil before their first feeding?
 
In an organic grow they are being fed from day one, not just absorbing available nutes. It's safe advice to recommend no nutes or half strength, so you see that a lot on the forums, but there's nothing wrong with trying to super charge the grow either, if the plants can handle it. Most feeding charts include seedlings for a good reason... In the right hands they can handle it... Just depends on your style
 
In the right hands they can handle it... Just depends on your
I want to learn to be the right hands for my plants. My style is organic soil that is being fed and balanced so that in turn it feeds my plants. I enjoy offering them nutes via foliar as well. Doing my best to keep things organic.
 
Wow I am way way behind the curve on the thread here haha. Emilya has been my biggest teacher from day 1 and the tea I have brewed here is a uk version of her own compost teas. All my compost teas, soil builds etc. Are based around Emilya's so I cant take credit.

The light situation. I couldn't agree more to an extent. The light spectrum from the sun cannot be duplicated but strength of light maybe. The girls are telling me by how much they are putting into vertical growth they need a little more. We are still in very early spring here I'm just taking advantage of the good weather for time of year to harden them up a bit and the wind is awesome for encouraging root growth. But I want bushy plants so getting a CFL nice and close should help before moving to the tent and the Metal halide.

Back to the tea it's not meant for the plant. Emilya taught me a valuable lesson, one that took me a while to get my head around. I am feeding the soil not the plants. The tea I made was more to boost the micro life in the soil and I dilute it 5parts water to 1 part tea before applying. I do add small quantities of calmag and katana roots from bottle which is plant direct but this is to help it out. I know from other peoples experiences that purple punch likes calmag so I want to introduce it at the beginning. The worm casts are full of microbial life so having a good covering that on top works as a mulche to keep the soil moist and rain down goodies every time I water. I've learnt from experience that the low nitrogen content keeps the seedlings a little more perky.

My recipe:

30ltrs rain water/pond water
2 handfuls plant magic compost
1 handful soil from compost bin (very established and very old)
1 handful worm casts
1tsp hoof and horn
1tsp kelp meal
1tbls alfalfa meal
Pinch of micorhizae granuals
1tsp liquid seaweed
1tsp calmag
1tsp katana roots
2tbls black strap molasses.

Brewed for 72hours.

And as to when I will give this to them I'd say when the first 3 finger leaves are up and out and the next set are mini but visible
 
Back to the tea it's not meant for the plant. Emilya taught me a valuable lesson, one that took me a while to get my head around. I am feeding the soil not the plants. The tea I made was more to boost the micro life in the soil

Yes, this is a valuable lesson I learned between last year's grow and this year. My soil base is MUCH stronger and healthier this year. My mistake is that I was focused on a soil for established plants. I did not take into consideration the younger seedlings. Now I will be playing catch up and feeding the soil appropriately. Thanks for the response!
 
Hey guys and gals, forgot to put this up yesterday. So went ahead and up potted all my plants I first let them dry up a bit so it's safe to move out of the pot. The plants never wilted though so not too much. Here is a little step by step of how I up pot to ensure no or limited stress is put on the plants and ensure no root shock. Firstly all water and new soil added to my pots or anything in this process is the same or near enough to the soil that they are in currently. This is very important. I see so many problems after up potting I have not had one when I do it like this... And then follow the following....

Step 1.
I get all my pots I'm going from a 1Ltr to a 3ltr. I put a thin layer of my own super soil in the very bottom that has been cooking for around 3 weeks. When the plant hits this layer it will probably through a hissy but tells me where the roots are and gives them a boost. 20200429_131825.jpg
Step 2.
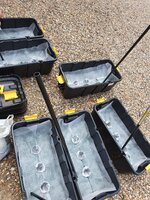
I then add a layer of soil with just added worm casts Mycorrhizae and seaweed meal. I use a bummy pot the exact same as the plants are currently in. I want the Rim of the smaller pot slightly lower than the rim of the new bigger pot

Step 3.
I then remove the pot out and sprinkle a dusting of Mycorrhizae over the top of worm cast and soil mix. This is so when the roots start searching and before they get into the super soil below they are fully equipped with the fungi required to make the most of the potential nutrients.

Step 4.
I then place the dummy pot back in and start to put soil around the sides of it filling the gap between the small and large pot. Do this all the way round dont start pushing soil down the gap just poor it in with your hand for now.

Step 5.
Next push it down with a little pressure all the way round. Now repeat the previous step until it's about 1cm up from the rim of the pot. The reason I do it stage by stage and not It one go is so there is not any air gaps left in the soil.

Step 6.
Now by putting your fingers inside the smaller pot and thumb on the bigger pot (see picture) go round and squeeze the dummy pot up to the side of the new pot but not too much your just getting the soil to hold its form and to free the dummy pot slightly.

Step 7.
You can normally check weather the soil is compressed enough when no soil falls out when you turn the pot side ways.

Step 8.
You can now remove your dummy pot to reveal you now have the perfect new hole for your plants to go in. The old soil will sit directly up against the new soil meaning no air gaps or pockets. Just good fresh fertile soil the plant will love you for. If you have air pockets remove the soil out from the sides and start again. If you leave it there is a chance of that air getting trapped and turning bad.

Step 9. With a squeeze bottle mist the hole with water ( I use nothing but rain water or water out the pond, tap water should NEVER be used in organics) make it so its wet but no so soil starts falling from the edges.

Step 10.
Get yet more Mycorrhizae and wipe/dust up the sides of the hole. Now that's its wet it should stick.

Step 11.
Get one of your plants and prepare to turn upside down. Make a Vulcan sign with two fingers either side of the stem supporting the soil around the stem.

Step 12.
Turn your plant upside down. This is where the soil needs to be fairly dry, as it looses moisture soil will shrink and in turn free itself from the sides of the pot. Give it a bit or persuasion by squeezing the pot gently and tapping the bottom once it's free always lift the pot from the plant.
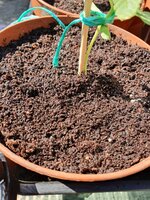
Step 13.
Gently turn the plant the right way up and put into the whole it should fit perfect!

Step 14.
Top up the soil over the top and push the soil down and into the centre.

Step 15.
Finally water in (I also add a little root enhancer to the water when I water in). By watering the entire top of the soil concentrating on the area the old and new soil now touch. This is to bed the two soils together and keep the roots moist.

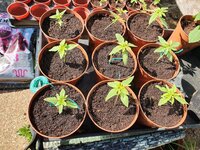
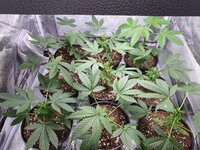
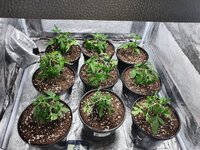
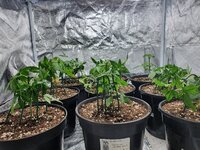
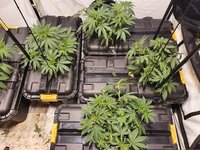
Back into the tent. My girls are currently under a 300W CFL and loving life.
This is a picture of when I put them back from being up potted.

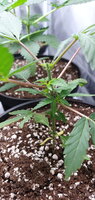
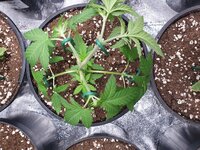
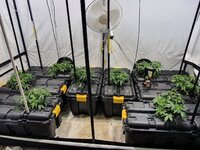
And this is a picture just 24 hours later

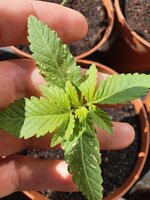
The growth spurt has kicked in and not that it's clear but they have not only fanned out but also new shoots from the nodes have started popping and the stems are proper thickening up.
Top result and shows they are happy with the new home and turning it up!
Hope this helps some guys and gals out there. Share this page to them if they need it :)
 
So now the girls have been going full pelt under the light they started getting brave so I topped them at the beginning of the week. They are now bushing out nicely!
 

Attachments

  • 20200509_091654.jpg
    20200509_091654.jpg
    1.3 MB · Views: 111
  • IMG-20200505-WA0023.jpeg
    IMG-20200505-WA0023.jpeg
    661.1 KB · Views: 110
So today I have beaten the girls up. Hair cut and LST training has begun! Taking some of the fan leaves out stretch each collar vertical and bringing to top right down. On my last grow I left this too late and mate the plants lean way over creating a hole in the middle of my scrog net. I want to keep them fair central this time round.

One or two were too lanky and tall so to keep them at an even canopy I took the really tall one in the back to 4 colars cutting her in half and another taking the top node off. Its helped alot. I do enjoy LST it's great fun and rewarding!
They will be going into the big tent next week under the 400w metal halide turned down to 250w for the first week.
 

Attachments

  • 20200512_125721.jpg
    20200512_125721.jpg
    1.2 MB · Views: 117
  • 20200512_140312.jpg
    20200512_140312.jpg
    1.3 MB · Views: 125
  • 20200512_140307.jpg
    20200512_140307.jpg
    1.4 MB · Views: 118
  • 20200512_140319.jpg
    20200512_140319.jpg
    1.2 MB · Views: 115
I was already drooling for the title of your journal but those plants and setup looks amazing man. im in for the long run, goodluck
Cheers mate more than welcome!
 
Hi all! Sorry it's been a while from the last update. I've been super busy with my head in Sub irrigation planters and have decided it's worth a go! Currently I have made myself a prototype out of a 60 ltr container so once finnished I'll get some pictures up for you. I'm desperate to get my girls into there final containers as growth is slowing a little but they are happy never the less. Pictures to come....
 
Hi guys so as mentioned. I have opted to upgrade and take the living soil to a new level. Living organic soil likes to be more moist than most soils, allowing your soil to dry out between waters can hurt your microbial colony. After some homework and playing around I made my own SIP containers (sub irrigation planters) essentially my pots now sit on a reservoir filled with friendly bacteria and water ready to be wicked up by the soil and plants. This essentially provides the perfect habitat for both plant and rhizosphere. I make it so fungi control the top section of soil using a special selection of mulche and bacteria from the bottom using EM-1. Leaving the middle a mixed battlefield for the plants to thrive from both. My soil is a living soil that I have re amended and recycled from my previous grow and should need nothing but water from start to Finnish. I will not add any feeds and only add AACT and SST from the top.

My girls have just been moved in and running a 400w Metal halide over the top.
The trellis net will be installed next week and as they grow up to it I will spread them out before the flip. I'm hoping to get them flipped in 2-3 weeks time.
I soon will be moving to LED lights to control temps a little better.
 

Attachments

  • 20200527_135240.jpg
    20200527_135240.jpg
    1.4 MB · Views: 103
  • 20200527_175951.jpg
    20200527_175951.jpg
    812.3 KB · Views: 101
  • 20200527_180613.jpg
    20200527_180613.jpg
    664.5 KB · Views: 109
Living organic soil likes to be more moist than most soils, allowing your soil to dry out between waters can hurt your microbial colony.
Please check this assumption... it is not entirely true. There is still a need to draw oxygen down to the lower roots, living soil or not. It is imperative to at least every 3 cycles or so to totally dry the soil out all the way to the bottom just to bring that needed oxygen down to the roots. It is a fallacy that a dry container kills microbes... First, none of us truly get the soil completely dry or our plants would die... and to the point we take it, there are still plenty of active microbes hiding in and within the organics in that soil, sitting in caverns in the perlite and just hanging out. Long before things get bad enough for them to die, the microbes will go into stasis, just waiting for water to come along again to wake them up. Think about the freeze dried products like RealGrower's Recharge... add water and you get instant microbes! How is this possible if dryness kills them?
Enjoy the wicking system, but watch for troubles because of keeping the bottom wet and not taking care of the upper spreader roots. As you might be able to tell, I am not a fan of the system. Good luck though... I hope it works as you expect and I am curious enough to watch to see what happens.
 
so, lets try an analogy.
A young man in high school doesn't "need" to work out or develop his muscles with exercise and protein. He can get by just fine without developing his body and he can be perfectly content and a full human being without ever lifting weights or working out and surviving on potato chips and ice cream.

His friend has a different plan and gives his body that little extra effort, and some more and better nutrition, concentrating on body building protein. This extra effort in his life was not necessary, but having chosen to go that route his body becomes bigger and stronger, he looks better, gets a better job and marries a prettier girl and produces many children.

His scrawny 98 lb weakling friend however is sickly and can barely stand up in a good wind. He never got a good job, married late in life and he and his constantly anemic wife only produced one ugly child.

The difference in these two lives? Early nutrition.

Hahahah analogys.
 
Please check this assumption... it is not entirely true. There is still a need to draw oxygen down to the lower roots, living soil or not. It is imperative to at least every 3 cycles or so to totally dry the soil out all the way to the bottom just to bring that needed oxygen down to the roots. It is a fallacy that a dry container kills microbes... First, none of us truly get the soil completely dry or our plants would die... and to the point we take it, there are still plenty of active microbes hiding in and within the organics in that soil, sitting in caverns in the perlite and just hanging out. Long before things get bad enough for them to die, the microbes will go into stasis, just waiting for water to come along again to wake them up. Think about the freeze dried products like RealGrower's Recharge... add water and you get instant microbes! How is this possible if dryness kills them?
Enjoy the wicking system, but watch for troubles because of keeping the bottom wet and not taking care of the upper spreader roots. As you might be able to tell, I am not a fan of the system. Good luck though... I hope it works as you expect and I am curious enough to watch to see what happens.
I do not disagree with anything said! I am also on a learning curve with this one and following another journal on another site, seeing his outcome I had to give it a go. My reservoir is never allowed to fill up enough that it touches the entire bottom of the soil there is always a large air pocket between the bottom. And the res. I dont want to release too much information on the system just because I dont know how it's going to go if it's a success then I'll do a run down of how I made this. Feeling the top of the soil and putting my hands down into the soil none of it is wet. Its moist as if it were a compost heap. The soil is doing the trick at the moment not too wet not too dry. And never fluffy still. Take a look at the pics this is the growth after just 3 days of in the tubs. I'd say they are pretty happy so far.
 

Attachments

  • 20200527_175951.jpg
    20200527_175951.jpg
    812.3 KB · Views: 110
  • 20200531_193120.jpg
    20200531_193120.jpg
    1 MB · Views: 101
  • 20200531_215053.jpg
    20200531_215053.jpg
    1.1 MB · Views: 103
  • 20200531_215142.jpg
    20200531_215142.jpg
    1.2 MB · Views: 103
I do not disagree with anything said! I am also on a learning curve with this one and following another journal on another site, seeing his outcome I had to give it a go. My reservoir is never allowed to fill up enough that it touches the entire bottom of the soil there is always a large air pocket between the bottom. And the res. I dont want to release too much information on the system just because I dont know how it's going to go if it's a success then I'll do a run down of how I made this. Feeling the top of the soil and putting my hands down into the soil none of it is wet. Its moist as if it were a compost heap. The soil is doing the trick at the moment not too wet not too dry. And never fluffy still. Take a look at the pics this is the growth after just 3 days of in the tubs. I'd say they are pretty happy so far.
Looking good Auto, reminds me of a sci-fi military establishment.
 
Back
Top Bottom