

Navigation
Install the app
How to install the app on iOS
How To Use Progressive Web App aka PWA On 420 Magazine Forum
Note: This feature may not be available in some browsers.
More options
You are using an out of date browser. It may not display this or other websites correctly.
You should upgrade or use an alternative browser.
You should upgrade or use an alternative browser.
Amy Gardner’s High Brix Dreams
- Thread starter Amy Gardner
- Start date
Thought you might show up Lady G2, so I brought some nibbles for your horse!Okay cool, I get it, you wanna get your hands dirty first...hahahaha duuuuh,
I can't grab a seat cause I'm on my horse right now, not my HIGH horse...hahahahaha
Hey LadyG can you throw me some carrots over here. Orange you glad you started a new journal Amy? hahahaha stop it brain!
nobodyhere
Well-Known Member
I am in.
I am in.
I was expecting another seat to be taken but then there was nobody there.


nobodyhere
Well-Known Member
I standI was expecting another seat to be taken but then there was nobody there.
- Thread starter
- #46
Ok I'm here
And all is well

Hiya Amy G,
I hope you don't mind if I join your motley assembly of officinados, curisoty seekers, misfits, ner-do-wellers, friends, and accomplished cannabis cultivators. Good luck on your grow. With DBHBB, you won't need luck. Well then, happy growing!! Cya
Yay Bode!
Yep no luck needed now! Plenty of luck finding this place though - well luck and good decision making to settle on these forums (but it was a no brainer really) 
Thanks - keeping the kitchen stocked for all comers, human and beast (just don’t feed any beastly humans!)Thought you might show up Lady G2, so I brought some nibbles for your horse!
I am in.
nobodyhere! Great to have you along. Relax and enjoy ")
I was expecting another seat to be taken but then there was nobody there.
“There was a man upon the stair,
but when I looked it wasn’t there
He wasn’t there again today
I wish that man would go away”
it’s a great username eh - it would work for kicking off a meditation... the seat is already taken by nobodyhere... clears the mind well.
")
Back troubles?I stand

I was expecting another seat to be taken but then there was nobody there.
*HAHAHAHAHA TOADally got that one.
I was expecting another seat to be taken but then there was nobody there.
Awe...come on Ween....
....cheers my brotha...- Thread starter
- #49
DIY indoor sun! Building the frame...
I have been working on this very slowly since about February. Researching and then slowly buying all the components bit by bit to spread out the cost, and then building it very very slowly over the last 2 months.
There were a few configurations considered, and originally this light was going to be for a smaller space of only 2’x2’ | 600 x 600mm. I ended up ditching the DIY tiny closet and getting a tent that is a little bigger (Homelab, by Homebox 80x80x180cm). I already had the LED panels (5) so the extra space means I can spread them out a little bit more (it was gonna be an angled squeeze in the original space).
I love to work with scale drawings and scaled movable pieces when designing something... there are numerous versions of this with the panels arranged differently but this is the final one (except I drew the panels in from the sides a few centimetres

I am super stoked to discover that I can still build things even though I have to do pretty much everything from my bed! It just takes planning and help (ie borrowed muscle) at cruicial points along the way.
I had great fun drawing up the design... (there are diff coloured dots for different types of bolts I’m a details person). This is the final drawing showing the construction, materials, dimensions and also the wiring plan 
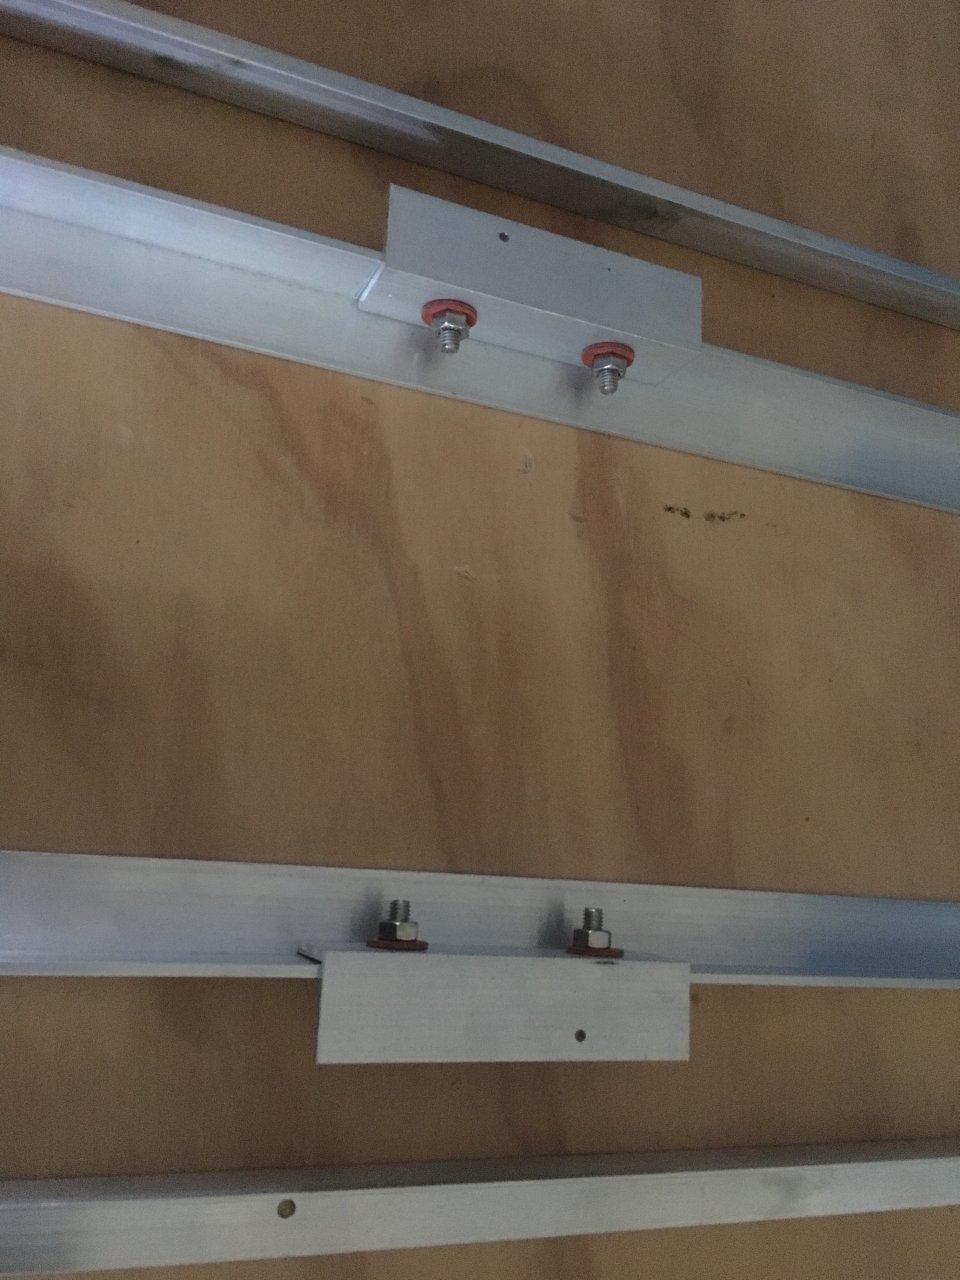
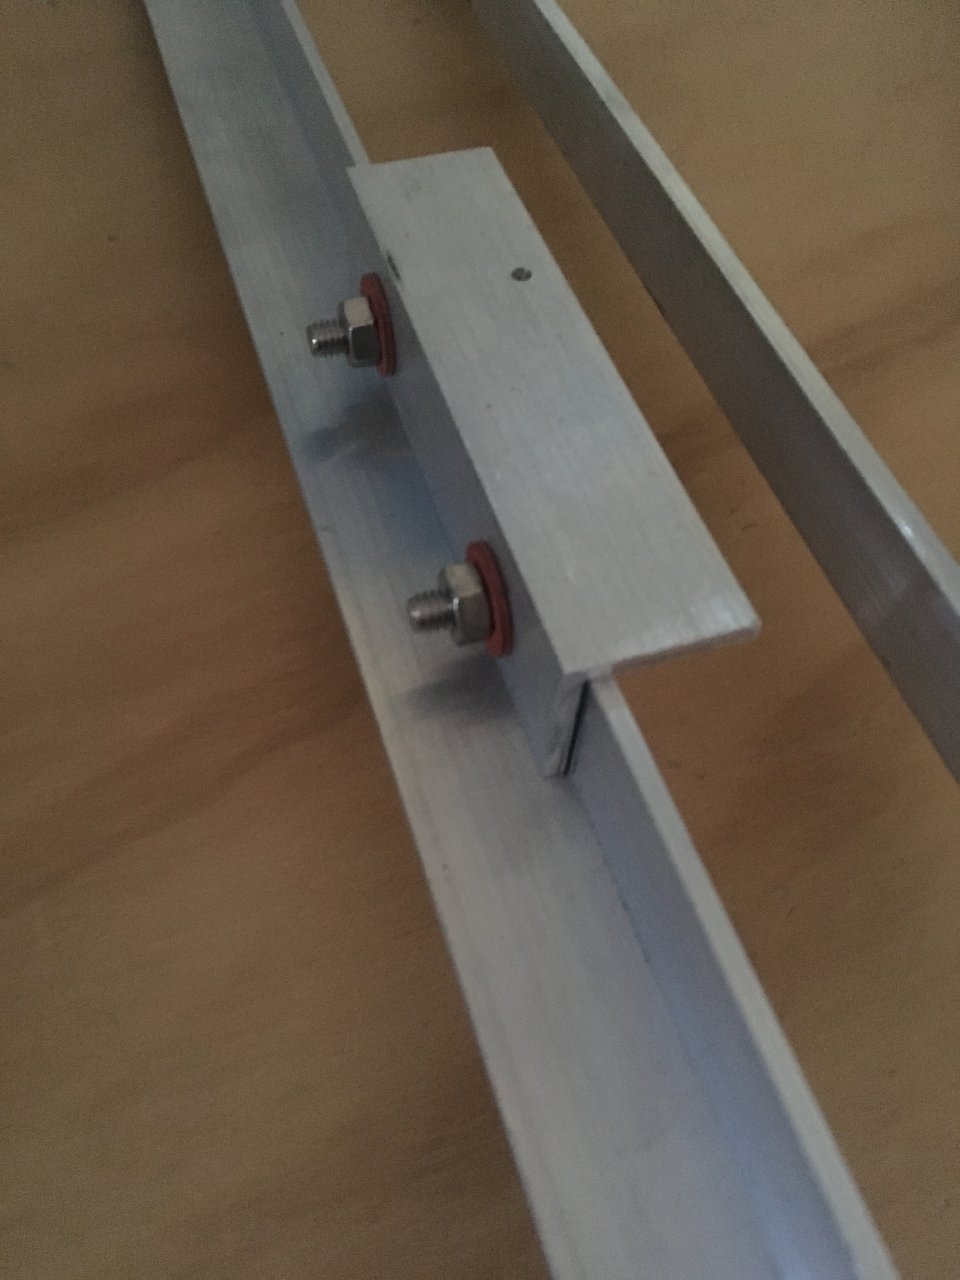
So thats 2x 3mm thick angle rails and 2 x 3mm thick angle cross pieces in the middle, creating a nice, strong form and the rest is lighter 1.5mm angle (to help reduce overall weight).
I was having trouble working out how to get the materials here and get them cut - remember that I can’t go out to stores very easily and I cannot use any of my beautiful power tools right now (2years and counting...) although I did manage to drill a little, we’ll get to that.
Anyhoo, long story short (yeah right ) I ended up finding a local steel supplier who cut my pieces to exact lengths for me I’ll never do it any other way, even when I am able to wield a power saw again. It was cheaper than buying the raw materials and doing it myself because they only charged me for what I used, no wasted off cuts! This was a great discovery - and likely for them it uses up bits of their waste, so wins all ‘round. So, I paid over the phone and a friend picked them up... and I did a quick mock up on the floor to see if it all fit together right...

All good.
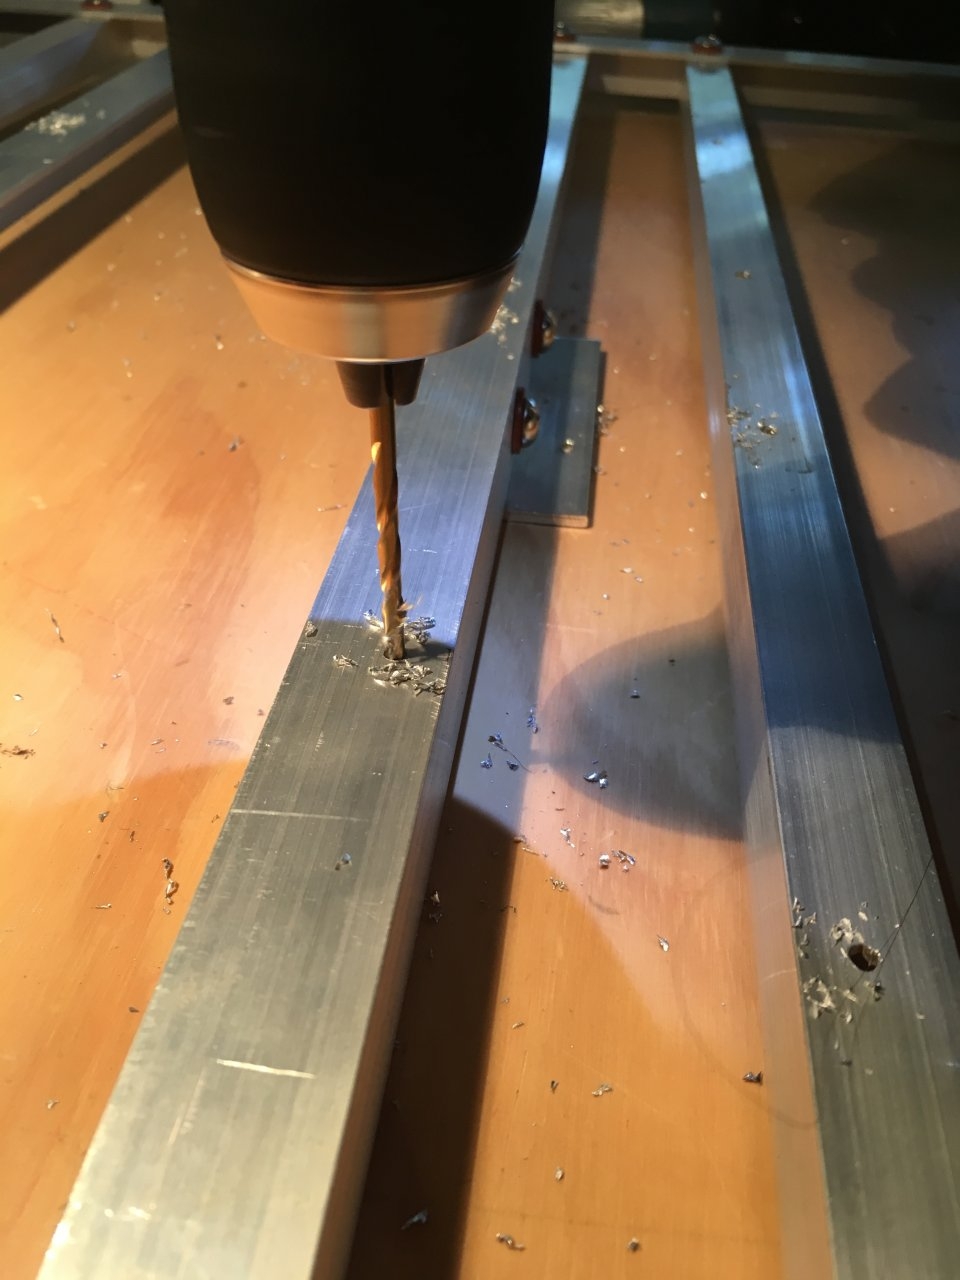
Then it was a matter of waiting until someone came around that could drill the holes for me to put the basic frame together ... my garden helper came (so I could give him some of the cured stash from our summer efforts to enjoy) and he got things going, drilling out all the holes I needed to join the frame together (and the first 6 holes for the boards...)
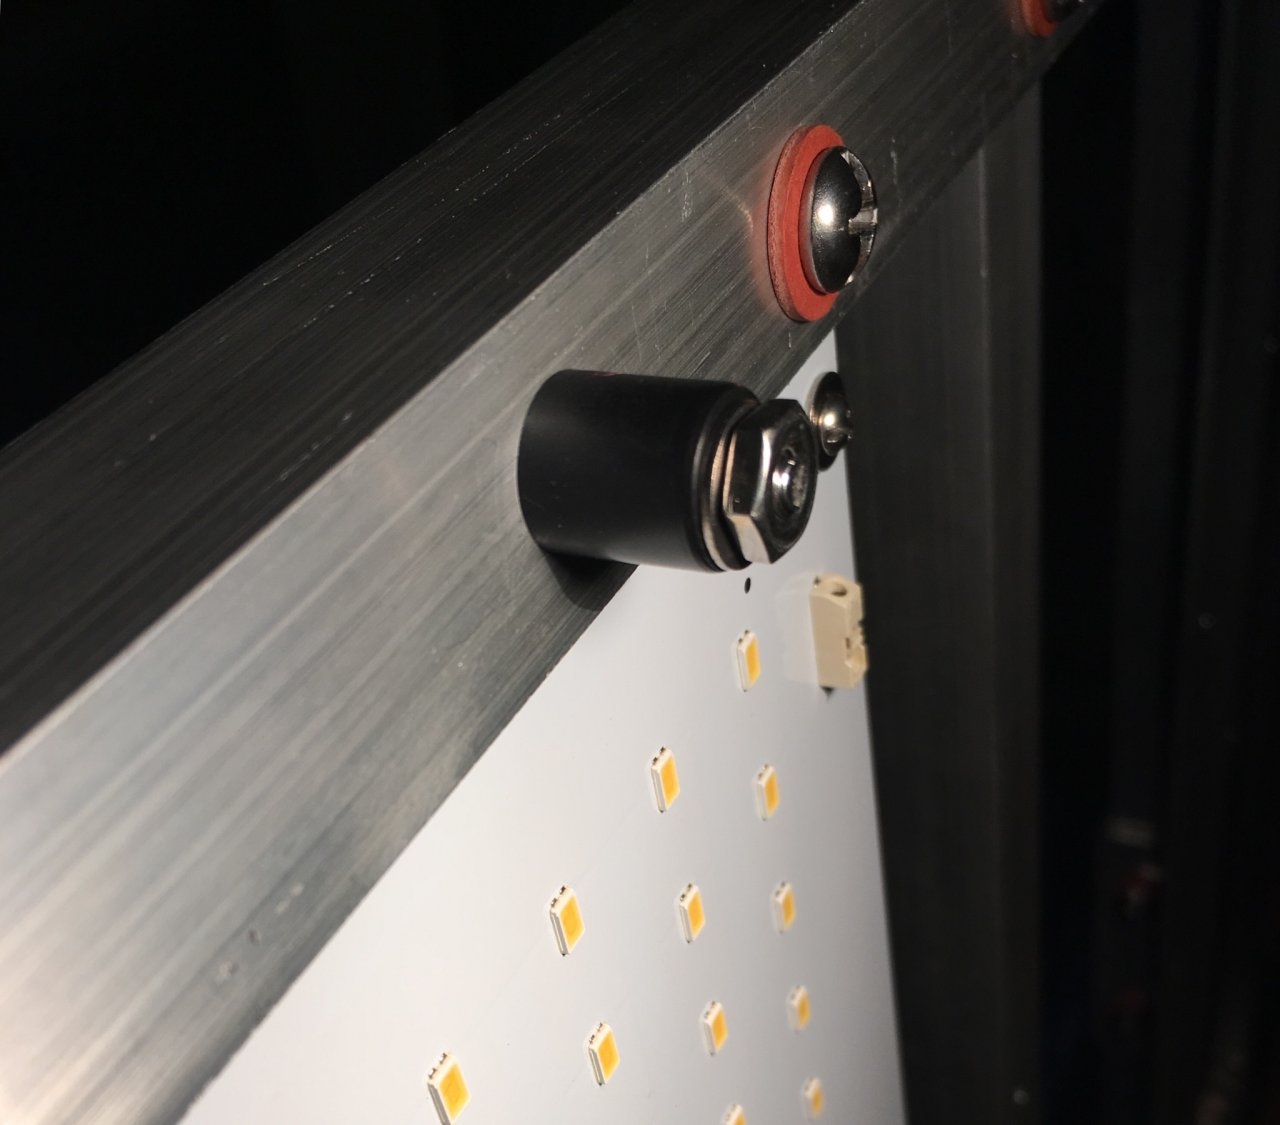
Framed... I chose some coloured non metallic washers to make it a bit pretty (and technically, seperating different metals is a good idea, but I didn’t do that everywhere as I’m sure it’s not an issue on this kind of project - mostly it was for looks) I spent about a week doing a bolt or 2 a day (seriously I’m not joking, there are periods where even that wouldn’t be possible), like the dripping of water that creates a canyon, I can assemble a frame, over time ...
Then I marked out the holes the will be needed for attaching the panels...
I decided to use tiny bolts to attach all the panels. Time consuming and fiddly? Yes, very, but down the track I’m going to be able to swap out the boards very easily (and without tearing out the screw holes if id have screwed them in). PLus, while I’ve discovered I can still weild the drill if I go really easy and don’t do too many in one day, I definitley can’t manage the driver - it;s a whole other story. So modular, with bolts!
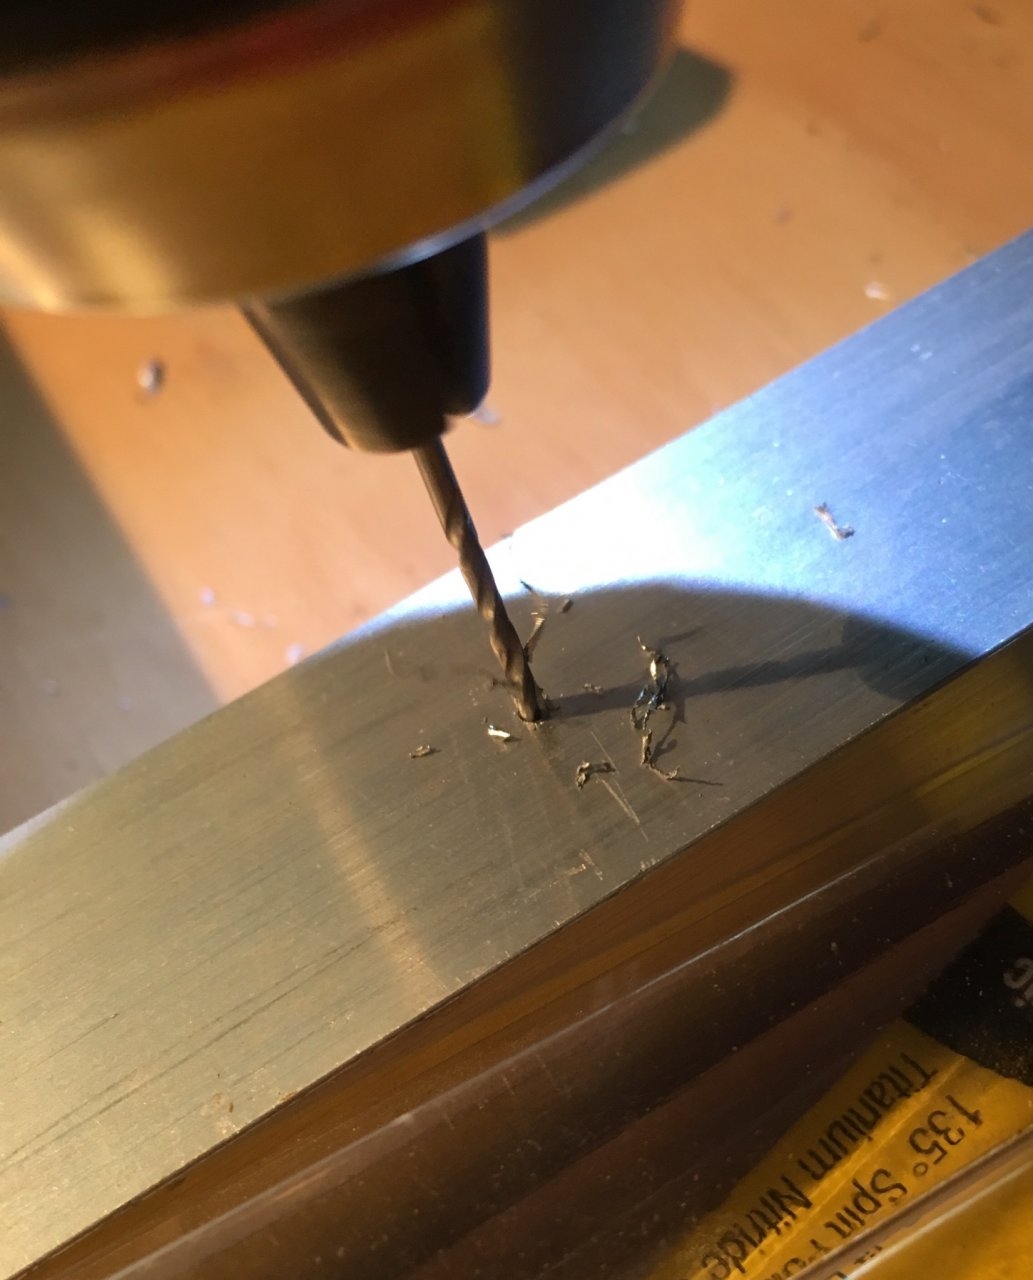
To get the holes as accurate as possible I drilled a tiny hole as close to the middle of the marks as possible and then drilled them out with the larger sized bit. Doing it this way meant more drilling but it’s less taxing on the driller and on the bits
These were taken over a period of about 2 weeks, while I slowly got all the holes done
Almost as good as a bought one! Except better cause I made it myself
I used some eye bolts to create point to hang it from (these went into thee 3mm angle) and used their length to insert some grommets underneath (left over form the mounting kit from when I wall mounted the telly - see it pays to keep things ). This means that when I need to take the light down it can be placed on the floor safely, the grommets raise the whole thing about 3/4 of an inch.
ANd finally, while I’ve been working on this, it’s been reminding me strongly of a certain childhood activity i used to adore, and that I have a set for in my shed. So I was finding the little bolts a bit tricky and remembering this kit, I had a flash of a little tool that might be helpful - so a slow walk to the shed later... does anyone recognise this?
Meccano! The greatest thing evah! Truth be told the little tool is a tad too big but it works to hold the bolt in place while I turn the screws... so too speak
So yesterday I got 2 boards attached and today I will finish off attaching the rest and wire it up. Next feature I will show that final stage and - hopefully - a working light that will blind me form a distance!
I’ve earned a toke... ... aaah better
Great days to y’all.
I have been working on this very slowly since about February. Researching and then slowly buying all the components bit by bit to spread out the cost, and then building it very very slowly over the last 2 months.
There were a few configurations considered, and originally this light was going to be for a smaller space of only 2’x2’ | 600 x 600mm. I ended up ditching the DIY tiny closet and getting a tent that is a little bigger
(Homelab, by Homebox 80x80x180cm). I already had the LED panels (5) so the extra space means I can spread them out a little bit more (it was gonna be an angled squeeze in the original space).I love to work with scale drawings and scaled movable pieces when designing something... there are numerous versions of this with the panels arranged differently but this is the final one (except I drew the panels in from the sides a few centimetres
I am super stoked to discover that I can still build things even though I have to do pretty much everything from my bed! It just takes planning and help (ie borrowed muscle) at cruicial points along the way.
I had great fun drawing up the design... (there are diff coloured dots for different types of bolts
I’m a details person). This is the final drawing showing the construction, materials, dimensions and also the wiring plan So thats 2x 3mm thick angle rails and 2 x 3mm thick angle cross pieces in the middle, creating a nice, strong form and the rest is lighter 1.5mm angle (to help reduce overall weight).
I was having trouble working out how to get the materials here and get them cut - remember that I can’t go out to stores very easily and I cannot use any of my beautiful power tools right now (2years and counting...) although I did manage to drill a little, we’ll get to that.
Anyhoo, long story short (yeah right
) I ended up finding a local steel supplier who cut my pieces to exact lengths for me I’ll never do it any other way, even when I am able to wield a power saw again. It was cheaper than buying the raw materials and doing it myself because they only charged me for what I used, no wasted off cuts! This was a great discovery - and likely for them it uses up bits of their waste, so wins all ‘round. So, I paid over the phone and a friend picked them up... and I did a quick mock up on the floor to see if it all fit together right...All good.
Then it was a matter of waiting until someone came around that could drill the holes for me to put the basic frame together ... my garden helper came (so I could give him some of the cured stash from our summer efforts to enjoy) and he got things going, drilling out all the holes I needed to join the frame together (and the first 6 holes for the boards...)
Framed... I chose some coloured non metallic washers to make it a bit pretty (and technically, seperating different metals is a good idea, but I didn’t do that everywhere as I’m sure it’s not an issue on this kind of project - mostly it was for looks)
I spent about a week doing a bolt or 2 a day (seriously I’m not joking, there are periods where even that wouldn’t be possible), like the dripping of water that creates a canyon, I can assemble a frame, over time ...Then I marked out the holes the will be needed for attaching the panels...
I decided to use tiny bolts to attach all the panels. Time consuming and fiddly? Yes, very, but down the track I’m going to be able to swap out the boards very easily (and without tearing out the screw holes if id have screwed them in). PLus, while I’ve discovered I can still weild the drill if I go really easy and don’t do too many in one day, I definitley can’t manage the driver - it;s a whole other story. So modular, with bolts!
To get the holes as accurate as possible I drilled a tiny hole as close to the middle of the marks as possible and then drilled them out with the larger sized bit. Doing it this way meant more drilling but it’s less taxing on the driller and on the bits
These were taken over a period of about 2 weeks, while I slowly got all the holes done
Almost as good as a bought one! Except better cause I made it myself
I used some eye bolts to create point to hang it from (these went into thee 3mm angle) and used their length to insert some grommets underneath (left over form the mounting kit from when I wall mounted the telly - see it pays to keep things
). This means that when I need to take the light down it can be placed on the floor safely, the grommets raise the whole thing about 3/4 of an inch.ANd finally, while I’ve been working on this, it’s been reminding me strongly of a certain childhood activity i used to adore, and that I have a set for in my shed. So I was finding the little bolts a bit tricky and remembering this kit, I had a flash of a little tool that might be helpful - so a slow walk to the shed later... does anyone recognise this?
Meccano! The greatest thing evah!
Truth be told the little tool is a tad too big but it works to hold the bolt in place while I turn the screws... so too speak So yesterday I got 2 boards attached and today I will finish off attaching the rest and wire it up. Next feature I will show that final stage and - hopefully - a working light that will blind me form a distance!
I’ve earned a toke...
... aaah better Great days to y’all.
Aaaand we're back to the amazing Amy tutorials! Well done and it looks beautiful. 
Here...you'll need these .
.
Here...you'll need these
.I saw toe toes....
KeifKeith
Well-Known Member
Great start, look at you go Amy! You are using steel or aluminum? Looks like extruded aluminum but maybe Australian metal looks different
Looking forward to your finished DIY LED panel.
Peace
Keith
Looking forward to your finished DIY LED panel.
Peace
Keith
- Thread starter
- #53
cover thy eyes!!!I saw toe toes....

Great start, look at you go Amy! You are using steel or aluminum? Looks like extruded aluminum but maybe Australian metal looks different
Looking forward to your finished DIY LED panel.
Peace
Keith
Thanks Keith, I’m looking forward to it as well. Hoping it’s going to be today... I’m racing against the seed... which I havent even checked yet today...
And
to my humble corner of the mag, it’s good to have you along. Shed and I have have a couple of bands going, we should have a jam sometime 
No,..i said no,..i like toe toes, and feet,...and other stuff....
- Thread starter
- #55
It’s funny you know, I dont set out with the sole purpose or intention of being “educational”. All i’m doing is sharing my process and the journey of doing stuff and often (usually) that involves me learning stuff, so that’s what comes through i guess... But really, it’s just that I want to share every detail of what I do that is related to growing cannabis, and not many people in real life really care much about it so it all comes out here!!

- Thread starter
- #56
Just as well I edited it then... there were feet AND other stuff in there beforeNo,..i said no,..i like toe toes, and feet,...and other stuff....
Great evenin to ya Duggs
Amy, hats off to ya woman,..yes, this is exactly what u should be doing,..here, sharing your experiences, we learn from each other. Lots of tips , tricks and very useful info goes around , these parts, now you have a lil tutorial , building an economic lighting solution. Great job woman...
No,..i said no,..i like toe toes, and feet,...and other stuff....

- Thread starter
- #59
Cheers Duggs - i’m Following in the footsteps of some greats who’ve gone before me. I was trying to save up for an HLG kit when some excellent folks round here steered me to some more economical options (thanks dynamo1 and Graytail).
I’ll post a final cost once the thing is lighting up the tent!
DIY indoor sun! Building the frame...
I have been working on this very slowly since about February. Researching and then slowly buying all the components bit by bit to spread out the cost, and then building it very very slowly over the last 2 months.
There were a few configurations considered, and originally this light was going to be for a smaller space of only 2’x2’ | 600 x 600mm. I ended up ditching the DIY tiny closet and getting a tent that is a little bigger
I love to work with scale drawings and scaled movable pieces when designing something... there are numerous versions of this with the panels arranged differently but this is the final one (except I drew the panels in from the sides a few centimetres
I am super stoked to discover that I can still build things even though I have to do pretty much everything from my bed! It just takes planning and help (ie borrowed muscle) at cruicial points along the way.
I had great fun drawing up the design... (there are diff coloured dots for different types of bolts
So thats 2x 3mm thick angle rails and 2 x 3mm thick angle cross pieces in the middle, creating a nice, strong form and the rest is lighter 1.5mm angle (to help reduce overall weight).
I was having trouble working out how to get the materials here and get them cut - remember that I can’t go out to stores very easily and I cannot use any of my beautiful power tools right now (2years and counting...) although I did manage to drill a little, we’ll get to that.
Anyhoo, long story short (yeah right
View media item 1582252
All good.
Then it was a matter of waiting until someone came around that could drill the holes for me to put the basic frame together ... my garden helper came (so I could give him some of the cured stash from our summer efforts to enjoy) and he got things going, drilling out all the holes I needed to join the frame together (and the first 6 holes for the boards...)
Framed... I chose some coloured non metallic washers to make it a bit pretty (and technically, seperating different metals is a good idea, but I didn’t do that everywhere as I’m sure it’s not an issue on this kind of project - mostly it was for looks)
Then I marked out the holes the will be needed for attaching the panels...
I decided to use tiny bolts to attach all the panels. Time consuming and fiddly? Yes, very, but down the track I’m going to be able to swap out the boards very easily (and without tearing out the screw holes if id have screwed them in). PLus, while I’ve discovered I can still weild the drill if I go really easy and don’t do too many in one day, I definitley can’t manage the driver - it;s a whole other story. So modular, with bolts!
To get the holes as accurate as possible I drilled a tiny hole as close to the middle of the marks as possible and then drilled them out with the larger sized bit. Doing it this way meant more drilling but it’s less taxing on the driller and on the bits
These were taken over a period of about 2 weeks, while I slowly got all the holes done
Almost as good as a bought one! Except better cause I made it myself
I used some eye bolts to create point to hang it from (these went into thee 3mm angle) and used their length to insert some grommets underneath (left over form the mounting kit from when I wall mounted the telly - see it pays to keep things
ANd finally, while I’ve been working on this, it’s been reminding me strongly of a certain childhood activity i used to adore, and that I have a set for in my shed. So I was finding the little bolts a bit tricky and remembering this kit, I had a flash of a little tool that might be helpful - so a slow walk to the shed later... does anyone recognise this?
Meccano! The greatest thing evah!
So yesterday I got 2 boards attached and today I will finish off attaching the rest and wire it up. Next feature I will show that final stage and - hopefully - a working light that will blind me form a distance!
I’ve earned a toke...
Great days to y’all.
People on this forum.....like YOU....are so damn interesting and capable! I'm always impressed with the stuff people do....making your own lights! wow!