The Proper Way To Water A Potted Plant

This was a very awesome read with a lot of good info!! Thanks for the tips and the info! As far as my light yah I know it’s said it’s a 800w but I think the true watts are 240w. At least from what I can tell.
Glad it helped @Mrgrowit77! Welcome to our forum! I hope you stick around for a while! :welcome:
 
Flowering addendum:


It seems upon gaining more knowledge and experience; I have found that my watering guide is lacking a complete explanation of the process all the way from seed to harvest. Although everything said above is valid in veg, there is a point in the grow where things must change in order to give the plants everything that they want. Also, this watering discussion was meant to cover all container grows, but upon more experimentation with cloth grow bags (smart pots and the various clones) it became clear that the rules change a bit when using these cloth bags. Instead of adding a qualifier that this watering guide is only valid in hard sided containers, I decided to cover what happens in smart pots too.


First, let’s look at our goals in veg. We are attempting to build as big and robust of a plant as we can to take to flower, and we do this by concentrating on developing a strong rootball. We tease out the watering and entice the plant to grow more roots, by forcing the plants to find the last bit of water on every wet/dry cycle. There is an adage in the plant (and coincidentally in the metaphysical world) that says, “As above, so below.” We can interpret this to mean that as long as the plant is growing in width and height, so are the roots. When we flip to bloom, the plants dramatically stretch, and of course, the roots below are also stretching. There is a point however, about 2 weeks into bloom when all this stretching stops, TOP AND BOTTOM.


ShiggityFlip coined the adage first, and I now use this to explain the bloom part of watering. We build roots in Veg and use them in flower. – ShiggityFlip


As soon as the goal is no longer to grow new roots and the vertical and horizontal growth of the plant has mostly stopped, it is then time to USE those roots. I have found that my plants thrive best in bloom when I switch gears and stop trying to dry them out, and instead try to keep them damp inside the core of the rootball. I finally give credit to the knuckle waterers, and concede that when in bloom, when the top roots dry out, it is time to water.


Smart Pots:
It is also clear that to completely cover container watering, we have smart pots to consider. If you use these bags correctly, by allowing air flow on all sides, including the bottom, amazing things happen. First, the rootball produced in one of these bags is far superior to anything else I have been able to produce in a hard sided container, whether they be round, octagonal, square… air pruning works. Because you get more roots and better air absorption, your plants go crazy in one of these bags if you let them. I find that I am watering every other day in 5 and 7 gallon smart bags, and the plants are taking 90% of what they would have taken if I had allowed them to dry out completely in 4 or 5 days. Water use has exploded in my tent in bloom, and by keeping up with it, reading the plants and giving them what they ask for, I have the biggest and healthiest buds that I have ever seen at this point in a grow. For flower, I find that I have to modify the lift method, and change it to not waiting for feather light as we do in veg, but in just becoming “lighter.” After two days, popping my finger in the top to the middle knuckle confirms that the top root mass has become dry, and with those two criteria met, I water to runoff. At the present time, my 6 plants are using about 25 gallons of water a week, at least twice what I have ever given my plants.


Summary:
So, no matter the type and size of container, watering needs change once bloom has started and the stretch has ended. Don’t be afraid to water more often in flower. If you keep letting her dry out, she can handle that too, because she is a weed, but if you really want to see her thrive, “use” those roots in flower, and give her all the water she can take. This doesn’t mean watering 5 times a day every day… she can’t take that much… but if you have done well, flowering roots can take a lot more water than vegging roots can. Change the equation that is valid in veg, that wilting is better than overwatering, and try instead to give water every time the top and sides dry out and the lift method tells you that “most” of the water is gone,. You WILL see the difference.
Great Read...............Thanks
 
The Proper Way to Water a Potted Plant
Also covered: the importance of pH and why we successively up-pot


How to Water
Over the last several years I have put a lot of study into this, and I feel that I can now define the proper way to water a potted plant. Keep in mind that this discussion applies to at least 3 gallon containers and bigger. Please realize that this special plant of ours does not grow like anything else you have ever tried to grow, and no matter how good you are at growing peas, beans and tomatoes, you will have to change your methods to grow a weed.


The first rule of watering is to always water slowly, using no more than a quart at a time, pausing often to let the soil suck air in behind the water as it pools on the top. For me, that involves a routine of watering each of my plants with 1 quart, then taking a nice relaxing drink of whatever beverage I have brought with me to the tent. Then I take a deep breath, making sure to exhale deeply onto this plant, letting her know that I love her. After this, I take a nice big hit off of the pipe that also followed me into the tent, and then after a nice pause and maybe another drink, I go back to plant #1 and repeat the cycle. For 2 rounds, I water the entire surface of the soil, watching it pool up and get sucked down.


After this initial wetting of the top, my watering method changes a bit. Now, I want to do whatever I can to make the outside edges of the container, the wettest areas. Still only using a quart at a time, I now carefully water only there, all around the plant, only on the edges. While doing this, I slow down a bit so that the water doesn't pool as much in the center, always concentrating on the edges. The center will end up getting some too, and that's fine, but the wettest areas of the pot will be on the outside edges and you will be driving nutrient rich soil into the dense original root ball. Continue this, again going slow, maybe with a deep breath in the middle of it, and then continue all around, taking drinks, deep breaths and hits in between each round. Continue until you see the first signs of runoff, and then stop.


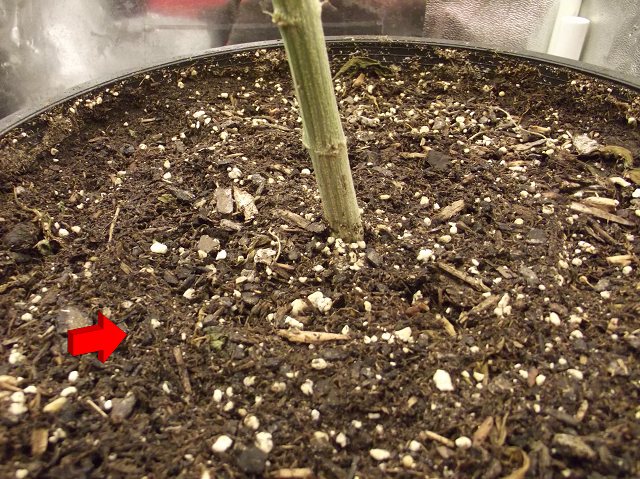
Look carefully at the surface of your container now. You will clearly see where the root ball is from your last transplant, because it will now be sticking up just a little bit above the original outer rim. Very fine soil has been driven through the original root ball with the flow of water and soil from the outer edges. This micro fine soil is very rich with nutrients because of its mobility. When you water from the outside edges, you force this micro fine sludge into the dense root ball, where it can do the most good. Once you establish this flow pattern in the container, you can be assured of totally replacing the micro soil in the center of the root ball with new soil, every time you water. Watering in the normal way does not create his circular flow, and root growth cannot be nearly as aggressive.
soil_with_arrow_640_1_.png

Lastly, take one last quart of water, and water very very slowly, just in the raised area where the original root ball is. As you do so, watch what happens at the outer edge of the original root ball.

You will see the very finest soil, almost a mud, migrating out of the old root ball, and into the middle! This completes the process of soil exchange in the container. In this manner, all the roots get to take advantage of the nutrients in the soil, and the roots follow the migration of the nutrient rich soil, toward the outer edges, creating lateral growth. I strive to actively drive the soil out of the middle, making room for the roots to grow more dense and bigger there, and as they do, the lateral growth also has to increase. Using this method, I have seen a steady increase in the amount of water needed to get to run off throughout the grow and by the end, plants watered in this way use approximately 30% more water than is seen using standard watering techniques. Watering in the manner I have described allows for a constant circular flow of soil throughout the container and will create an extremely dense root ball.
proper_potted_plant_number_2.jpg


Now it is time for a truism. It is best to water the roots, not the plant. A healthy and robust root system means a happy and productive plant. Neglect the roots and your plants can die, and certainly will be less than they could have been.

When do we water?
By far, one of the most common plant problems that I see with new gardeners is a lack of understanding as to when to water. New people get it set in their mind that watering every day or every other day is best, or that somehow, mysteriously, they know in their own human minds exactly how much water the plants need. These well-meaning new gardeners will determine that they will give exactly one quart or some other random amount, each time, no more... and no less, and really believe that they are doing a good thing for their plants, making these decisions for them.
Just as bad as these over-thinkers are the tomato gardeners, the "stick your finger in the ground" crowd, who proclaim: it's time to water when it is dry below the second knuckle. What they fail to realize is that when the top 2 inches is dry, the lower half of the container could still be saturated with water. Both of these common mistakes in watering methods are quick ways to drown your plants. These methods are not correct for growing weeds, and using them can actually kill your plants.


Marijuana is a weed, and the main thing that this scientific term refers to, is a class of plant that thrives in adversity. In order to grow it well, you need to understand that this incredibly robust plant works differently than other, less hardy plants. It is an extremely aggressive grower if you allow it to be, and to grow prize winning pot, you need to use its abilities to send out new roots to your advantage.


Watering incorrectly is the most common mistake that new weed farmers make. This plant needs a clear wet/dry cycle in order to thrive. If you keep it moist, you will kill it. The roots will aggressively chase your water, whatever you give them. If you just give a small amount every couple of days, that water will drop right to the bottom of the container. Your roots will follow, and will cluster on the bottom, instead of growing laterally throughout the container, and since they continually sit in the nutrient rich water, the plant sees little need to grow additional roots. How you water makes a huge difference in the formation of the root ball, and how this development happens is up to you.


There are many ways to tell when it is time to water, and if you wait long enough the girls will actually tell you that they are thirsty. They do two things when they see that they need water, they throw out a smell, and they begin to wilt, starting at the bottom, moving up. You can also use the lift method to tell when the container is dry, and almost always you will "feel" a dry container, before the above mentioned wilt and fragrance pump happens. Rusty Trichome taught me an important lesson; every time I think that I need to do something to my plants, I wait a bit... and I try to move at the speed that my plants are moving. "Patience, above all else." --Rusty


If you have a moisture meter you can also use it to find where the wet/dry (water table) line is in your container, and you can watch that wet/dry line move down over time. I used to graph my water table level by day, so that I could project ahead when the wet dry line would reach the last inch of container. Your wet/dry line will never go lower than that last inch or so, because once you get down in there, you are in all the big tap roots and mass at the bottom, and it tends to stay wet there longer because of capillary effect. Again, if you wait for the first sign of wilt and that perfume pump that happens at "water me" point, it will usually be just a bit longer than your measurements would indicate. Once the water table line is anywhere in that bottom inch is ok to water. You have dried out 95% of the water by that time and the roots have been chasing it as the wet/dry line progresses both downward and outward. The suction caused by the diaphragm that is the water table, will have pulled oxygen down deep into the container, and filled any voids. The roots will be happy.


Why do we up-pot?
The art of successive up-potting is important in growing a healthy root system. People like to be lazy. I am constantly seeing new gardeners take a little sprig of a weed and put it in a big 3 or 5 gallon container, thinking that they have done a good thing, and are now done with it... it's on to harvest time! The problem is, this doesn't work, because it gives you zero control over developing the roots, and without crazy watering techniques, almost no chance of a solid root ball forming. It is imperative to successively up pot your plants through stages so that the root system can roughly take on the same size and shape as the plant in order to get the maximum productivity. The roots grow aggressively in these weeds, and if you confine them to a container the size of the plant, they will fill that space in a short time with a dense root system. Putting a plant in an oversized container can and often does, result in all the roots going to the bottom, drowning the plant, root rot and overall poor health because of a lack of a root ball, and certainly less than optimum harvests. It is important to force these weeds into producing a root ball at various stages, to give the plant the ability later on to take in the massive amounts of nutrients needed to produce lots of quality buds.
The plants in the smaller containers can also more directly show you when they are thriving or more importantly when they are not. A strong healthy plant will eventually outgrow its container and an observant gardener is carefully watching the length of time between wet/dry cycles, and directly relating shorter cycles with more robust roots. A smaller container also gives the gardener the ability to see when the moment arrives that the amount of soil the plant is in is no longer large enough for the plant's abilities to be happy in it, because it will be obvious when the plant can drain the water that soil is able to hold, in less than 24 hours. Your soil and your container at that point have ceased at that point to be a good enough buffer, and it is time to double the space the roots have to work with. Let your plant show you when that time is, and try not to make decisions for her.


Why is pH important?
Some people claim that pH is not important, and if you are a pure organic gardener, never applying chlorinated water or salt based synthetic nutrients at your plants, pH indeed is not important. For the 99.9% rest of the world, a very important lesson for the new gardener to learn is the importance of pH. There is a scientific reason why a proper pH allows the plants to use synthetic nutrients, and why being outside of the proper range can cause deficiencies. If you want to grow pot using chemicals, you need to invest in a method to test the pH of any water going into the plant, whether it is plain water or water mixed with nutrients, and whether it is applied to the roots or sprayed on the leaves. If you neglect the pH, you can easily create deficiencies in your plants, and if left unchecked, you can even kill them. If you spend a lot of money on nutrients, it makes sense that you would want to also create the proper environment so that the plant can use these nutrients, but with a pH way out of the 6.3-6.8 range in soil, a lot of those expensive nutrients will just sit there, not doing the plant any good. If you are in a soilless mix, pH in the range of 5.5-6.1 is necessary. It is only within these ranges that all the nutrients are mobile, are able to be broken free of their salt bonds and be in the form that can go into the plants. Most soils and systems are designed so that you can apply liquids at a lower pH and then the soil or the soilless mix causes a drift, so that the pH can visit each spot in the usable pH range for that medium, and all of the 17 needed nutrients will be picked up, each in its turn.


I hope that this study on containers, watering and pH helps someone who reads it. This paper was a result of having to explain these same concepts over and over and over again to new growers at they hit the forums, until finally I put all these thoughts together into this paper. Some of the thoughts previously given have also been refined for this publication, as questions were asked and answered the last time I posted it, and I have learned better ways of explaining my thoughts. Here, I give you, approximately draft 10 of this paper.


Be well everyone and blessings from my garden to yours,
Sense Emilya
I only pot once. Straight from cloner to 5 gallon pot/ bucket with holes drilled in bottom for drainage. Remove chance of transplant shock. Watering I stick my finger in dirt up to second knuckle daily. If it feels dry I water. If it's damp I leave it be. Even in the day when I grew outside in pots I did same accept I used actual seedlings instead of clones.
 
I only pot once. Straight from cloner to 5 gallon pot/ bucket with holes drilled in bottom for drainage. Remove chance of transplant shock. Watering I stick my finger in dirt up to second knuckle daily. If it feels dry I water. If it's damp I leave it be. Even in the day when I grew outside in pots I did same accept I used actual seedlings instead of clones.
You are doing everything wrong and yet you still have success.... this is a tribute to just how adaptable and resilient these weeds are as well as to your personal skills as a gardner. I suspect you could get better harvests if you changed your methods, but what you have going works for you and I am not going to criticize... it is just not how I am going to advise new growers to do things. Your methods simply will not work for everyone, because you simply have a knack for making it happen. Consider yourself lucky, but I am not going to endorse your method as the proper way to do things because others might get in trouble trying to follow your methods. My way works well every time, and since you have never done a side by side test of your seat of the pants methods compared to mine, you will never know what you are missing.
 
Another greenhorn come to pay tribute to the Guru of watering. Excellent write up. I've reread it 4-5 times now.

I'm going to have to reread it again to see what I missed on using additives (natural stuff). Though I'd swear it read like you don't generally use them because this technique maximizes the soils potential.
Hi @FRage93 and welcome to the forum! :welcome:
If you are looking for my recipes for organic natural nutrients, please click on my links link in my signature lines. There you will find several recipes to make nutrients that can work along with a natural organic grow.
This question as to what specifically to add with the water depends entirely on the particular method of growing you have chosen, so the subject of using additives was not covered in this thread. When I first wrote this article I was using regular commercial organic soil in a FoxFarm Ocean Forest and Fox Farm nutrients grow. Now I use no commercial nutrients but instead use a highly mineralized home mixed organic soil that provides everything the plants need, so I no longer use any regular nutrients, but I do use some supplemental natural nutrients in addition to what the soil provides. The watering method described above however has not changed in any way for either of the widely different soil growing methods.
 
The Proper Way to Water a Potted Plant
Also covered: the importance of pH and why we successively up-pot


How to Water
Over the last several years I have put a lot of study into this, and I feel that I can now define the proper way to water a potted plant. Keep in mind that this discussion applies to at least 3 gallon containers and bigger. Please realize that this special plant of ours does not grow like anything else you have ever tried to grow, and no matter how good you are at growing peas, beans and tomatoes, you will have to change your methods to grow a weed.


The first rule of watering is to always water slowly, using no more than a quart at a time, pausing often to let the soil suck air in behind the water as it pools on the top. For me, that involves a routine of watering each of my plants with 1 quart, then taking a nice relaxing drink of whatever beverage I have brought with me to the tent. Then I take a deep breath, making sure to exhale deeply onto this plant, letting her know that I love her. After this, I take a nice big hit off of the pipe that also followed me into the tent, and then after a nice pause and maybe another drink, I go back to plant #1 and repeat the cycle. For 2 rounds, I water the entire surface of the soil, watching it pool up and get sucked down.


After this initial wetting of the top, my watering method changes a bit. Now, I want to do whatever I can to make the outside edges of the container, the wettest areas. Still only using a quart at a time, I now carefully water only there, all around the plant, only on the edges. While doing this, I slow down a bit so that the water doesn't pool as much in the center, always concentrating on the edges. The center will end up getting some too, and that's fine, but the wettest areas of the pot will be on the outside edges and you will be driving nutrient rich soil into the dense original root ball. Continue this, again going slow, maybe with a deep breath in the middle of it, and then continue all around, taking drinks, deep breaths and hits in between each round. Continue until you see the first signs of runoff, and then stop.


Look carefully at the surface of your container now. You will clearly see where the root ball is from your last transplant, because it will now be sticking up just a little bit above the original outer rim. Very fine soil has been driven through the original root ball with the flow of water and soil from the outer edges. This micro fine soil is very rich with nutrients because of its mobility. When you water from the outside edges, you force this micro fine sludge into the dense root ball, where it can do the most good. Once you establish this flow pattern in the container, you can be assured of totally replacing the micro soil in the center of the root ball with new soil, every time you water. Watering in the normal way does not create his circular flow, and root growth cannot be nearly as aggressive.
soil_with_arrow_640_1_.png

Lastly, take one last quart of water, and water very very slowly, just in the raised area where the original root ball is. As you do so, watch what happens at the outer edge of the original root ball.

You will see the very finest soil, almost a mud, migrating out of the old root ball, and into the middle! This completes the process of soil exchange in the container. In this manner, all the roots get to take advantage of the nutrients in the soil, and the roots follow the migration of the nutrient rich soil, toward the outer edges, creating lateral growth. I strive to actively drive the soil out of the middle, making room for the roots to grow more dense and bigger there, and as they do, the lateral growth also has to increase. Using this method, I have seen a steady increase in the amount of water needed to get to run off throughout the grow and by the end, plants watered in this way use approximately 30% more water than is seen using standard watering techniques. Watering in the manner I have described allows for a constant circular flow of soil throughout the container and will create an extremely dense root ball.
proper_potted_plant_number_2.jpg


Now it is time for a truism. It is best to water the roots, not the plant. A healthy and robust root system means a happy and productive plant. Neglect the roots and your plants can die, and certainly will be less than they could have been.

When do we water?
By far, one of the most common plant problems that I see with new gardeners is a lack of understanding as to when to water. New people get it set in their mind that watering every day or every other day is best, or that somehow, mysteriously, they know in their own human minds exactly how much water the plants need. These well-meaning new gardeners will determine that they will give exactly one quart or some other random amount, each time, no more... and no less, and really believe that they are doing a good thing for their plants, making these decisions for them.
Just as bad as these over-thinkers are the tomato gardeners, the "stick your finger in the ground" crowd, who proclaim: it's time to water when it is dry below the second knuckle. What they fail to realize is that when the top 2 inches is dry, the lower half of the container could still be saturated with water. Both of these common mistakes in watering methods are quick ways to drown your plants. These methods are not correct for growing weeds, and using them can actually kill your plants.


Marijuana is a weed, and the main thing that this scientific term refers to, is a class of plant that thrives in adversity. In order to grow it well, you need to understand that this incredibly robust plant works differently than other, less hardy plants. It is an extremely aggressive grower if you allow it to be, and to grow prize winning pot, you need to use its abilities to send out new roots to your advantage.


Watering incorrectly is the most common mistake that new weed farmers make. This plant needs a clear wet/dry cycle in order to thrive. If you keep it moist, you will kill it. The roots will aggressively chase your water, whatever you give them. If you just give a small amount every couple of days, that water will drop right to the bottom of the container. Your roots will follow, and will cluster on the bottom, instead of growing laterally throughout the container, and since they continually sit in the nutrient rich water, the plant sees little need to grow additional roots. How you water makes a huge difference in the formation of the root ball, and how this development happens is up to you.


There are many ways to tell when it is time to water, and if you wait long enough the girls will actually tell you that they are thirsty. They do two things when they see that they need water, they throw out a smell, and they begin to wilt, starting at the bottom, moving up. You can also use the lift method to tell when the container is dry, and almost always you will "feel" a dry container, before the above mentioned wilt and fragrance pump happens. Rusty Trichome taught me an important lesson; every time I think that I need to do something to my plants, I wait a bit... and I try to move at the speed that my plants are moving. "Patience, above all else." --Rusty


If you have a moisture meter you can also use it to find where the wet/dry (water table) line is in your container, and you can watch that wet/dry line move down over time. I used to graph my water table level by day, so that I could project ahead when the wet dry line would reach the last inch of container. Your wet/dry line will never go lower than that last inch or so, because once you get down in there, you are in all the big tap roots and mass at the bottom, and it tends to stay wet there longer because of capillary effect. Again, if you wait for the first sign of wilt and that perfume pump that happens at "water me" point, it will usually be just a bit longer than your measurements would indicate. Once the water table line is anywhere in that bottom inch is ok to water. You have dried out 95% of the water by that time and the roots have been chasing it as the wet/dry line progresses both downward and outward. The suction caused by the diaphragm that is the water table, will have pulled oxygen down deep into the container, and filled any voids. The roots will be happy.


Why do we up-pot?
The art of successive up-potting is important in growing a healthy root system. People like to be lazy. I am constantly seeing new gardeners take a little sprig of a weed and put it in a big 3 or 5 gallon container, thinking that they have done a good thing, and are now done with it... it's on to harvest time! The problem is, this doesn't work, because it gives you zero control over developing the roots, and without crazy watering techniques, almost no chance of a solid root ball forming. It is imperative to successively up pot your plants through stages so that the root system can roughly take on the same size and shape as the plant in order to get the maximum productivity. The roots grow aggressively in these weeds, and if you confine them to a container the size of the plant, they will fill that space in a short time with a dense root system. Putting a plant in an oversized container can and often does, result in all the roots going to the bottom, drowning the plant, root rot and overall poor health because of a lack of a root ball, and certainly less than optimum harvests. It is important to force these weeds into producing a root ball at various stages, to give the plant the ability later on to take in the massive amounts of nutrients needed to produce lots of quality buds.
The plants in the smaller containers can also more directly show you when they are thriving or more importantly when they are not. A strong healthy plant will eventually outgrow its container and an observant gardener is carefully watching the length of time between wet/dry cycles, and directly relating shorter cycles with more robust roots. A smaller container also gives the gardener the ability to see when the moment arrives that the amount of soil the plant is in is no longer large enough for the plant's abilities to be happy in it, because it will be obvious when the plant can drain the water that soil is able to hold, in less than 24 hours. Your soil and your container at that point have ceased at that point to be a good enough buffer, and it is time to double the space the roots have to work with. Let your plant show you when that time is, and try not to make decisions for her.


Why is pH important?
Some people claim that pH is not important, and if you are a pure organic gardener, never applying chlorinated water or salt based synthetic nutrients at your plants, pH indeed is not important. For the 99.9% rest of the world, a very important lesson for the new gardener to learn is the importance of pH. There is a scientific reason why a proper pH allows the plants to use synthetic nutrients, and why being outside of the proper range can cause deficiencies. If you want to grow pot using chemicals, you need to invest in a method to test the pH of any water going into the plant, whether it is plain water or water mixed with nutrients, and whether it is applied to the roots or sprayed on the leaves. If you neglect the pH, you can easily create deficiencies in your plants, and if left unchecked, you can even kill them. If you spend a lot of money on nutrients, it makes sense that you would want to also create the proper environment so that the plant can use these nutrients, but with a pH way out of the 6.3-6.8 range in soil, a lot of those expensive nutrients will just sit there, not doing the plant any good. If you are in a soilless mix, pH in the range of 5.5-6.1 is necessary. It is only within these ranges that all the nutrients are mobile, are able to be broken free of their salt bonds and be in the form that can go into the plants. Most soils and systems are designed so that you can apply liquids at a lower pH and then the soil or the soilless mix causes a drift, so that the pH can visit each spot in the usable pH range for that medium, and all of the 17 needed nutrients will be picked up, each in its turn.


I hope that this study on containers, watering and pH helps someone who reads it. This paper was a result of having to explain these same concepts over and over and over again to new growers at they hit the forums, until finally I put all these thoughts together into this paper. Some of the thoughts previously given have also been refined for this publication, as questions were asked and answered the last time I posted it, and I have learned better ways of explaining my thoughts. Here, I give you, approximately draft 10 of this paper.


Be well everyone and blessings from my garden to yours,
Sense Emilya
thankyou Emilya
 
Emilya- found your watering post while searching for other info. That led me to this site. Thank you. Is there a way to determine moisture levels in soil all the way down to the bottom of the pot? What is the best container to grow in? Is there a bag of sorts that would allow oxygen in from the sides? Thanks, finnicki.
 
Emilya- found your watering post while searching for other info. That led me to this site. Thank you. Is there a way to determine moisture levels in soil all the way down to the bottom of the pot? What is the best container to grow in? Is there a bag of sorts that would allow oxygen in from the sides? Thanks, finnicki.
Hi @Finnicki ! Glad you found us! :welcome:

The best way to determine if there is moisture in the pot is the lift method, but if that won't work for whatever reason, a wooden dowel dip stick can be stuck in all the way to the bottom and then lifted out to see where the wet/dry line is. This is also the only good use for the $6 moisture meter that can be found in any gardening center. Remember that physics or more specifically, gravity, demands that all of the water will fall to the bottom of the container. If there is any moisture left in the container, it will always be toward the bottom and the center.
The best container of course depends on the situation, but for allowing oxygen in from all directions, sides and bottom, I think the best containers are the cloth grow bags, such as those made by our sponsor GeoPot. I am growing in 10 gallon GeoPots right now.
 
Emilya- found your watering post while searching for other info. That led me to this site. Thank you. Is there a way to determine moisture levels in soil all the way down to the bottom of the pot? What is the best container to grow in? Is there a bag of sorts that would allow oxygen in from the sides? Thanks, finnicki.
Cloth pots are the best!
 
Thanks. I started with what we had lying around. Plant came in a small cup. She transplanted it immediately. Another q;
What happens when you want to go larger,
cut out the bottom of the current bag?
 
Thanks. I started with what we had lying around. Plant came in a small cup. She transplanted it immediately. Another q;
What happens when you want to go larger,
cut out the bottom of the current bag?
The 1 gallon bags that I now use have a velcro strip along one side that greatly helps peel them out of there for transplant, also so that I can reuse that grow bag several times. Before I used these high quality GeoPots, I used another cloth bag product that did not have the velcro, and there it is simply a matter of patiently folding down the sides until you have peeled the rootball out of there. It is not as easy as popping a plant out of a hard sided container, but the roots you get as a result are worth the extra effort.
 
We ordered bags and will be here tomorrow. We use simple potting soil that I’d like to add more perlite to. Bought a bag of earthworm castings that I have not opened I bought a bottle of Fox Farms at local place. I’ve heard to use it every other watering. Plant is bare now as I collected leaves and branches for my canna butter. I never want to run out of my marshmallow treats. Long winter ahead...
 
Hey Emilya first time indoor Grower here thank you for this thread it was very informative. I recently up potted from Dixie cup sized peat pots into final 5g fabric bags. I know general advice in this thread is to up pot slower but I was initially intimidated by doing several transplants. Anyway I used the wet dry cycle method of watering while in the smaller pots and had some good root balls at transplant. They've been transplanted for around 36 hrs now no sign of any growth yet hopefully they get moving soon. I very slowly watered over 24hrs with a very light nutrient solution followed by plain ph adjusted water with majority of it poured in from the edges and then a light watering of the root ball. I watered until very slight runoff. Here's hoping for that explosive post up pot growth! I plan to top in about a week once they are settled in. With 3 kids and a 60 to 70hr work week I don't have time to spend 2hrs everytime I water but will be at least doing it slowly over 30mins.

I am growing in soilless Promix hp with general hydroponics nutrient lineup and b52 added for stress relief under one 300w and one 600w LED.
 

Attachments

  • IMG_20191028_2035156.jpg
    IMG_20191028_2035156.jpg
    987.6 KB · Views: 100
Hey Emilya first time indoor Grower here thank you for this thread it was very informative. I recently up potted from Dixie cup sized peat pots into final 5g fabric bags. I know general advice in this thread is to up pot slower but I was initially intimidated by doing several transplants. Anyway I used the wet dry cycle method of watering while in the smaller pots and had some good root balls at transplant. They've been transplanted for around 36 hrs now no sign of any growth yet hopefully they get moving soon. I very slowly watered over 24hrs with a very light nutrient solution followed by plain ph adjusted water with majority of it poured in from the edges and then a light watering of the root ball. I watered until very slight runoff. Here's hoping for that explosive post up pot growth! I plan to top in about a week once they are settled in. With 3 kids and a 60 to 70hr work week I don't have time to spend 2hrs everytime I water but will be at least doing it slowly over 30mins.

I am growing in soilless Promix hp with general hydroponics nutrient lineup and b52 added for stress relief under one 300w and one 600w LED.
It sounds like you have this figured out and are doing well. Be patient as the plant works on finding its new boundaries in the new container. It is easy to forget that the plant is putting its primary focus on the roots right after a transplant and mistake a lack of activity at the top as shock. You did well after the transplant to water to runoff in order to merge the soil regions together, but now it is very important to not start over watering, but not underwatering either. Keep using the lift method if you can, and try not to do another full watering until the plants can drain all that water you just added, but don't let the plant go more than 3-4 days without at least getting a little sprinkle of water by coming in with the same amount of water you gave the solo cup, but spreading it out across the surface of the soil. Continue to concentrate on the edges, enticing those top spreader roots to grow laterally. This small amount of water will keep things active, but it won't be enough to drop to the bottom and add to the water table. When the container gets into a 3-4 day cycle, then you can just water properly without this 2 stage watering.
 
I will do just that, thanks again! I have a spare grow bag Im going to fill with dry medium to have a comparison pot to lift for determining dry which is a sound suggestion I picked up from this thread!
 
Back
Top Bottom