Skybound's Journal

I forgot I grabbed this pic last night and wanted to note how much Pineapple Chunk especially, but also Em Dog to a lesser degree LOVE the Megacrop formulation. I've been hand watering this one even though she's in rockwool croutons, they hold water for well over a day and can be treated like soil or RDWC. @Weaselcracker I am very surprised to see how well she's doing with half as much P as her great great /... ... .../ gramma was getting, yet here it is, before my eyes. Ideal targets, watering every other day.

FYI
NO3....138.7
NH4.........6.6
P............34.6
K..........186.4
Ca........116.2
Mg.........46.2
S.............25.0
Silica........0.9

Fe----2.2
Zn---1.4
Mn--0.9
B-----0.9
Cu----0.5
Mo---0.1

MC.jpg

This is very encouraging. I hope it carries through to the end. I did see some pics of late flowering Mega Crop product and it seemed good. Hard to tell from the pics if it was ‘great’ as opposed to merely good, but the stuff definitely seems to work.
 
My "Roots" powder is

3 TBS Planters II
1 TBS Soluble Seaweed
1/4 TSP Great White Mycorrhizae.

sprinkle some on the root ball and in the hole when transplanting. It has a 10:1 Ca:Mg ratio is a loaded with exotic micros, plus has a really high CEC.
 
This is very encouraging. I hope it carries through to the end. I did see some pics of late flowering Mega Crop product and it seemed good. Hard to tell from the pics if it was ‘great’ as opposed to merely good, but the stuff definitely seems to work.

I was sharing those numbers in the event you want to try to hit those target with your current bottles. In theory, I made Megacrop with GH 3 part. Of course the targets were way off, still, I think making the effort might still be helpful to someone, and perhaps your bottles will get closer than GH did? It hurts nothing to open up Hydro Buddy, load up your bottles and input Megacrop's numbers to see how close your bottles will get you to there. Me though, I was mostly surprised that 35ppm of P was enough. I thought for sure I would hit a P def hard, but I didn't. Em Dog and PC both like it. In all fairness though, Gglue hated every single thing I fed them, all of them. I think Herbie's G Glue does not like me.

MC from GH.JPG


Edit - ^That's pretty close to Megacrop with Calmag. P is high, Mg is low, Zn, B, and Cu are also low, but overall, if all you had was GH 3 part, you could say you tried Megacrop before you bought it, or whatever, lol.
 
Actually that’s what I’m doing now - my mix is based roughly on Mega Crop, and things seem to be doing well. I did toast a few leaves pissing around with the mix earlier on- but it seems like the damage has held steady since switching to the MC formula. I’ll get a better idea how well it’s working over the course of the next round.
I am pretty excited that the two plants which were dosed up with bunny turds eventually ended up being the best looking bud of all, after some problems early on.
 
whats up dude! :)

Started framing the new room yesterday. It'll only be 8-1/2' x 9'. I'll chip away at it all day and hopefully it'll be ready for plants tonight, but if I have to wait another day, that'll be fine too. I had to slack on my journals for a few days, but I'll catch up after all of the confusion.
 
Started framing the new room yesterday. It'll only be 8-1/2' x 9'. I'll chip away at it all day and hopefully it'll be ready for plants tonight, but if I have to wait another day, that'll be fine too. I had to slack on my journals for a few days, but I'll catch up after all of the confusion.
cool I figured you were busy just checking in cant wait to see your new room im going to be jealous lol! :)
 
@Skybound reason I suggest the soil test (I can help you with that if you need it) is that I read and see you really like to know whats in your medium and I do to.

For soil the soil test will spell it out. Then you can make some changes that you want to make and get another test. Then watch your plants grow and see if there's improvement or not.

For me, adding stuff to a soil mix that I do not know whats in there caused me a lot of head scratching. Once I started soil testing then I dont really mess with the soil much. Just keep everything in the good to over-good amount and let the microbes do the work.

I'm not positive about Doc's kit info cause I dont follow along with it but I'm betting those drenches are for revving up the soil microbes more than feeding the plant nutrients. Thats just a guess tho, I could be wrong.
 
I'm betting those drenches are for revving up the soil microbes more than feeding the plant nutrients. Thats just a guess tho, I could be wrong.

He keeps saying things like that too, though IDK how much of it I'm buying. His professed position is to keep the microbes eating rocks, not sugars, yet one of the two drenches has molasses in it. Also, having reverse engineered the kit and doing a lot of surmising, I know the kit is loaded to the hilt with calcium, but everything else has to be continually re-upped.

I'll accept that in the soil, there are microbes and already soluble elements (ions), and that the microbes will stabilize the PH and also exchange those ions for root exudates. But I won't accept that that the elements are useless to the plants, but for the microbes. If that were the case, we would not be able to grow hydro.

For soil the soil test will spell it out. Then you can make some changes that you want to make and get another test. Then watch your plants grow and see if there's improvement or not.

Once I settle on a formulation that works well, I'll send some samples into the lab along with information about the drenches and foliar sprays for them to consider, but as it is now, I already know what's in my soil within reason, I'm the one who put it all there. In hydro, it's easy to say I want X amount of N, X amount of P and X amount of K etc etc, but in soil, it seems all the popular mixes (except DB's) involve 1 cup of X, 2 TBS of Y and a cubic foot of Z. Just volume of raw mostly unprocessed components with no numbers to reference from. With Doc's kit, all of them numbers are on each of the products, so I then have something to aim towards. Of course I know that my mix is likely pretty close at best, but in the grand scheme of things, pretty close is totally fine with me. I can tweak any of the macros and secondaries as needed, plus also likely influence micros as well. I already have almost everything imaginable on hand save for the illusive Chilean Nitrate, but all else I have.

FWIW, even though I greatly deviated in my first mix, I am still very pleased with what it's doing to my pineapple chunk. She could be better of course, but her leaves look so pretty and generally, I was expecting that one to face plant, but she's thriving.
 
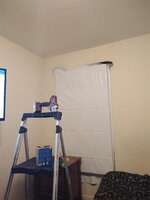
Construction today whipped my ass! Everything hurts! I got the frame up, panels cut, then re-cut, then re-cut then screwed down. I also got all the panda film hung up on the ceiling and walls. I did my best to stretch it out and keep it flat, but it still found a way to bunch up every now and again and I had to pull back, fold and staple down the flap, you know how Murphy's law works. That said, I'll have to tidy up the walls, especially where I tried to cutout around the window case and the air handler, the skizzers went a bit nuts and ended up taking too big of a bite. Nothing that strips of panda film and duck tape won't remedy. I also failed to put much thought into the door, so I will have to do some scabbing to ensure I can seal off the light.

Tomorrow's goal is to tidy up the walls, install the vinyl floor, mount furring strips on the ceiling to hang lights, poke 1 or 2 six inch holes in the ceiling for extraction, hang the HID in that taped up box and wait for lights on in bloom to relocate all the plants.

Some pics.

The start of the frame (yesterday)
frame.jpg


the air handler (yesterday)
mini split.jpg


I had to get at least one of the 17 outlets outside the room
outlets.jpg


open frame looking at the new veg
open fram looking at veg.jpg


I repurposed my budwashing line to stretch out the panda film so I could fight from underneath it on a the ladder to line up the center of the film with the center of the room. Once I got that done, I did the same to the other side of the room, then the center, then each between and outward from there. This may have been impossible if not for the many printed circles I stapled through
hanging panda film.jpg


Close up of the printed circle. I also made angle pieces for the right angles
staple circle.jpg


Just after the sheeting was all cut and hung. That light came down next
sheets hung.jpg


Getting ready to start cutting panda film.
start cutting.jpg


I'm laying on the floor looking up to the ceiling. The walls more or less look the same with polka dots everywhere. I need to print a few more circles and angles as I ran out.
the ceiling.jpg
 

Attachments

  • window.jpg
    window.jpg
    149.7 KB · Views: 96
Your new room is coming along. I'm about to be in your shoes. Not sure how I'm going to do it. I've got a 13x14 room with glass sliders access to outside. Woot but I gotta figure it out.

You got your plan and your working it. Awesome job brother. Keep going.

On the soil thing. I of course have a starting recipe thats all raw ingredients nothing soluble form. When I mix it first time the microbes are there and they start working on the soil right away. You can see the mycelium growing.

The microbes and the fungi work on the soil to make the nutrients available for plant uptake.

Ca is one that isn't all that mobile but cannabis likes a lot of it. So all I do is make sure there's plenty in the soil mix that is short term, medium term and long term availability. None of it soluble.

Thats the diff hydro to soil - in hydo its all soluble, in soil nothing soluble its the microbes and worms do the heavy lifting.

I make sure the macro and micro nutrients are there, verify with a soil test and good to go.

Reason for the soil test is that you can get another test next year and compare what you started with and how it's being used up. Without that comparison its a guess really.

Most gardeners dont care. I gotta move around a lot of soil so I want to do it the least possible amount as its a lot of work. If I can get the soil to the point of being self sustainable then I'm ahead of the game and thats my goal with soil.
 
My only goal with my soil, well one of the very few, is cost. As far as I know, all I need to keep buying is EWC (microbes), but all else I'm well stocked up on. There's an estimated 20% of the amendment weight that is soluble salts, all of which is organic and natural. There's some ready right now calcium, colloidal calcium and some rock phosphate calcium which I understand is long term. Also, the soil cooks for better than a month anyways, so the microbes have plenty of time to build up and establish the soil.

Another hard day chipping away at the project. I got mostly everything all done and I wanted to keep going, but my back was locking up and my hammies were getting Charlie horsed, so I called it quits. The floor is down, all the seams are taped, I put slats on the ceiling to hang things from, I poked a hole in the ceiling, hung the HID and mounted the ballast. What killed my time was fussing with the HPS socket as I needed to remove the wire so I could feed it through the 3/8" hole I drilled for it and I kept putting the damn thing back together wrong. I must've reassembled that socket about 5 times. I'll know tomorrow if I wired it correctly, lol. If it's backwards, I have another hood and bulb on standby, but this one is the Eye Hoirtilux, so knock on wood!

Note, The vinyl flooring does a lot better when put down on hard floor surfaces. I put mine right on the rug and it keeps bunching up in whatever corner I stand it. I wish I would've put down some OSB or something hard. Lesson learned for next room I build, lol.

Some more pics.

on the roll.jpg
crinkled floor.jpg
folded sides.jpg
rippled floor.jpg
exhaust.jpg
slats and tube.jpg
Hortilux.jpg
 
Looks great, Sky. You'll get it. You'll think of many ways to make it better. That's part of the fun of projects. Great job. Cheers
 
I'm really digging the room build sky :high-five: I'm try to think outside the box for growing out in my shed this winter. It's already snowing here. But it's not as cold yet as it will be soon. I'm considering running another tent out there with my other 1k hps. Both on separate 12/12 cycles for a extra heat source. I'm thinking about circulating the air constantly from one tent to the other for heat. I've got it insulated good and a small heater. Heater is probably not much cheaper than running another light
 
Back
Top Bottom