Thanks to Monkeybusiness...Well since i had to convert a window AC unit to use inside an enclosed area, i figured I'd try to document the process since there seems to be quite a few misunderstandings about the concept.
Now I'm going to explain the theory/concept and then show how i decided to convert mine but it's going to be one of those, 'do as i say, not as i do' demonstrations. Frankly, i don't recommend you do it exactly as i did because i was battling space and supply factors. Basically i wanted to use supplies i already had and I had to install it into a very confined space so I made a pretty tight conversion. I'm comfortable with that because i have a dedicated exhaust fan with plenty of CFM's to make sure heat is sucked out of condenser. You'll have to decide whats best for you.
Anyways...
on to the show:
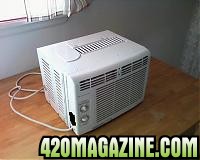
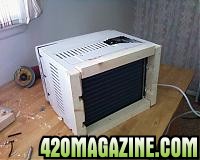
As you can see in the pictures, an ordinary window AC unit with vents on the back, sides, and top. The air is suppose to flow in through the sides and top and out the back. This is the most important thing. (I've seen where people just put the ac in a room and blow a fan across the back and that won't work. It might seem to work for a while but even if it does bring the temps down it will shorten life of your AC)
So, you will have to figure out a way to funnel air in, then out the back. I've seen where people build a box to enclose the top and sides and funnel it into an intake hose, as well as building a box on the back to funnel out to an exhaust hose. I'm going to close off the sides completely and funnel fresh air thru the top and out the back.
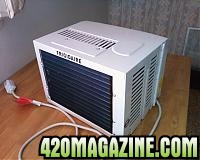
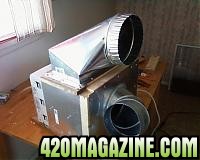
So i have a big ole vent connector that will work great. I just set it on top and make sure everything lines up ok. Once i have it where i want it, I trace the inside with a marker so i know where the opening sits compared to the inside.
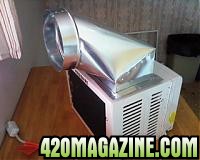
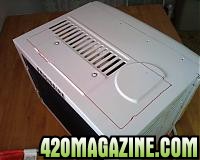
Then i pull the cover off to see where the hole lines up (don't want to just cut the entire outlined rectangle open before making sure there aren't any conflicting items. And as you can see, there are conflicting areas)
We don't want to cut it all open and pump are into the front and the back. We just need to open up where the compressor is and the other thin channel through the middle. The thin channel already has the vent over it so i only cut open an area over the compressor.
Now while it's open, double check your game plan to make sure no screws are going to puncture anything or stuff like that, etc. (I strongly recommend you screw from the inside to the outside to avoid accidentally puncturing something important)
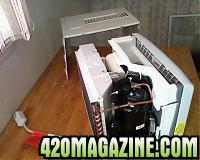
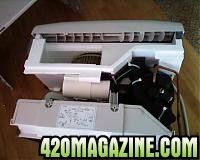
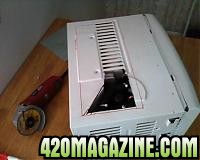
Then i encased the back with a face frame made out of 2x2's and the top with 1x2's (screwing from the inside out and trimming/sculpting wood as nessasary) You will also see that i used some cheap sheet metal to cover the sides
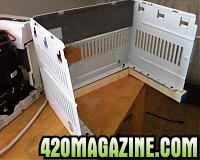
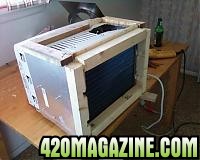
Then i screwed the vent connector on top and put on a piece of sheet metal that covered the back entirely. After i cut an access hole in the back i install the hose connector and that's basically it. ( I apologize, i was pretty stoned at this point and completely spaced taking pics of this step)
I would have normally built the back out more for extra breathing space but then it wouldn't have fit in my particular area.
I have passive fresh air going in the top, and the exhaust fan sucking hot air out the back. Been up and running a few weeks now and seems to work like a charm.Oh i forgot to note, you'll have to drill a hole for condensation drainage. I drilled a small hole in the plastic case (under the condenser (back area of unit)) and connected a 1/4 inch hose to drain it to a container.
Hope this helps!
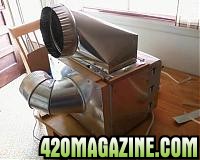
Now I'm going to explain the theory/concept and then show how i decided to convert mine but it's going to be one of those, 'do as i say, not as i do' demonstrations. Frankly, i don't recommend you do it exactly as i did because i was battling space and supply factors. Basically i wanted to use supplies i already had and I had to install it into a very confined space so I made a pretty tight conversion. I'm comfortable with that because i have a dedicated exhaust fan with plenty of CFM's to make sure heat is sucked out of condenser. You'll have to decide whats best for you.
Anyways...
on to the show:
As you can see in the pictures, an ordinary window AC unit with vents on the back, sides, and top. The air is suppose to flow in through the sides and top and out the back. This is the most important thing. (I've seen where people just put the ac in a room and blow a fan across the back and that won't work. It might seem to work for a while but even if it does bring the temps down it will shorten life of your AC)
So, you will have to figure out a way to funnel air in, then out the back. I've seen where people build a box to enclose the top and sides and funnel it into an intake hose, as well as building a box on the back to funnel out to an exhaust hose. I'm going to close off the sides completely and funnel fresh air thru the top and out the back.

So i have a big ole vent connector that will work great. I just set it on top and make sure everything lines up ok. Once i have it where i want it, I trace the inside with a marker so i know where the opening sits compared to the inside.


Then i pull the cover off to see where the hole lines up (don't want to just cut the entire outlined rectangle open before making sure there aren't any conflicting items. And as you can see, there are conflicting areas)
We don't want to cut it all open and pump are into the front and the back. We just need to open up where the compressor is and the other thin channel through the middle. The thin channel already has the vent over it so i only cut open an area over the compressor.
Now while it's open, double check your game plan to make sure no screws are going to puncture anything or stuff like that, etc. (I strongly recommend you screw from the inside to the outside to avoid accidentally puncturing something important)


Then i encased the back with a face frame made out of 2x2's and the top with 1x2's (screwing from the inside out and trimming/sculpting wood as nessasary) You will also see that i used some cheap sheet metal to cover the sides


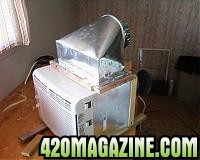
Then i screwed the vent connector on top and put on a piece of sheet metal that covered the back entirely. After i cut an access hole in the back i install the hose connector and that's basically it. ( I apologize, i was pretty stoned at this point and completely spaced taking pics of this step)
I would have normally built the back out more for extra breathing space but then it wouldn't have fit in my particular area.
I have passive fresh air going in the top, and the exhaust fan sucking hot air out the back. Been up and running a few weeks now and seems to work like a charm.Oh i forgot to note, you'll have to drill a hole for condensation drainage. I drilled a small hole in the plastic case (under the condenser (back area of unit)) and connected a 1/4 inch hose to drain it to a container.
Hope this helps!


