- Thread starter
- #161
OK Lets get this done. Here is the final update of the move and transplant that will bring us current. ALL PHOTOS ARE FROM LAST WEEK.
Phase 3 and final phase of move:
If you remember a few posts back, I left my clones in a GROCLONE machine and left to go get my last load from the old house. I did not return for 10 days. This is what I came back to.
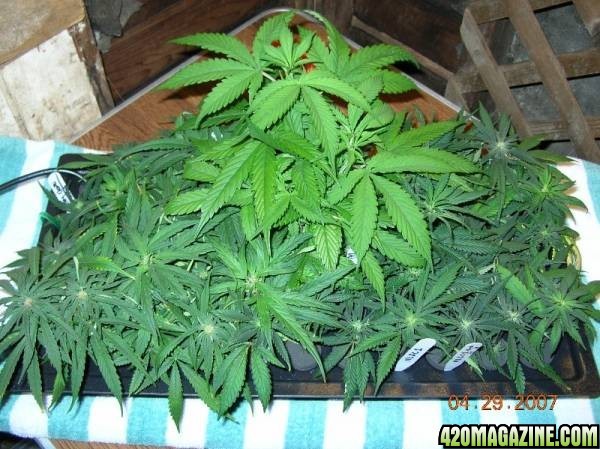
I knew I had to get these bad boys (girls) out of this cloner and into some sort of growing medium. I eventually want to get a couple AquaMist aeroponic growers. I needed to figure out how to make the transition from cloner to net pots, which the Aqua mist uses. I didn't want to use Clay pellets for support since it becomes a huge hassle once the roots get into them. I decided to transplant into 3x3x2.5 rockwool cubes.
I was concerned that I would have a problem separating the roots that had developed over the course of 14 days.
Here's the roots after 14 days in the Cloner: groClone.com Plant Propagation - Proven Results
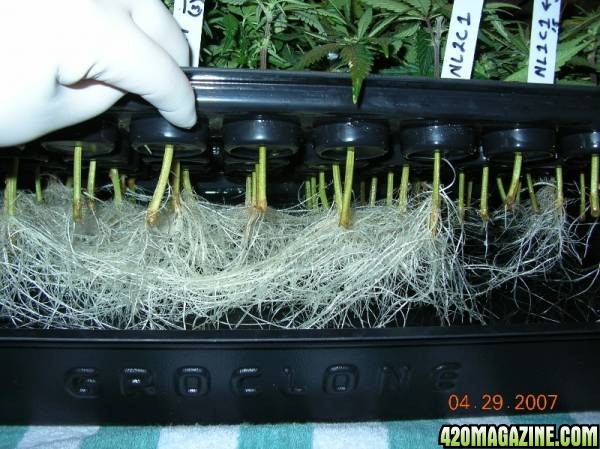
Now I have had ZERO cloning experience and I got a 100% success rate with this machine. It was very simple to use and took ten minutes to set up. It does not use a dome. 53 cuttings went in.........53 CLONES came out.
Like I said, I was concerned I would have a problem separating the roots. But that was not the case. They basically slid right out and separated themselves.
Here is a photo of the clone right as it came out:
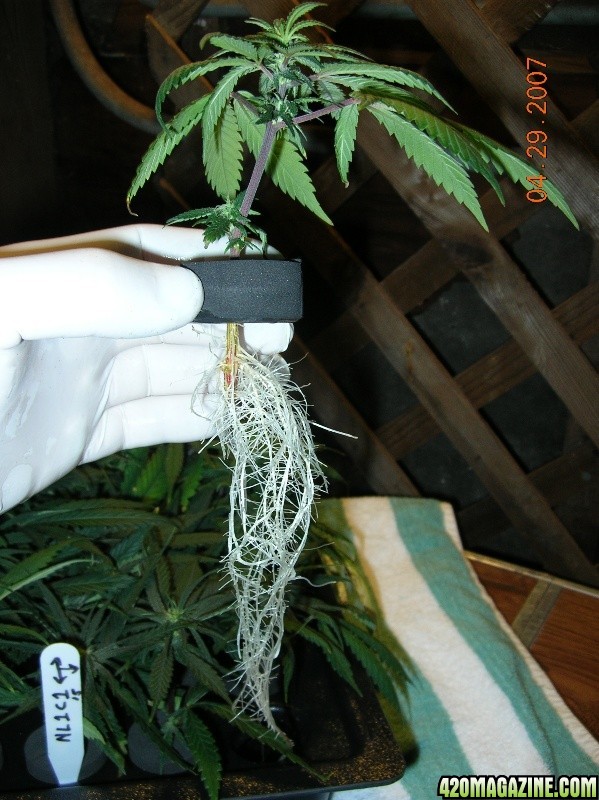
Next I had to transplant that into a rockwool cube. I soaked and then shredded several cubes to use as packing material around the roots and main stem for support.
Clone Ready for Rockwool
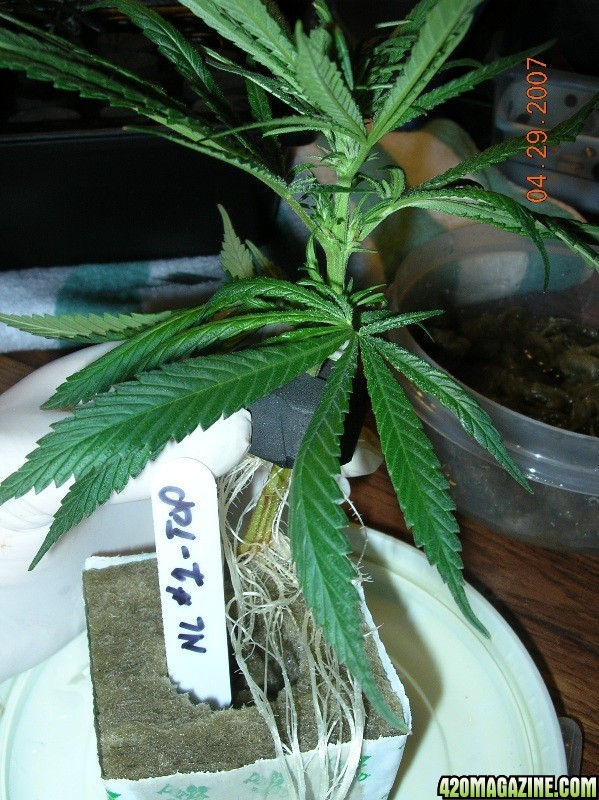
Here we have the clone going into the 1.5 inch PREMADE hole in the 3x3x2.5 inch cube.
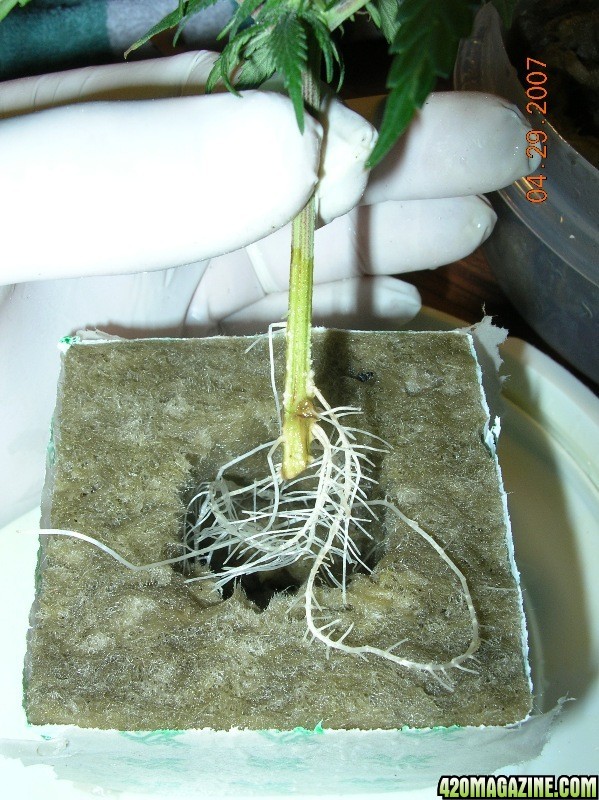
Final Transplant, loose rockwool was used around roots and stem using a slightly tight packing yet loose enough not to crush the delicate roots:
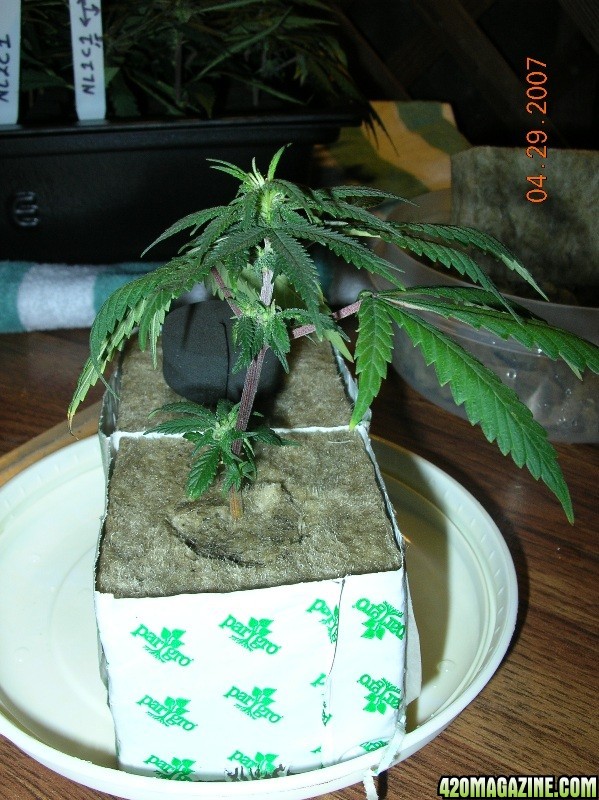
Here is a photo for kicks and giggles. Look at those roots !! This is a White Widow "Top"
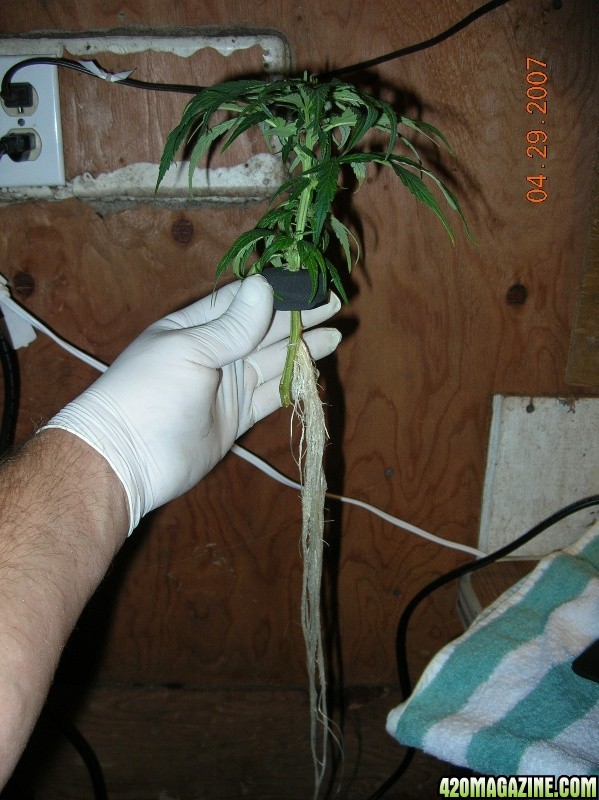
Once I cut a clones that had the correct # of nodes and looked like they were the best to cut............as an experiment I cut some that had No NODES to slice off. Contrary to whats been published, written or ad-viced, I found any cutting can be cloned. If I did cut one where there was no nodes than I would scrape the outer layer as well as split about 1/4 inch of the main stem down the center with a sharp razor. I do not have photos of that process. Next time.
Once I transplanted all clones into rockwool I needed to get them into their veg room. Now, I have a room that is 13 x 9 but has unfinished walls. It is open stud with no insulation or drywall. I am going to insulate and close up the walls air and light tight eventually. I'm gonna do it up right.
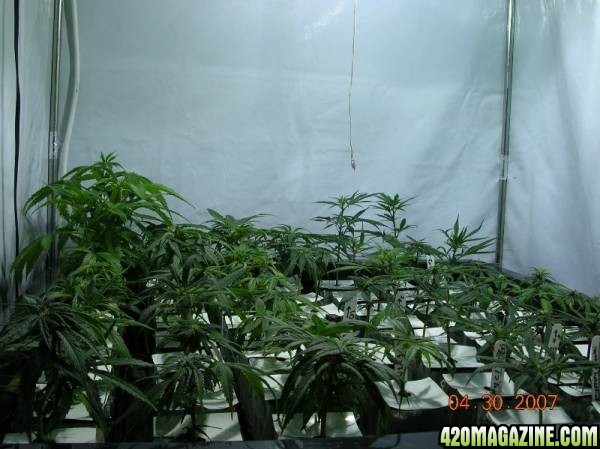
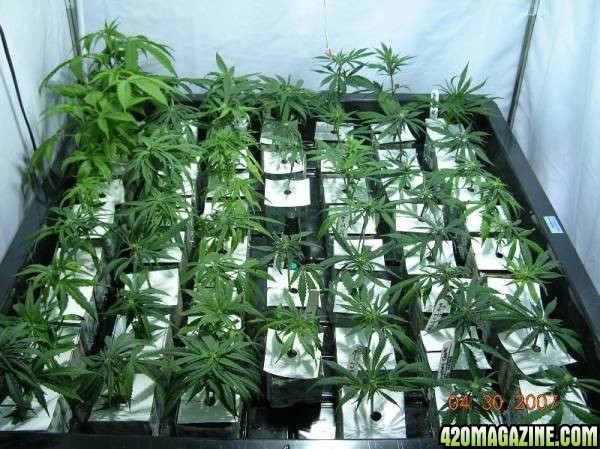
For now, I needed some sort of TEMPORARY room. I was gonna build one from 2x4s and drywall just to get them in a hydro and under lights but...........I found this Hydro Hut at my local hydro store that cost about the same as dry wall and wood and I set it up in less than 1 hour. I would highly recommend one of these. Very good quality and easy to set up. Steel frame, Tough canvas, ports for intake, exhaust, electrical, water tight flooring and premade reflective walls. Worth every penny of 200 bucks. Hydro Hut This is not where I bought is. This is just for your viewing pleasure.... Hydroponics : Hydroponic Online Store: IGS HydroHut Mini
Since I am going to be revamping the 13 x 9 room I needed to be able to move the Hydro Hut around with Tray, plants, resevior and all. I mounted wheels on the bottom of a 4 x 4 sheet of plywood and set the Hut on top of that. Now I can wheel they whole thing around so I can work in that room. LOL.......Gotta do whatcha gotta do.
Here are a few photos of the final veg room:
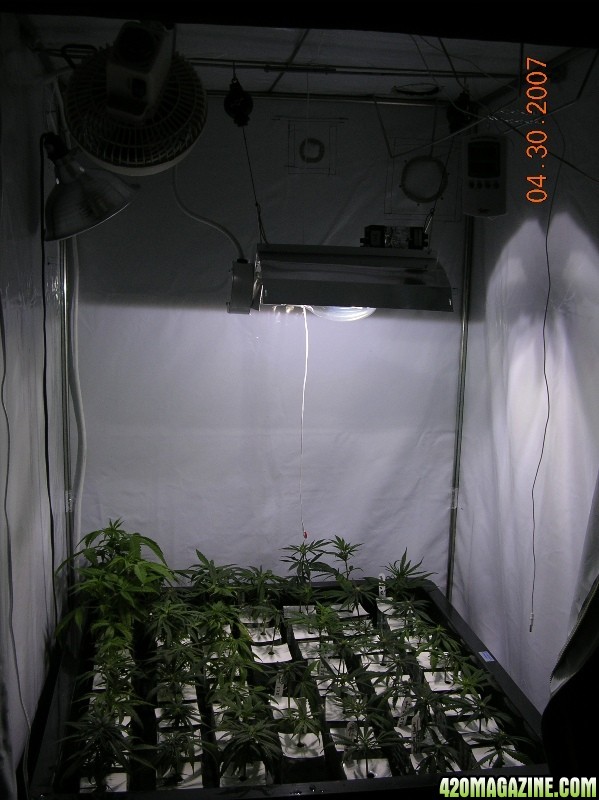
Climate in the room is 100% controllable. I am easily able to maintain Temp. Humidity.
Here's is that data:
Temperature = 75* steady
Humidity = 50 to 55% steady
PPM = 550
PH = 5.8 to 6.2... (I never go below or above those #s)
1 single 400 watt Metal Halide Light is on 24/7 until I am sure we have good root development into thew rockwool. Once I am sure that is good I will add 1 more 400 and switch lighting to 18/6. I am lowering the light each day until I am around 8 inches above the tops. I wanted to give them some time to get use to the 400 watt MH since they have been under florescent for the past month.
Anyway, there it is...............done..........Updated to present day.
I really hope you enjoy my grow show.
Pirate Out.
Phase 3 and final phase of move:
If you remember a few posts back, I left my clones in a GROCLONE machine and left to go get my last load from the old house. I did not return for 10 days. This is what I came back to.
I knew I had to get these bad boys (girls) out of this cloner and into some sort of growing medium. I eventually want to get a couple AquaMist aeroponic growers. I needed to figure out how to make the transition from cloner to net pots, which the Aqua mist uses. I didn't want to use Clay pellets for support since it becomes a huge hassle once the roots get into them. I decided to transplant into 3x3x2.5 rockwool cubes.
I was concerned that I would have a problem separating the roots that had developed over the course of 14 days.
Here's the roots after 14 days in the Cloner: groClone.com Plant Propagation - Proven Results
Now I have had ZERO cloning experience and I got a 100% success rate with this machine. It was very simple to use and took ten minutes to set up. It does not use a dome. 53 cuttings went in.........53 CLONES came out.
Like I said, I was concerned I would have a problem separating the roots. But that was not the case. They basically slid right out and separated themselves.
Here is a photo of the clone right as it came out:
Next I had to transplant that into a rockwool cube. I soaked and then shredded several cubes to use as packing material around the roots and main stem for support.
Clone Ready for Rockwool
Here we have the clone going into the 1.5 inch PREMADE hole in the 3x3x2.5 inch cube.
Final Transplant, loose rockwool was used around roots and stem using a slightly tight packing yet loose enough not to crush the delicate roots:
Here is a photo for kicks and giggles. Look at those roots !! This is a White Widow "Top"
Once I cut a clones that had the correct # of nodes and looked like they were the best to cut............as an experiment I cut some that had No NODES to slice off. Contrary to whats been published, written or ad-viced, I found any cutting can be cloned. If I did cut one where there was no nodes than I would scrape the outer layer as well as split about 1/4 inch of the main stem down the center with a sharp razor. I do not have photos of that process. Next time.
Once I transplanted all clones into rockwool I needed to get them into their veg room. Now, I have a room that is 13 x 9 but has unfinished walls. It is open stud with no insulation or drywall. I am going to insulate and close up the walls air and light tight eventually. I'm gonna do it up right.
For now, I needed some sort of TEMPORARY room. I was gonna build one from 2x4s and drywall just to get them in a hydro and under lights but...........I found this Hydro Hut at my local hydro store that cost about the same as dry wall and wood and I set it up in less than 1 hour. I would highly recommend one of these. Very good quality and easy to set up. Steel frame, Tough canvas, ports for intake, exhaust, electrical, water tight flooring and premade reflective walls. Worth every penny of 200 bucks. Hydro Hut This is not where I bought is. This is just for your viewing pleasure.... Hydroponics : Hydroponic Online Store: IGS HydroHut Mini
Since I am going to be revamping the 13 x 9 room I needed to be able to move the Hydro Hut around with Tray, plants, resevior and all. I mounted wheels on the bottom of a 4 x 4 sheet of plywood and set the Hut on top of that. Now I can wheel they whole thing around so I can work in that room. LOL.......Gotta do whatcha gotta do.
Here are a few photos of the final veg room:
Climate in the room is 100% controllable. I am easily able to maintain Temp. Humidity.
Here's is that data:
Temperature = 75* steady
Humidity = 50 to 55% steady
PPM = 550
PH = 5.8 to 6.2... (I never go below or above those #s)
1 single 400 watt Metal Halide Light is on 24/7 until I am sure we have good root development into thew rockwool. Once I am sure that is good I will add 1 more 400 and switch lighting to 18/6. I am lowering the light each day until I am around 8 inches above the tops. I wanted to give them some time to get use to the 400 watt MH since they have been under florescent for the past month.
Anyway, there it is...............done..........Updated to present day.
I really hope you enjoy my grow show.
Pirate Out.


