My Second Cabinet

trigger-420

New Member
I have taken some time to research and design this cabinet. I am posting my story in an attempt to help others what are looking to DIY. I have never worked construction or done carpentry of any sorts. This is my first real project. If I can do it, so can you. Pictures are coming.

Dimensions = 2x4x4
 
As promised, here are some images of my 2x4x4 project.

First off, this is my work station at the end of the first day. :high-five:
DSCN18213.JPG


I started with the 2x3's for the cabinet floor frame. :bravo:
DSCN18125.JPG


I used 1/2 inch ply for the flooring of the cabinet
DSCN18133.JPG


Another view of the floor frame and floor from different view
DSCN1814.JPG


went to the 2x2's for the wall frames. I just figured we did not need the weight of the 2x3's up top.
DSCN18151.JPG


Another view of the walls
DSCN18161.JPG


finding a spot to mount my fan which is a 115v fan running straight
DSCN18182.JPG


The fan guard from the outside. Just an old fan gaurd from a 500w computer power supply.
DSCN18202.JPG


This is all i have for now. i will try and get some more pics posted as i progress. please keep all comments polite and courteous. thanks. TRIGGER out!:tokin:
 
alright, got a few more pics processed so that i can keep showing the progress of my medicine cabinet. These are just a few of the light and fan system being tested at the end of the day yesterday.

testing the lights
DSCN18233.JPG


a close up of the light and fan setup in the R tek insulation. looking good i think :bravo:
DSCN18242.JPG
 
Got some more pics of my medicine cabinet in progress

This is my 6 month old Blue Fawn. He is my shop help lol.
DSCN18042.JPG


Second light fixture setup. R-tech is installed as well
DSCN18335.JPG


Intake screen and guard all setup. You can see location in prev. pic. bottom left
DSCN18342.JPG


I grind grooves into the fixtures so that they will set flush and not pinch the wires.
DSCN18392.JPG


Got the 4 wall fixtures mounted and getting ready for R-Tech
DSCN18361.JPG


R-Tech is installed and notched for fixtures
DSCN18461.JPG


testing the fixtures and my wiring. :bravo:
DSCN18481.JPG


got the ceiling put in
DSCN18492.JPG


a better view of the box with ceiling.
DSCN1851.JPG


so far i feel like its coming along pretty good. At this point in the project, i have spent only $85 bucks on materials. My most used and important tool has been my Dremil.
 
kk here we are again. progressing right along. I hope to have it completed later today and have it running in test mode so that i can test temps and air ciculation.

Finally got the floor insulated with R-Tech. Now i will run white masking tape along the joints and boards to cover them. will look clean.
DSCN1856.JPG


I dont know what these are called, but its what im using to tighten the hold on the R-Tech. The insulation actually holds itself into place if cut just an 1/8 of an inch bigger than hole.
DSCN1854.JPG


here is an image of the little tacs or whatever holding the insulation in tighter.
DSCN1855.JPG
 
still pluggin away on my medicine cabinet. I have not heard from the community so I am assuming that the design is good and there are no issues noticed at this point.

this image is of the 4-way I am mounting on ceiling of my medicine cabinet. This will allow me to add 4 more 100w CFL's for a total or 1200w in CFLs. or i could use the 4-way for other lighting options. what do you guys think?
DSCN18581.JPG


This is an image of where i will be setting the heating pads to keep root temp up and promote growth. I used the cardboard cutouts for reference. I will have two heating mats set there. probably underneath the R-Tech. between the insulation and ply.
DSCN1859.JPG


If some of you are wondering why i used the R-Tech rather than Mylar or any other reflective material, its because i felt that the white would reflect better and reduce any and all risk of hot spots. was that a good choice?
 
I got a question that i need an answer to lol. it has to do with my lights. I am using Sylvania 23W 120V 60Hz 380mA 2700k CLF's

There are 12 of them in my cabinet. the cabinet is 2x4x4. I was just wondering if this would be a good way to go, or if i need to change the lights. thanks in advance for the help. :thanks:

oh yeah, also, on the package of the light bulbs. it said 100W (23W) so what does that mean?
 
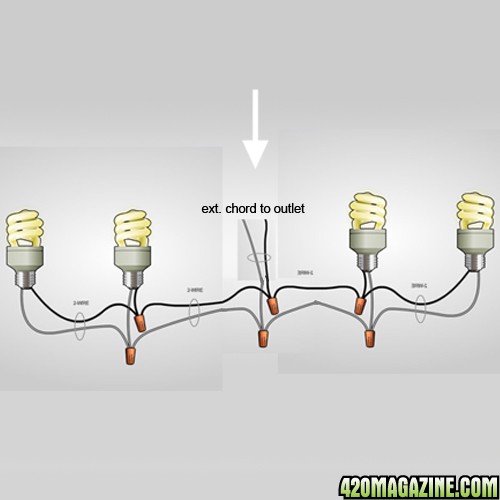
im not good with electrical work, how do you hook up those fixtures so they plug into an outlet, i got the same fixtures with a standard to mogul adapter for my 125w cfl's
 
im not good with electrical work, how do you hook up those fixtures so they plug into an outlet, i got the same fixtures with a standard to mogul adapter for my 125w cfl's

I am no good at electrical work either. the only thing i do know is + means positive and - means negative. I spliced the end off of an extension chord and stripped the black and white wires. which in my mind are the positive and negative. I just ran that straight to the back of the fixture. I can get an image if it will help. when i started connecting all of the fixtures, there is a plate on the back of each that has a screw to attach an incoming wire and another screw of same type to connect outgoing which in turn becomes the incoming for the next fixture. here is an image so you get the idea
DSCN18392.JPG


what about the type of lights im using? are those ok or do i need different?
 
nah your good on the type, its work really well i think. do you know how to hook multipule lights to one power cord or do i have to splice a new cord for each light
 
nah your good on the type, its work really well i think. do you know how to hook multipule lights to one power cord or do i have to splice a new cord for each light

yup yup, you gonna be on site for a while. i can draw up a quick diagram for you if you want. an easy to understand diagram would come in handy for ya if you got the time to wait for me. would only take me about 45 minutes to get drawn up.
:thumb:
 
cool cool. ill get it made up for you. When its done, ill just get it posted here.
 
kk here you go bro. this is exactly how i did the multiple lights in my medicine cabinet. again, i dont know if its the right way or not, but it works for me eheheheh. and all the lights work perfectly. :bravo:

diagram5.jpg
 
:thumb:you bet bro. hope that helps you out. if you need anything else. please feel free to send me a PM or something. I will help you, help me, help each other accomplish more.
 
Nice cabinet.

Things to consider, reflectors for you CFL when ever possible. The more wattage you put in the more heat. I doubt the one fan will even come close to getting it under full grow. Concentrate of creating and controlling an environment. It is the single most important thing you can do for success in your garden.

Lighting distance or penetration is not good with CFL, so plan carefully. Will you raise and lower the light or the plant? You will need to stay within 4" to be most effective.

I luv this DIY stuff :circle-of-love:
 
Back
Top Bottom