Mars-Hydro LED Grow Light Discussion

:welcome:Welcome, Klovneposen. They do look nice.:cheesygrinsmiley: The flower looks nice and the light looks nice. :laugh:Well done!:thumb:
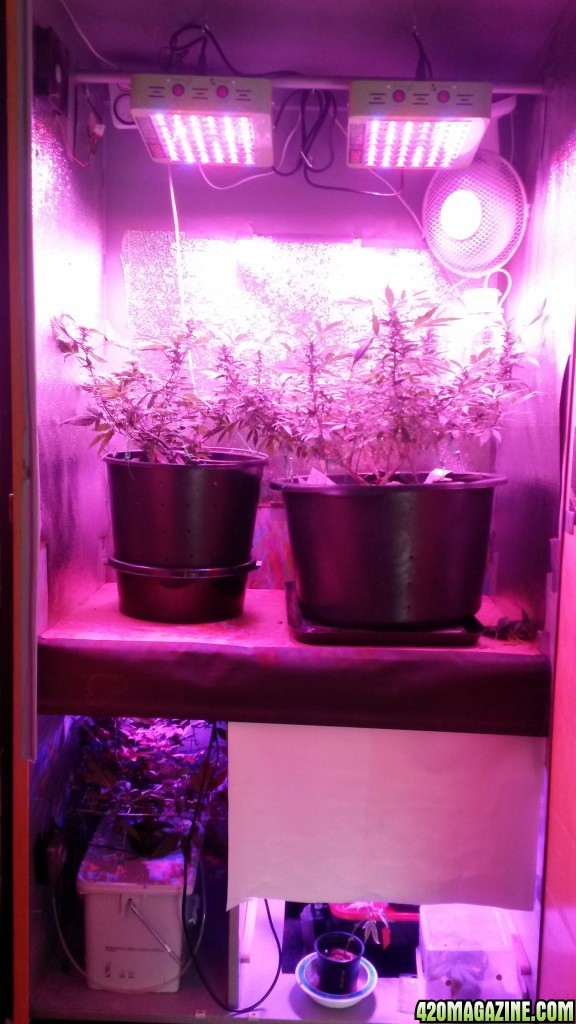
So i got my two small Mars Hydro reflector lamps 23 days ago and thought i would show how nice my plants looks in flower - day 32 (left one white widow) day 37 (right one unknown but great sweet tasting strain) And keep in mind the first two or so weeks of flower was under a 90w ufo. i think mars does a very good job. :D i am glad that i finally got a descent light upgrade for my small closet. Oh yeah and i spend about 14 days battleling some spidermites (from my strawberrys or tomatoes outside :( ) so they have been under a bit of stress as well. being bombed on a regular basis with showers mixed with first some garlic, cayenne, pepper, onion and cinnemon mixed tea, then tobacco tea, homemade insectal soap. and a rosemary, peppermint, aloe vera foliar spray in between. Took pretty good care of those small bastards :) and the predatory mites will be released within days from now MUHAHAHA!!!!

20150926_094054.jpg
20150926_094100.jpg

20150926_094110.jpg

White widow from white label seeds

20150926_094105.jpg

unknown strain from royal queen seeds

20150919_150944.jpg

This is taken at day 24of flower

20150910_105544.jpg


last picture is from the day the new lamps got installed.
 
:circle-of-love: hi Florida, I am sorry to hear about this. If you have already had leaf burnt, you should take measures to increase the distance. You can consider to change the space or order a tent.:high-five:
Have a prob with my MarsHydro LED. I know the specs say to keep the light 12"-18" above the top canopy, but I no longer have that much space left even after training the plants as much as I can to gain headspace and am experiencing leaf burn.

I've just placed a later of cheesecloth below the light to attempt to diffuse the light and limit the burn. Question is will that help and, if not, what other action can I take to prevent the leaf burn?

Any help will be appreciated...
 
:thanks: thanks for the help, randy.
I have had plants grow into the light without any problem if you are getting leaf burn go low enough on the branch and roll it between your fingers to soften and bend it over give it support till stalk heals the top will turn toward the light in a matter of hours only shorter
 
:cheesygrinsmiley: haha, this is the way of thinking out of the box. :thumb: I love that idea.
You must either pull the plants/branches down lower , if not possible I would remove the plants and cut a square hole in the roof of the cabinet the size as the Panels glass then sit the light on the outside of your box.

Consider buying a tent if you need to.


The cheese cloth is a bad idea , make / buy a bigger space
 
:high-five: so far, so good, Am4zin.:cheesygrinsmiley::hugs:
My highest top is currently 7 inch below my marsll 400w with no adverse effects as yet. Don't think I've ever had 18 inches as my space won't allow it.
 
:circle-of-love: you are welcome, Camelion. I agree with you. It's the best when we all don't need one. :high-five:
Yes.... but i prefer something bigger :clap:

Thx for the reply Sara, and when i buy, the best way is, that i never need warranty. :thumb:
 
Hope the young leaves will be good after the adjustment.:Namaste:
The leafy new growth does get bleached , the leaves being so young and tender are not prepared for 10" of light height.

I am finding 16" to be a sweet spot allowing room for new plant growth/height without bleaching. Last week my plants grew into the light and bleached some young leaves , the distance was 8-9" after new growth.

My Plants are short / bushy so I am also hoping that the 16" distance will encourage some stretching.
I was using 12 inches

P3100089.JPG
 
:thumb: very good info, Klovneposen, thanks for the instructions.:high-five:
First two days of treatment i blasted them with a garlic cayenne cinnemon oinion mix were i spottet most infestation and of course rinsed with water after 15-20 minutes

then about one week i switched between the soap and tobacco treatment every other day they got either soap or tobacco tea and a good rinse

the homemade soap/alcohol mixture i used seemed to encapsulate grown up mites when applied for 15-20 minutes before getting rinsed off pretty damn well.

The tobacco water seems to react good on the nymphs and larval stages of the mites when applied and left on for 15-20 minutes before a good rinse off

And the rosemary and peppermint aloe vera i have used the last week of treatment as an "afterburner" foliar spray should be like "teargas" and annoying as shit for those little bastards by doing so they wont get a good foothold on the plants again. the aloe vera is added to help the plants systemic acquired resistance.

i give the plant a few good rinses with pure water and let them be for a couple of days before releasing the predators. so they won't be annoyed by any applications i have put on the plants earlier :)

i know my room look small and newbie-ish. But keep in mind before i lost my house and everything do to sickness, i actually made a quite good living on the side of my job on growing meds for people in my 12x12 feet growroom so from my earlier experience i would say my plants are gonna be just fine. (this treament would have been a bit annoying back then having to carry 40 plants to the shower every day even tho they were placed in aquafarms) but with two plants in flower i think can manage dragging them to my shower once in a while

thanks for your advice m8 :)

but next spring im gonna change the layout of my garden for mites security purposes :D even tho that means no strawberries and tomatoes :(

btw here is a link onsite to organic pest control.
organic pest control solutions - Blogs - 420 Magazine ®

:Namaste:
 
:hugs: yes, it gets easy after you say it, haha. Thanks for the help, LEDBud.:high-five:
You are in quite a bind

You can bolt the tent onto a lumber base , made from 2x12 or stacked 4x4"s

Sometimes its easy to solve a problem when its not your own ..

You have to build it for instance .. lol


even cinder blocks would work
 
:thumb: it makes sense as far as I can see. Very good advice.:yahoo:
yep gotta mod it and cut it. i took a saw and cut holes in my closet just to gain 5 inch in my nursery and my room for motherplant. like LEDBud said. make a small lumber base or something. some guy had the same tent and same problem in here some time ago. he cut the bottom of the tent and mounted it on to the pot somehow. gaining the pots height inside the tent by placing it outside. If my explanation makes any sense ? :)
 
:circle-of-love: yes, it will be. They two look perfect match for each other.:Love::Love:
There need to be MANY more photos of tiny ganja plants with stuffed animals. Should be a trend.
 
:party::party::party::party::party:amazing grow, ganjazz, you are talented! So good to know it's beyond your expectation.:yahoo::yahoo::yahoo:
Grow journal is completed, total yield is around 1gr/w,

MarsII, reflector lights did most of the work, and proved to be well wurth the money, was hoping for 0.5 gr/w :)

Can change default parts when needed, assume life expectancy is gonna be alright.
Energy efficiency could be better though.

This harvest from last plant just dry- weighted :Namaste:
SAM_9476.JPG
 
Welcome, mushfarmer, sorry, we don't accept bitcoin.:Namaste:
Smokesara, have you all ever considered accepting bitcoin payments on your website using a 3rd party bitcoin-to-fiat service?
 
:thumb: thanks for the attention.:high-five:
Thanks , I tried to warn "side lightening artist" to crush , twist n bend the foxtails down. THe tops got a little crispy bleachy a few days later
. Keep the canopy uniform!
 
Bushy Bushy Bushy :MoreNutes::MoreNutes::MoreNutes:
Day 25 Skunk DWC ...actually had a one week glitch of 24 hour light cycle about 7 days into bud . THis made them even more bushy HA HA HA. Setting up a good base for lots of big fat buds so I 'gotta be good' now... watch that PH and PPM
20150927_185153_1_.jpg
 
:welcome:Welcome, Klovneposen. They do look nice.:cheesygrinsmiley: The flower looks nice and the light looks nice. :laugh:Well done!:thumb:

Thanks Sara. i know its your smallest lights, but they do really perform good for the size. we bought also 2x mars II 400 and one mars II 900. The guys thought i should also go for the mars II 400(their filosofy being typical caveman style bigger are most likely better).My inner geek :geek: wanted to make site by site comparison between 2*240 and marsII 400. But after they have been installed i must say i prefer two of these small ones in a 2x3 feet room for better coverage then the mars II 400. IMO the mars 240w reflector series are just great for micro to small size grows. i only need 1 5volt pc fan to remove heat and the temps are really stable in the closet. It does not get easier and cheaper to run than this. and with two 240w (85-105w draw) instead of one of the 480 reflectors or the marsII 400, i get more mobility and maybe less risk of bleeching (can be hung in angled positions, and in individual heights and finally if one brakes down i still have one going strong) :D In my nursery room and motherplant room i have a 50*1w ufo and a 12*3w E27 fitted light. When i do upgrade my flowering light some day again, these reflectors from you are gonna do a great job for vegging in the nursery and used in the motherroom or sidelights in bloom rooms etc. using only about 60w in the veg. mode.

BTW have your company ever thought of making some line of sitelights strips or bars or cups or something?

Again thanks to you and the company, for a affordable quality built product for the common man. ;)

really :circle-of-love: to you guys

:Namaste:
 
Back
Top Bottom