List of Links on Harvesting, Drying, and Curing

Just wondering if I could add to the list here? Well, I hope its alright. If not, I'm sincerely sorry for posting this.. but I think everyone will appreciate this post.

Hygrometer & Jar Curing method/process
----------------------------------------


First we will break it down into phases. This seems easiest as you can refer back to any point of the cure by phase. Try to think of it like landing an airplane...

Phase one: The dry. This is kind of like preparing to land. The first thing you want to do is come to altitude and lower your landing gear. Basically, once you cut your bud, you need to decide what to do with it. Most of us go ahead and trim it now. Once it is trimmed to our liking, the bud is hung to dry.

Phase two: The pre-cure. This is somewhat like landing your airplane. The trick is to set it down on the runway at just the right angle as you begin to reduce your speed. This is where the mathematics come into play. What you are looking for here is the "feel". When your hanging bud begins to "feel" like it is drying out, but the stems are still flexible, it is time to jar. Don't worry, we will revisit this phase in more detail in a bit..

Phase three: The cure. Now your airplane is on the runway. This is where you are focusing on your instruments and applying the brakes. This is the actual part of the cure. It is a benefit to keep your bud in this stage for as long as possible. Actually, this may be a little misleading as some folks may like some cures better than others. In other words, this is the point where smells and flavors can change drastically. Depending on what it is you are after will dictate exactly how long you keep this phase in check. But only you can decide what you like.

Phase four: Storage. Well, the flight is over, time to put the airplane away. We have finally reached a point where the curing process has greatly slowed down and it is safe to store your bud.

Hygrometer is needed

Phase one. 70%+ RH: This starts out just like any other time you have done it. Once you have harvested your bud and trimmed it to your liking, hang it in a cool dark

place. This is where we will part from tradition. Allow it to hang until the buds begin to feel like they are drying (note the temps and rh as this will rarely be the same during

subsequent harvests). They will start to lose their "softness" in favor of a slightly crispy texture. We don't want to allow it to dry until the stems snap. THIS IS WRONG! We want

the stems to be flexible. Not totally soft, but not snapping, either. If allowed to dry until the stems snap we risk it drying too much and losing an opportunity to take full advantage

of the cure window. You see once the bud reaches the 55% RH range, the cure is dead. No amount of moisture added will revive this. If you are a brown bag dryer you can still use

this technique, although I no longer do. I feel it is unneccessary at this point in the drying process. Just make sure you do not over dry. Also, this is a perfect time to calibrate your

hygrometers with your new calibrating kit. This phase may take anywhere from 2 to 7 days depending on ambient temp, RH and strain, etc. It is important to be right on top of this

phase. Sometimes we will notice thinner stemmed buds getting done quicker. It is ok to take these first and put them in the jar. Just screw the cap on very loosely until the bulk of

the bud joins it.

Phase two. 70% to 65% RH: This is where the numbers game begins to kick in. Once you have reached the crispy bud/flexible stem stage, it is time to jar it up.

Now there are a few options here.. Really you can jar it up just like always. Only, fill your jar 3/4 to 4/5 full so you have room to use your hygrometer. You can leave it on the stem,

stem free, whatever. I personally prefer it in it's finished state, no stems. You can leave just a few stems intact for the sake of testing stem flexibility. Also, with more stems comes

more moisture. This may fit well with your style, but it also may play havoc if mold is present. Once your bud is in the jar drop in the hygrometer and cap it. Keep an eye on your

meter for the next hour or so. What we are shooting for in this phase is 70% RH maximum. If you hit 71% or greater, you will have to take the bud out to dry more. If this seems a

little tricky here, it is. The cure, even though we are still in the dry phase, has been happening to a small degree since the moment the bud was cut. Basically now we are juggling

time with mold prevention. We want to avoid any instance of mold, but we want to get every second of cure time in that we can. The goal in this phase is to start at a 70%

maximum RH and, in a timely and mold free manner, bring the RH down to about 65%. The reason I say "about" is that if there is an issue with mold (i.e. the crop was exposed to

heavy mold before and/or during harvest) we may choose to take the RH even lower, like 62%. This won't leave a huge window for curing, but it will keep the bud safe. Ideally,

however, 65% will do. Generally you can tell pretty quickly if the bud is still too wet as the hygrometer % will climb pretty quickly (rate: 1% per hour or faster). You will also notice,

at this point, that the bud will feel "wetter". That's ok. The reason for this is that while the exposed part of the bud began to dry quicker than the inside during phase one, the inside

of the bud and stems retained a good deal of their moisture. Once in the jars (phase two) that moisture can no longer be efficiently evaperated off and moved to a different area,

being replaced by dryer air. Once you have determined the RH, which may take up to 24 hours, you can begin burping the jars. This can be done at a rate of one to two hours once

or twice a day, depending on initial RH reading. Your room RH, temp, strain, exposure to mold and hygro readings will dictate this for you and wether to go faster or slower. Slower

is always better, but precipitating factors, as stated, may trump this.. Also, at the end of this stage is where most commercial bud will hit the open market, if you are lucky. The

bud at this stage should have that super sticky icky velvety feel and the 'bag appeal' will be at it's very highest.


Phase three, 65% to 60% RH: Your buds are in the jar and RH is 65% or less. Perfect. The object of the game, as stated before, is to slowly release the moisture

from the jar over time. Your buds are now in the cure zone. At this point we are looking for a much slower release than phase two and will shift to a short burp once a week. Your

buds will deliver a nice smoke at around 60%, so the speed at which this is done (which translates directly to duration of burpage) is entirely up to you. It is at this stage that small

stems should snap in two. It is also in this stage that you will meet true stability, or equalization, in RH. What that means is that the amount of moisture in the stems is no longer

disproportionate to the buds, and moisture transfer or persperation (sweat) slows dramatically. This also means it will take much longer to get a true reading from your Hygrometer.

A true reading at this point might take up to 36 hours, but that's ok.

So, do you know what your idea of a perfect smoking bud is? If you have followed the phases as you have read them, then this is the stage where you can find out. It may be as

specific as a stationary RH value, or even a "window" between different values. Everyone one should know there ideal smoking range. I prefer mine on a slightly dryer cure, say

between 56% to 58%.


Phase four, 60% to 55%+ RH: Even though a true cure is far from over, your buds are truly ready to smoke if you wish. They are also ready to face long term

storage. As stated before, the cure dies at -55%. It is ok for the cure to be dead if you have reached your desired cure level as later remoisturing can easily bring that bud back into

your prefered smoking range. But, you can also continue the cure for long time periods and the trick to this is to stay above the 55% level. Unfortunately even claimed 'air tight' jars

will allow bud to continue losing moisture over time. The trick here is to guarantee air tightness. Simon has suggested that he jars in air tight jars and double vacuum bags it as a

way to ensure cure integrity. I am less picky. It is a good idea, though not neccessary, to leave a hygro in the jar and check it from time to time. I would start with once a week for

the first month then, if everything is stable, once every month after that should suffice.


[--- E N D O F A R T I C L E ---]


I'm currently trying this method right now.. and it seems to be working great! Anyhow, its posted now.. so if anyone else would like to try it they can do so.

thanks.
 
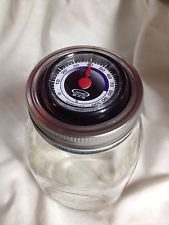
For more accurate hygrometer results install the cap in the lid of the mason jar. Checking the humidity of the contents of the jar without unnecessary burping, allowing a more slow and controlled curing process. Instead of making one I bought one.

Curing Cap for Regular and Wide Mouth Mason Jars
171168864545_1.jpg
 
These links are broken.
I've reported this for fixing. :thanks:

Might you be interested in helping us find more, by reporting them for us to fix?
 
I've reported this for fixing. :thanks:

Might you be interested in helping us find more, by reporting them for us to fix?

No problem! I'll let you know of any I come across. Is there a particular person I should tag? Be patient though. I don't get to dedicate as much time as I'd like on here. :Namaste: @420
 
No problem! I'll let you know of any I come across. Is there a particular person I should tag? Be patient though. I don't get to dedicate as much time as I'd like on here. :Namaste: @420

The links are all fixed. If you come across a similar issue, please tag me. :thanks:
 
Back
Top Bottom