Icemud's Grow 8.0 - New Intelligent-Gro LED - 2 x IGRO-228 LED - Testing & Review

Hello everyone and welcome to my 8th Grow Journal!!!

Sponsored by Intelligent-Gro LED Grow lights.
led-logo.png


I am Icemud and have been growing now and a member at 420 Magazine for 3+ years. I am a indoor soil grower who as of now have successfully completed 7 harvests over the past few years and as of now grown over 20-25 strains. I have used many different soil mixtures and recently have been on the quest for High Brix, as well as I have used many different types of lights from HID (CMH, MH and HPS) and recently converted over to LED to save on electricity, as well as give my plants a better quality light.

I recently found Intelligent-Gro as one of our new Sponsors here at 420 Magazine and found that Danky Dave of Intelligent-gro was seeking active members to test out and showcase their cutting edge technology...With fingers crossed I wrote to Danky Dave requesting to be considered as one of the testers and luckily enough, I was chosen as one of a few to feature Intelligent-Gro LED lights here on 420 Magazine.

I am so happy to be one of the testers, and I will cover all the details very thoroughly as well as give a 100% honest opinion and review of the lights, their performance and physical specs.

I welcome all to join along as I test out 2 of the brand new INTELLIGENT-GRO 228w LED GROW LIGHTS (IGRO-228LED)

First I will cover the lights and the details and then I will get into the details of the grow, plants, medium and other details.

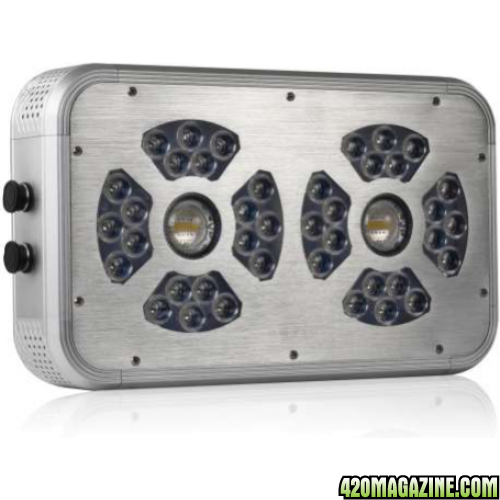
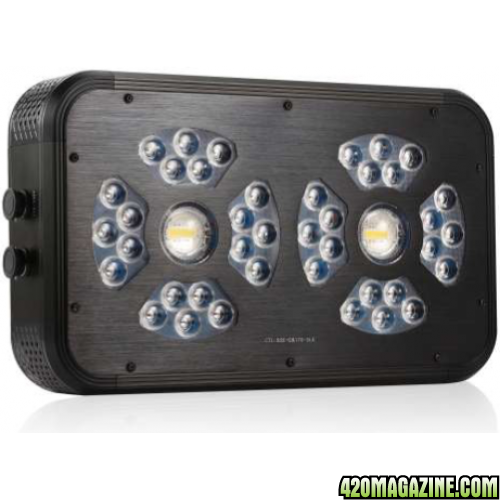
Introducing the Intelligent-Gro 228W LED Grow lights (IGRO-228LED)
228-1-500x500.png
228-3-500x500.png
228-2-500x500.png
228-4-500x500.png


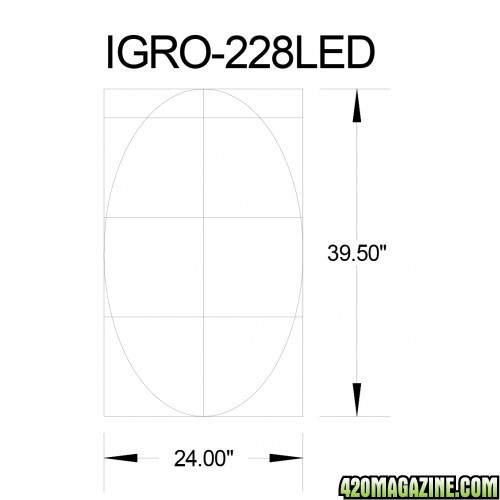
This I-Gro Intensity Series LED light coverage area is 24" x 39.5" at a height of 24 inches.
(Each order comes with one free Intelligent-Gro Controller *additional controllers sold separately)
IGRO-228LED-500x500.jpg

LED_controller_Accessories-500x500.png
IGRO_remote_control-500x500.png


Key Features:

Modularized design:
- Easy and fast production
- Easy maintenance and repairing

Full aluminum housing:
- Light weight, cost saving for delivery
- Anti-rust, anti-corrosion
- Good heat dissipation, long life time
- Smart design, elegant shape

Three Programmable LED channels:
- Independent channels for Growing, Vegetation, Flowering
- Mode setting for sunset, sunrise, sunny, cloudy, 24 hoursrecycling
- Customized setting for each channel in each hour, 24 hours recycling
- More energy saving with controller

228-spectrum1.png
228-spectrum2.png
228-spectrum3.png
228-spectrum4.png
21hr-Clone-program-graph.png
18hr-Veg-program-graph.png
12hr-Bloom-program-graph.png


54W High power center (105°beam angle) + 3W LEDs surrounded (78° beam angle):
- High power penetration
- Even LED light coverage

Daisy chain control:
- One controller can support 10 lamps
- Synchronous control
- Saving cost for controller

High energy-efficiency:
-Intelligent-Gro LED Grow Lights cost between 40% - 70% less to operate compared to HID lamps

Application:
- Commercial Greenhouses
- Indoor and Vertical Farms
- Nurseries
- Research

Certificate:
-CE and ROHS

Specifications
AC input 85V - 265V / 50-60Hz
AC plug standard Customized
Auto-Grow Programmable
Beam angle 105° +78°
Color options Silver
Daisy chain Support 10 units / controller
Gross weight 3.78kg
Housing material Aluminum
LED channels Growing/vegetation/flowering
Life span 50000 hours
Modularized design Yes
Net weight 2.98kg
Packing size 510mm"256mm"106mm
Par reading (30cm) 690 UmolCO2 m-2.s-1.
power 228W
Power consumption 180W
Power efficiency >85%
Product size 370mm"220mm*70mm
Spectrum 10 Bands with UV&IR


What strain is it?

Black Cherry Cola: not exactly sure what the genetics are but found this on one website "Airborne G13 X Ortega x C99 x Blackberry x Cherry AK-47 — 20% Indica/80% Sativa"

GDP: Supposedly Big Bud x Purple Eurkle, this is one of my favorite strains. I am excited to have 2 of them Definitely going to have to keep them around for a while.

Harlequin: A High CBD strain that gives about a 1:1 ratio of THC/CBD, great for the medicinal effects without a full blown high. About a 75%/25% sative/indica and typically produces 4-6% CBD or higher I couldn't find the details on the genetics but the sativa side is supposedly from a columbian gold and a strain from switzerland and the indica side from a Nepal strain.

Purple Dragon: Purple Urkle x Blue dragon (Sour Diesel x Blueberry)

Green Candy OG: Green Cr@ck x Candy Kush (OG x Trainwreck)


Is it in Veg or Flower stage?
Newly transplanted clones I received from a local clone dispensary.


If in Veg... For how long?
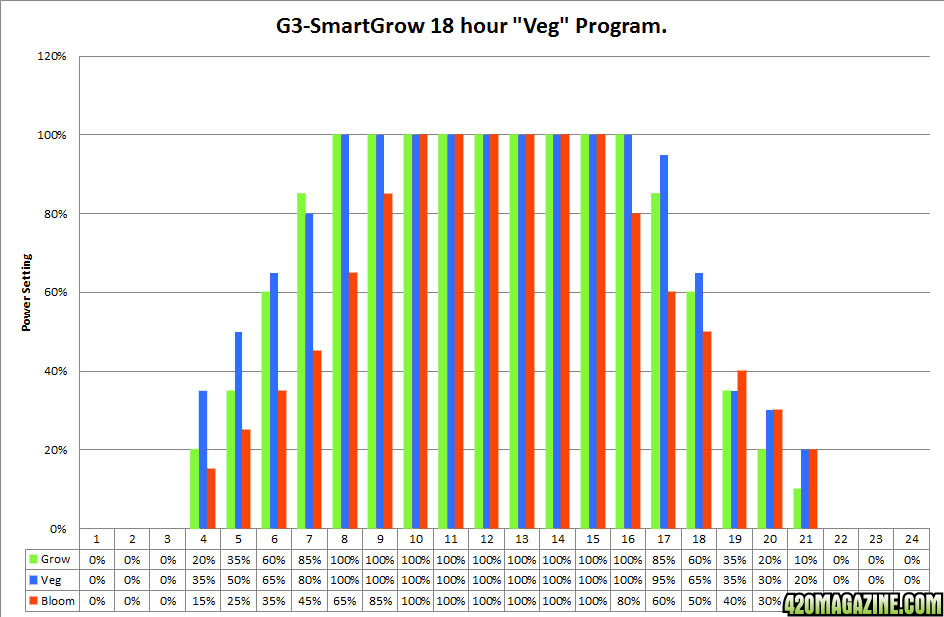
These plants were clones that I purchased a few weeks ago from a local clone dispensary and they say that all the genetics are verified. The clones were transplanted into 3 gallon pots about a month ago and vegged under LED. Now that I am using Intelligent-Gro LED, I will be using the 18-6 veg schedule with custom settings recommended on their website.


Indoor or outdoor?
Indoor using a 2x4 Hydrohut Silver Edition (Actual Measurment 55" x 28" x 78"),


Soil or Hydro?
Soil


If soil... what is in your mix?

I am running the soil from my last grow, mixed with about 20% new soil that has cooked for a few months. Both were amended at the same time with the following amendments. Upon re-use, I did not add anything to the mix.


The Base Soil Mix:
Each of these equaled about 2 1/2 (2gallon) pots.
So a total of 5 pots of premixed soil was used
8 (2gallon pots) of ProMix HP
2 (2 gallon pots) of FF Ocean Forest
2 1/2 (2gal pots) of Worm Castings
1 1/2 (2gal pot) of Volcanic Pumice
2 (2gal pot) of Alaskan Forest Humus

The Amendments: Make up 15% of my total soil mix
1 1/2 Cup of Azomite (trace minerals and micronutrients)
4 Cups of Calcium Carbonate Powder 97%
3 1/2 Cups of Soft Rock Phosphate (Collidal Clay with high phosphorus and CEC value)
1 1/3 Cups of Gypsum (Calcium Sulfate)
2 Cups of Crab Meal 2-3-0 23% calcium(also a P source and source of chitin a hormone/growth regulator)
1 1/2 Cups of Fish Bone meal. (3-18-0) 24% Calcium
1 1/2 Cups of Lava Sand (adds trace minerals and supposedly adds paramagnetic value to the soil)
2 Cups of Crab Shell Meal 2-3-0 23% Calcium
2 Cups of Kelp Meal (also has growth hormones and PGR's, plus trace minerals)
1 Cup of Alfalfa Meal. (2-0-3) (contains Trichontinol which aids in plant growth and health)
1/2 Cup of Powdered Humic Acid (Adds Carbons to the soil as well as trace minerals and aids in chelation of minerals)
1/2 Cup of Humboldt Myco's Maximum (Beneficial Bacteria and Mycorrizae Fungus)
1/2 cup of Epsom Salts (Magnesium Sulfate)
1/3 Cup of Greensand (0-0-3) (Trace Minerals)
1/2 Cup of Dry Molasses (1-0-3) (Energy for the Microbes)


If soil... What size pot?
3 gallon round plastic for veg, before flowering transplant into 5 gallon plastic square pots.


Size of light?
(2) Intelligent-Gro 228w LED Grow lights (IGRO-228LED)


Is it aircooled?
The tent is yes, the lights are vented and cooled with internal fans.


Temp of Room/cab?
Ranges between 64F-75F in Veg Tent
Between 73-82F in Flowering Tent


RH of Room/cab?
Generally between 40-50%, humidifiers are available if it dips with offshore breezes here in Socal.


PH of media or res?
I don't check it, its soil.


Any Pests ?


Not any currently, I use Spinosad, SNS and other preventative measures to keep it that way


How often are you watering?
Young vegging plants about 1x every week and a half
larger Vegging plants about 1x per week
flowering plants early flowering about 1x per week
flowering late about 1x every 4 days.


Type and strength of ferts used?

Using foliar products including Bloomit, Amaze and PGR.
I also will be using Tand J enterprises tea and bio-minerals
about 1x per month I will be giving a soil drench of earthjuice

Other nutrients on hand include and may be used:
occasional additive include advanced nutrients: carboload, organic b, fulvic acid
occasional additives include general organics: bioweed, cal/mag, hydrolyzed squid, florablend tea, bioroot
bonide liquid fish 2-4-0...love this stuff!
SNS pest products for prevention
Spinosad by bonide


I welcome everyone to my journal and feel free to ask questions, chime in with advice or just enjoy the ride as we put Intelligent Gro 228w LED's to the test!

I ask that you please do not ask questions regarding other LED manufacturers here, being that this is a sponsored grow by Intelligent-Gro, keep LED questions relating to their products only please. Thank you and enjoy the show!!
 
Re: Icemud's Grow 8.0, NEW Intelligent-Gro LED, 2x IGRO-228 LED, Testing and Review.

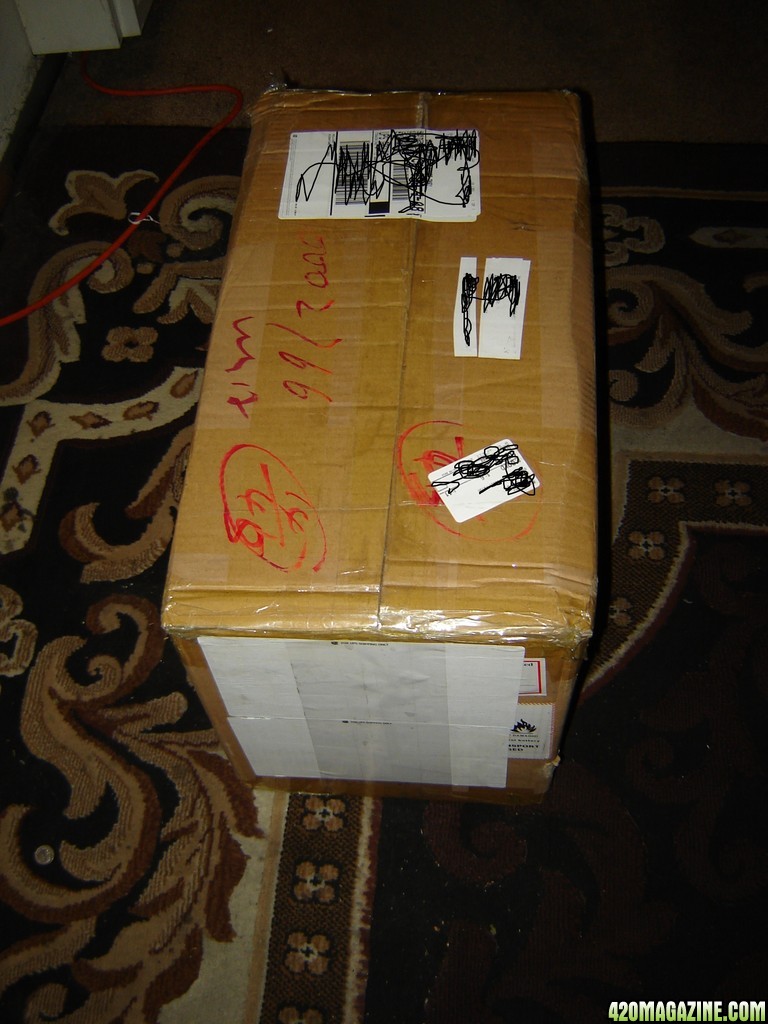
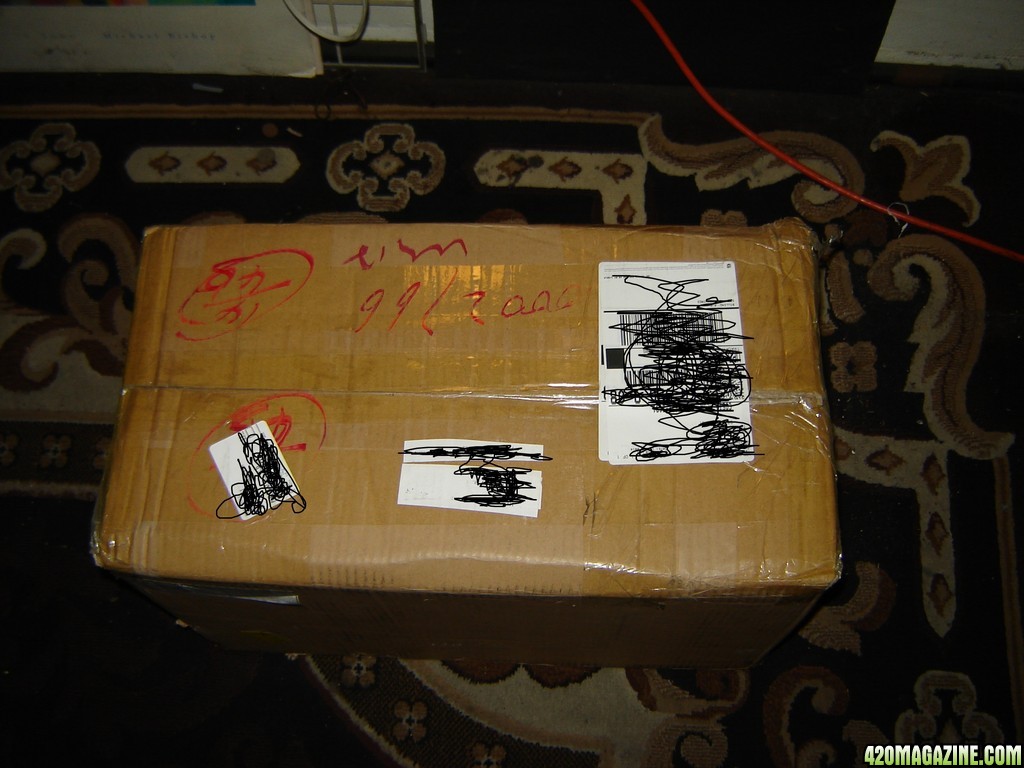
So Today I received my Intelligent-Gro Lights and they arrived rather quickly from when they were shipped (I think it was only 4 or 5 days). I had to sign for the package so I made sure that I was available today to receive my new lights and was like a kid at Christmas waiting for Santa! LOL

During the Day I moved around my grow tents, cleaned the bottom removable tray and got the tent ready for the new 228W LED's from Intelligent-Gro.

And around 3:30...the moment of truth arrived at my door!!! WOOOO HOOO!!! Anyone who has read through my journals or knows me in person knows that I am fascinated by lights, lighting spectrum's and how they effect plants. Part of growing is having a perfect environment including humidity, temperature, and lights and I have been looking for a while now for a LED solution that allows custom programming of the lights to replicate the color shift from dawn to dusk... and Intelligent-Gro answered my wishes!!

I was to receive (2) Intelligent-Gro 228w LED grow lights, a Intelligent-Gro controller, and all the cords required for power, daisy chaining and also for the controller. All of this came in 1 box which was very nicely packed with foam, bubble wrap and taped up good :)
edited_box1.jpg
box_edited_2.jpg
DSC085833.JPG
DSC085871.JPG


Upon opening the box I discovered the controller which was independantly wrapped in a packing foam sleeve and just below that another layer of bubble wrap and then (2) very nicely designed and very sturdy boxes containing the Intelligent-Gro lights. Inside each of these boxes was the Intelligent-Gro 228w LED which was suspended between 2 foam end protectors (not sure what the official name for them are) as well as it was wrapped in a clear plastic bag/covering.
DSC085861.JPG
DSC085852.JPG
DSC085942.JPG
DSC085931.JPG
DSC085951.JPG
DSC085971.JPG
DSC085981.JPG
DSC085992.JPG


They Definitely went the distance to make sure that the lights were protected very well.

So upon pulling out the light, the first thing I noticed was how light these were (not heavy at all) , the cases are made of what looks like a brushed aluminum, with a plastic composite type material on the corners of the light which featured vent holes for the hot air to escape. All of the corners of the lights were flush and void of any sharp or unfinished edges and the product seems to be built very sturdy.
DSC086022.JPG


On top of the light there are 2 cooling fans (probably like 3" diameter) and towards the corners of the light on the top are more drilled vent holes to help cool the lights.
DSC086041.JPG


Also nicely either etched/engraved or printed onto the back of the light are the specification information which was nice to see as well.
DSC086052.JPG
DSC086062.JPG


There were 3 switches on top of each panel, one for veg, one for Grow/Intense, and one for bloom/flower. What I really like about this light is that with each switch the fans come on so any of the spectrum channels can be used independently of each other.

DSC086032.JPG


On each side of the Intelligent-Gro 228w panels there is (2) connectors (each side) for use with the daisy chain feature, one for the power, and one for the controller signal. Each is clearly labeled to what each port/plug is for and was very easy to connect the cords. (plug/screw combo connections) which make sure the cords don't come loose :)
DSC086192.JPG


The LED chips themself are protected under a lens which I believe is for focusing the light more directly downwards to allow more intensity and the integrated/cob style middle chips have a dome style/rounded glass covering that also helps focus the light and protect the chips...

DSC086002.JPG
DSC086013.JPG
DSC086082.JPG
DSC086092.JPG


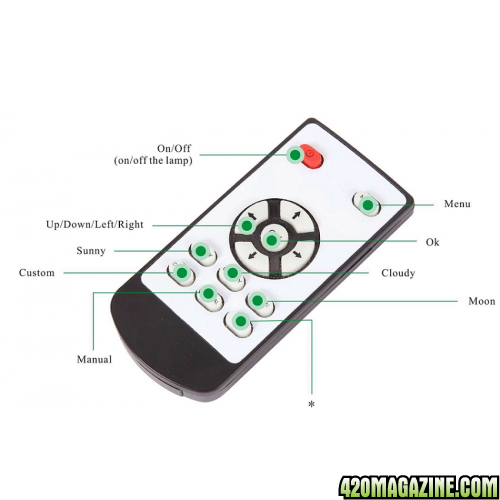
The controller was also very nice looking and comes with a 2-3' cord and also has an IR remote which allows control without having to physically use the controller. Each light also comes with a daisy chain cord, a power cord, and the steel/wire hangers for mounting and a 2 fold flyer/datasheet which shows the lights spects, features and photos as well as the spectral output graphs for each channel. (does not come with Yo-Yo's or hangers so those would need to be purchased separately). The controller in the photos has the plastic protective film over the LCD screen so in the photo's it looks scratched up, but its just the plastic covering which I didn't remove in the photos)
DSC086112.JPG
DSC085922.JPG
DSC085912.JPG
DSC085902.JPG
DSC085891.JPG


Overall the feel of the lights is very professional, well manufactured and I am impressed... on to the testing...!!!
 
Re: Icemud's Grow 8.0, NEW Intelligent-Gro LED, 2x IGRO-228 LED, Testing and Review.

led-logo.png

The initial lighting of the Intelligent-Gro 228w LED and draw tests(model/product code IGRO-228LED)... 1st impressions...

OK...so I was so anxious to plug the lights in to see how bright they are and I have to say...Whoa!!! Very very bright!!! Upon plugging in the light I noticed that the fans run very very quiet...much quieter than other LED's that I have used in the past, and you could barely hear them operating :)

I am all about giving honest reviews and helping to provide a lot of information so other consumers/growers can learn from me as well as see real world usage, results, and set their expections. I wanted to mention this because even though this grow is sponsored by Intelligent-Gro LED, my job is to test the lights and give an honest review, as well as to document my grow from veg to harvest.

My first test was a load test using a Kill-a-watt meter to test the total draw of the lights in operation. I wanted to first see if the specs listed on the website were accurate, as well as see how much power these 228w panels use. Each of the panels were tested independently as well as daisy chained together for Amps and Watts and more visual details will follow in the photos as well as the upcoming un-boxing video..

LIGHT #1
Intelligent-Gro 228w LED
(model/product code IGRO-228LED)

Here are the results of the 1st light I tested:
Note: This light was tested independent of the other light (no daisy chain) and it was plugged directly into my Kill-o-watt meter.

ALL 3 CHANNELS OFF: (SWITCHES IN OFF POSITION) 6w, .09A
VEG: 38w, .36A
Bloom: 31w .31A
Grow: 107w .95A
ALL CHANNELS ON FULL: 166w 1.43A (slightly lower than the 180w specs)

VEG
DSC086233.JPG
DSC086202.JPG
DSC086154.JPG


BLOOM
DSC086212.JPG
DSC086162.JPG
DSC086244.JPG


GROW
DSC086253.JPG
DSC086172.JPG
DSC086221.JPG


ALL 3 CHANNELS ON
DSC086264.JPG


One thing that I did notice that is a little ODD about both of the lights I tested is that when all switches are in the off position, Some of the Red LED chips still are getting some kind of power and are very dimly lit. (will be shown in upcoming video) At first I thought this might just be power that is built up inside the unit so I let it sit in the off position for about 10 minutes while I ran to the store, came back and the LED's were still dimly lit...
So there is some kind of power draw going through the light, even when all 3 switches are in the off position and leaking to the Red Diodes. I was curious how much power this was "leaking" when the light was supposed to be off, and the Kill-a-watt meter read : With all switches in off position, the light is drawing about 6 watts and .09 Amps.
When I unplugged the light from the wall, the dimly lit red LED's went out completely.

I will have to find out if these lights can be run on a regular digital timer, outside of the programmable light controller so that I can set my timer to come on a few minutes before the actual controller/programmer turns the lights on, and so that my timer turns off the power a few minutes after the controller/programmer turns the lights off. There probably isn't a need to do this since the red led's are very very dim and probably wouldn't effect the plants at all, but looking at the power draw/savings of not having this extra 16w pulling 24/7 would save me an extra $3 a month off my electric bill, and over $36 bucks a year off my power bill. I just need to find out how long the controller will hold its memory without power. If it can hold the custom settings for the duration of the dark period, then I most likely will put it on a digital timer like mentioned previous. Like I mentioned, not at all a big deal, but with me trying to limit my electric bill, every watt counts :) I will ask Danky Dave if the controller holds memory and if it does, problem solved :)


Light #2
Intelligent-Gro 228w LED
(model/product code IGRO-228LED)

I tested this light independent of the other light so it was plugged directly into my kill-a-watt meter with the included 110v wall plug. I noticed that when turning on this light, there was a slight noise coming from it when all 3 switches were in the on position but when I turned off the "grow" channel the sound nearly disappeared. The noise itself sounded as if it could be the fan (like a bearing was bad) or almost like a buzzing electrical sound (like when there is a short or a wire is not grounded properly). The sound itself is not that loud and most likely my guess would be the fan (but why only when veg and bloom are on is it quiet, and when then grow is switched on the noise starts). Does the fan change speeds depending on how much "juice" is turned on? Honestly its a very minor problem if it is the fan and still it runs much quieter than my other brand LED lights...much much quieter!


Here are the results of the 2nd light I tested:
Note: This light was tested independent of the other light (no daisy chain) and it was plugged directly into my Kill-o-watt meter.

ALL 3 CHANNELS OFF: (SWITCHES IN OFF POSITION) 6w, .09A
VEG: 39w, .37A
Bloom: 31w .31A
Grow: 110w .98A
ALL CHANNELS ON FULL: 171w 1.51A (slightly lower than the 180w specs)


VEG
DSC086642.JPG
DSC086651.JPG


BLOOM
DSC08666.JPG
DSC086671.JPG


GROW
DSC086681.JPG
DSC086691.JPG


ALL 3 CHANNELS ON
DSC086701.JPG
DSC086712.JPG


Results of both lights, daisy chained together with all 3 switches in the on position and at 100% power, and also the results of both lights, switches in the off position, daisy chained together.


Both Lights, All 3 Channels OFF: (switches in off position) 12w, .16A
Both Lights, All 3 Channels ON, Daisy Chained, intensity at 100%: 339w 2.88A (slightly lower than the 180w specs)


Both Lights, All 3 Channels OFF: (switches in off position)
DSC08662.JPG
DSC08663.JPG


Both Lights, All 3 Channels ON, Daisy Chained, intensity at 100%:
DSC086722.JPG
DSC08673.JPG


My 1st impressions:
I have to say, these lights are very nice. The quality of the build seems pretty sturdy, they run extremely quiet, like whisper quiet where you can barely hear the fans running (other than slight issue mentioned above). The lights are extremely bright, especially for their low power usage and the 2 of the 228W models together fully lights my 55"x28"x78" tent very brightly. I really like how the custom channels can be independently programmed by the hour, and by intensity 0-100% which allows room for many future experiments with different spectrum combos :) (I will get into the program modes in a little bit). I can't wait to see how my plants like them...
 
Re: Icemud's Grow 8.0, NEW Intelligent-Gro LED, 2x IGRO-228 LED, Testing and Review.

led-logo.png


Test Number 2, The Temperature Test:

Models Tested:
Intelligent-Gro 228w LED
(model/product code IGRO-228LED)


I wanted to test the running temperature of the LED lights to see what type of heat they were throwing out, as well as the case temperature and the temperature of my leaves with the lights hanging 18" above the plant canopy.

Before taking the temperature readings, the lights have been in operation for over 1 hour, with all 3 channels on 100% intensity/power.

I took 3 readings... The readings were done with a IR thermometer with Laser pointer. The readings were taken from there area's..: One at the top of the casing near the fans, one at the middle of the side panel of the lights, and one of the leaf's themselves sitting 18" under the light.. Here are the results:


Light #1
At top: 99.3F
At middle Side: 109.9F
At plant leaf: 71.2F
DSC086561.JPG
DSC086571.JPG
DSC086582.JPG


Light #2

At top: 103.2F
At middle Side: 113.9F
At plant leaf: 75.1F

DSC086591.JPG
DSC086601.JPG
DSC086612.JPG


Overall these panels run slightly hotter than my other 5w panels by a different company, but only by about 10 degrees warmer. These are definitely much cooler though than running a HPS or HID at the same wattage or more.

I still have to work on the ventilation for this tent to even out the cold air coming in, as well as to allow a greater amount of cooler air to be sucked into the tent. I will be doing this tonight or tomorrow depending on how soon I get tired :) thankful for sativas :)


The point of the test was to show exactly the temps of the units in operation. Most probably wouldn't care about this kind of data, and really it doesn't even matter to me much, but since I had the IR thermometer I decided to post the results.
 
Re: Icemud's Grow 8.0, NEW Intelligent-Gro LED, 2x IGRO-228 LED, Testing and Review.

led-logo.png


Intelligent-Gro Intensity Series Controller/Remote Control Set
LED_controller_Accessories-500x500.png
IGRO_remote_control-500x500.png


.... So I got through the initial testing and it was time to hook up the controller and play around with it. The controller came wrapped in a foam sleeve and had protective plastic covering the display. (***In the photo's I didn't remove the protective plastic so that is why it looks scratched up, but its just the plastic layer, not the actual screen)

The controller is about 4" long, hosts a backlight LCD screen, and a touch pad 4 way directional area, along with 2 other touchpad buttons, one is "MENU" and one is "OK".

DSC085861.JPG
DSC085891.JPG
DSC085902.JPG
DSC085912.JPG
DSC085922.JPG
DSC08636.JPG
DSC08637.JPG


So after tinkering with the controller for all of 5 minutes or so, I figured it out completely and was able to make my custom program. I will go through the step by step but first a little about the modes...


The Main screen:

The Main screen shows which program mode you are in (right now I have it on sunny day which is all 3 channels at 100%) but it will show a little Icon/picture and a description of what mode you are using. It also shows a clock (in military time) and the current date. Below the date it also shows all 3 channels and what % of intensity or power the channels are set on... (will explain more in instructions).
DSC086741.JPG
DSC086761.JPG


The Menu button:
From the Main screen, when you push the menu button, the display changes to a list of different settings, both pre-programmed and custom.

The program modes are : Sunny day, Cloudy, Moon, Custom, Sunrise/Set.

I haven't figured out how to apply the pre-programmed settings yet or what the purpose would be under manual control but I also didn't read and just figured it out on my own in a few minutes, so I am sure they have application and I will report back more when I find out..
DSC08677.JPG
DSC086791.JPG


The Settings sub-menu
This menu hosts the controls for the time, date as well as shows the software version number.


How to use the custom program mode: (programming the recommended settings for clone, veg and bloom)


DSC086782.JPG

Programming the custom mode is pretty easy. 1st you press menu and scroll down using the arrow buttons until you see "custom" in the menu. Once you highlight this option, you can either press "right" on the arrow buttons or press the "ok" button to advance to the custom programming menu. The controller has a built in timer set on a 24 hour cycle in military time... 13:00= 1:00PM. When you enter the custom mode screen it is pretty self explanitory but you use the arrow keys to move around and highlight the different options you want to custom set.

Each light color channel has a range from 0-100% (100% being full power) and you can set the individual intensities of each channel per hour of your 24 hour day. To do this is very simple...

First you pick what time you want your lights to come on. I chose 6:00am for the beginning of my 18/6 light schedule for veg. To do this you want to highlight the time using the UP/DOWN arrow keys (the time is on the LCD, 1st in the list). Start at 0:00 and make sure all the channel intensities are set to 0% from hour 0:00 until the time you want your lights to come on. To do this you just highlight the "time" option, and using the LEFT/RIGHT arrow keys you can move through the day, hour by hour... So for my situation...I checked 0:00 through 5:00 and made sure all channels were set to 0%.

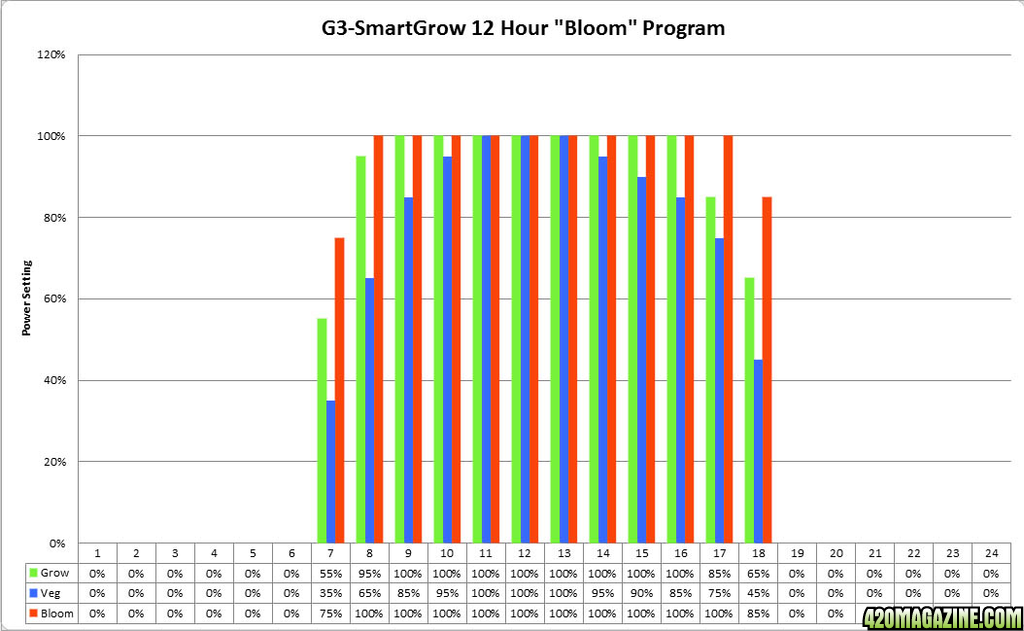
When I reached hour 6:00 or 6AM, I referred to the setting recommended on the Intelligent-Gro Website. For each hour starting from lights on, the intensities can be set according to the recommended schedule, or you can program your own. I chose to use the recommended settings because since this is a test, I want to use what is recommended. For each hour you can scroll UP/DOWN using the arrows to set each of the 3 channels (Grow, VEG, Bloom) by percentage from 0-100%. When I am done with setting the 6:00AM hour, then using the UP/DOWN arrows, I highlighted the option "time" and pressed right. This moves the time to 7:00. Again using the UP/DOWN arrows to select the channels, and the RIGHT/LEFT arrows to set the individual intensity %,

I did this for each hour of the 18 hour cycle. When I reached the dark period, again I wanted to scroll through the rest of the 1-hour increments to make sure that the intensities were set to 0%. Once you are done setting your full 24 hour day/custom program, using the UP/Down arrows highlight the option "save" and press the "OK" button. Now your custom program is saved.

Now to use your custom program mode, simply hit the "menu" button, highlight the option "custom" and press "RIGHT" and then hit OK a few times. Haven't figured out if its tapping it a few times or holding "OK" but when the setting is accepted, the LCD will return to the main screen, and the icon and description should read the setting mode you chose.
DSC086803.JPG


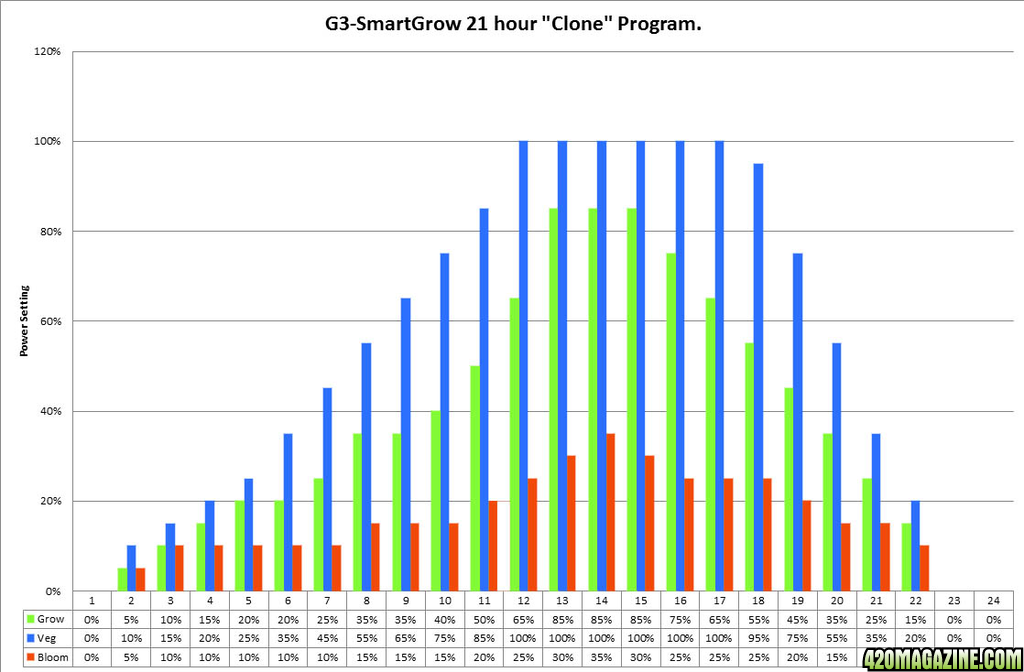
Here are the Intelligent-Gro Recommended Settings for good old Mary J..
21hr-Clone-program-graph.png
18hr-Veg-program-graph.png
12hr-Bloom-program-graph.png
 
Re: Icemud's Grow 8.0, NEW Intelligent-Gro LED, 2x IGRO-228 LED, Testing and Review.

My intelligence was correct icemud, can't wait to see your approach with these lights. Looking forward to getting my hands on some myself (when I can get to the bank, sorry danky, freaking work) I hope your able to put a clone under and utilise all the features of the unit to show us its capability. Awesome man, be watching to see how they should be used. Peace
Edit; went back after the excitement post and read the start of your journal, clones, this will be great to watch, all the best icemud.:peace:
 
Re: Icemud's Grow 8.0, NEW Intelligent-Gro LED, 2x IGRO-228 LED, Testing and Review.

ok this is the place to be Happy Weednsday Ice :thumb:
 
Re: Icemud's Grow 8.0, NEW Intelligent-Gro LED, 2x IGRO-228 LED, Testing and Review.

Now the Tent and environment, the Lights hung and wired, and the plants!!!


Alright, so hanging the lights was a breeze, I had to go out and buy 2 sets of Yo-Yo's because they were not included but basicly each light has 4 mounts on the top of the panel (brass looking loopholes) to which 4 wire's with clips are attached. The wires are paired up per side with a small Carabiner in which then I attached this to the Yo-Yo's.

The wiring was very easy, there are 2 types of plugs on each side of the panel, a 3 pin for the Power, and what looks to be a 9 pin (didn't count them) connector for the signal from the controller. The plugs push in, and there is a slot to make sure the pins are lined up correctly before inserting the plug. After the plug is pushed in, a screw type fastener tightens and locks the cords in place.

To daisy chain them is quite simple and I don't think I need to go over how to do it since it is pretty self explanitory, unless you were one of those kids who tries to fit the square block in the round hole..then ask me and I will help you....LOL j/k

So after hanging the lights, programming the custom modes and cleaning the tent. It was ready for my plants.

The plants were vegged for about 3 weeks from transplant under a different manufacturer LED, but since the plants are still in their young veg stage, the results of these new Intelligent-Gro lights will still be substantial and still will give a full veg to harvest result using the new lights :)

I still have to work on the ventilation tomorrow, ran out of time tonight and I want to add 6" intake ducts instead of using the screens in the tent for fresh air, and I may even swap 4" fan that I am currently using for another 6" fan I have laying around since these panels do throw a good amount of heat.

DSC08647.JPG


I am going to try to 1st just add the intake ducts to see if that lowers temps a bit, but right now with both lights on 100% power, my tent is sitting at around 81F at the canopy level and about 85 degrees about 1' above the light position in the tent.


So without further ado, Here are the photo's of the tent, the ladies, and featuring Intelligent-Gro LED!!!
DSC086303.JPG
DSC086313.JPG
DSC086391.JPG
DSC08640.JPG
DSC08641.JPG
DSC086421.JPG
DSC086431.JPG
DSC086441.JPG
DSC086452.JPG
DSC08646.JPG
DSC08648.JPG
DSC08649.JPG
 
Re: Icemud's Grow 8.0, NEW Intelligent-Gro LED, 2x IGRO-228 LED, Testing and Review.

They look nice. Can't wait to see how they turnout for you.

Welcome NewGrowKing!!! I am very impressed with these lights, the spectrums used, the design and the custom settings!! I think these Intelligent-Gro Led's are going to blow my mind!
 
Re: Icemud's Grow 8.0, NEW Intelligent-Gro LED, 2x IGRO-228 LED, Testing and Review.

My intelligence was correct icemud, can't wait to see your approach with these lights. Looking forward to getting my hands on some myself (when I can get to the bank, sorry danky, freaking work) I hope your able to put a clone under and utilise all the features of the unit to show us its capability. Awesome man, be watching to see how they should be used. Peace
Edit; went back after the excitement post and read the start of your journal, clones, this will be great to watch, all the best icemud.:peace:

Hey GrizzWald!!! Heheheehee, you guessed the surprise and I appreciate your clever way of guessing it without totally giving it away!! :high-five:

I have to say I am very impressed with this light and I am very excited to see how the plants perform under her. For this journal it is slightly too late to use the clone program, but I definitely will in future grow journals, and I also want to do my own custom programs in the future as well. I just chose to use the suggested Veg and bloom settings from Intelligent-Gro LED so that the test would be true to the company specs! I am very very excited and I've been waiting all week for this moment!! Definitely stay tuned because I have a feeling these lights are going to blow my mind!
 
Re: Icemud's Grow 8.0, NEW Intelligent-Gro LED, 2x IGRO-228 LED, Testing and Review.

ok this is the place to be Happy Weednsday Ice :thumb:

Welcome Cronic!!!!! Glad to have ya here!!! It is a super happy Weednesday for me too!!!! Lots more work to do tomorrow as far as getting my breeding project ready, mixing soil and also fixing the ventilation in this tent but still will be doing it with a huge smile... These Intelligent-Gro lights are amazing!

Hope you have a wonderful Weednesday!
 
Re: Icemud's Grow 8.0, NEW Intelligent-Gro LED, 2x IGRO-228 LED, Testing and Review.

Hey ice I've been reading about soft red light during dark periods, I wonder if this is what the leaking watts when off is about? With enough of these units set up single in a row, you could get your plants to bend and follow the sun, could programs each unit to allow for this. Could even turn one unit then progress through the row in 10/15 min intervals till all on, and go through day and turn off lights in same way. The possibility a these lights open up. Moon programe on Callander or is it possible to have 15 day months? Sorry for double or triple post, it's just the possibility sand this weed I'm smoking lol

No worries about triple posting, post all you want!!! I like where you are going with the ideas!! I haven't read anything about soft red light during dark periods, if you have any info or links to PM me I would definitely be interested in reading them. :) I know that there are some things about IR right before the dark period for flowering I have read, but I'm too tired right now to remember what I read...LOL Long day but a great one!!

To have the lights set up in a row, but controlled seperately, I believe each light would have to have its own controller but that would be awesome to program the lights to shift not only in color, but position like the sun!!! I also read something about inducing blue light at the start of daylight opens the stomata wider than red light, but I again will have to go to my notes to read up some more. I know the sun during the day goes through a color shift from a brief period of deep blue/purple before sunrise, to a very deep red at sunrise, gradually rises from 2000K to around 5000k around noon, and then starts shifting back to deep red at sunrise, followed by a deep blue after sunset..

I have been wanting to do this for a long time now, so now with these lights it is possible. I cant wait for future grows where I can experiment with different light settings :)
 
Re: Icemud's Grow 8.0, NEW Intelligent-Gro LED, 2x IGRO-228 LED, Testing and Review.

Awesome read!! Subbed!

Hey SavinPeace!!! Welcome to my journal testing out these new Intelligent-Gro lights!! I am so far very pleased with the lights and I am really excited to see how happy my plants get under these lights :) Glad to have ya aboard!
 
Re: Icemud's Grow 8.0, NEW Intelligent-Gro LED, 2x IGRO-228 LED, Testing and Review.

Icemud, looking awesome! Great writeup, as usual!

Dr Ziggy!!! Thanks for coming over to the new journal!! I think these lights are going to outperform my expectations!!! Glad to have ya here!!
 
Back
Top Bottom