

Xlr8;1677951 said:The idea of "ways to veg before putting plants in the Flo N Gro" came up in another thread, so I thought I'd post a breakdown again of my DIY veg system. It's worked perfectly from day one, and is an excellent way to start plants for the Flo N Grow.
The only changes I've made since it's original creation, is I've gone away from the flexible air bubblers/diffusers, and switched to old-school cheap 12"? airstone "bars". Ideal, would be a micro-pore diffuser, but they're pricey and overkill for this.
Like the Flo N Gro, once it's set up, it's just managing PH in the reservoir, and doing your weekly reservoir change. I've got it dialed in with my nutes now that the PH stays pretty constant, so I literally only do weekly reservoir changes now, which only take about 30 minutes with this system (at the most). Other than that, it's just managing/training the plants. Easy breezy! When I need to, I pull the net-pots from this system, and bury them net-pot and all in the hydroton of the Flo N Grow. Just enough to cover the lip of the 5.5" netpots when I bury them. Voila! Hopefully this is helpful to someone or sparks an idea for them.
Xlr8;1573151 said:Unlike the Flo N Gro, this DIY I did uses gravity to help it along. In its purest essence, there are flood fittings (see below) that can be set for a minimum level and maximum level of nutrients. A pump in the reservoir, set to a timer, floods for 5 minutes at periodic intervals. 5 minutes is enough time for the roots in all plant sites to get a good soaking before it drains again. The pump runs for the entire 5 minutes, but the overflow fitting keeps it from well, overflowing.
Here's a little more detail with pics on the DIY hydro system I built:
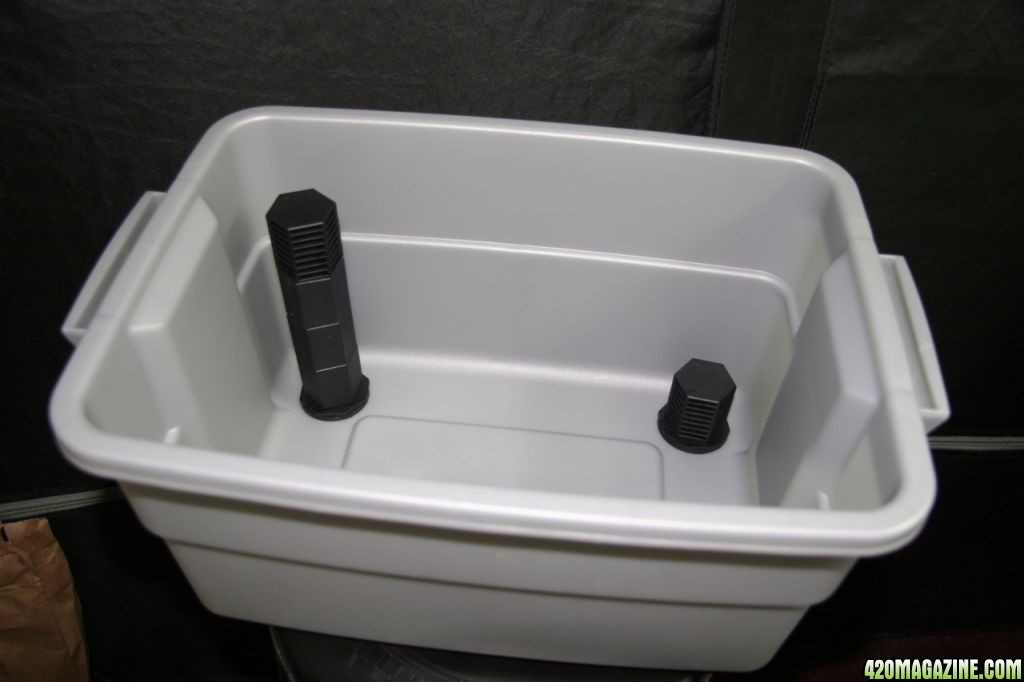
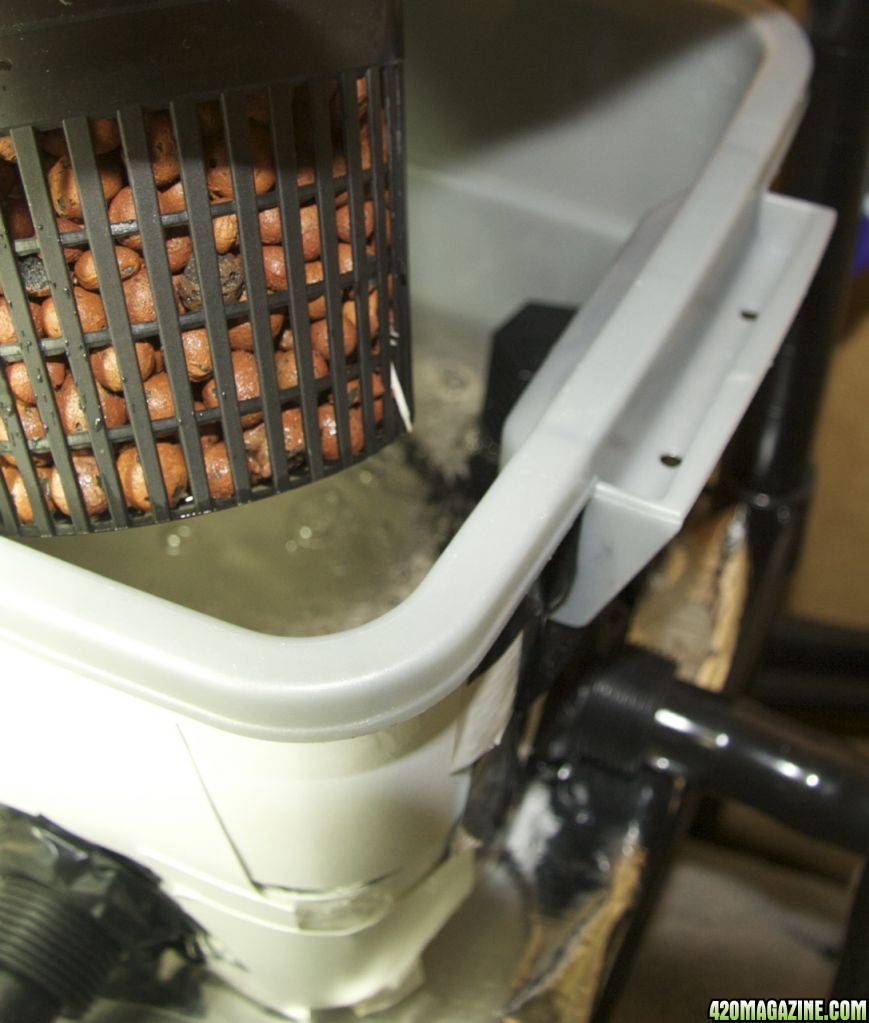
The grey "Brute" rubbermaid garbage container in the lower right of the pic is the reservoir. Notice on the lid there are 2 hoses, and an opening for electrical. One hose is "flood/drain" connection, that connects to a 200 gph pump inside (controlled by a timer). The other hose is for the "overflow drain" and simply dumps the water back into the container after (and during) a flood when it rises to a preset level. Finally, there is a small blue airline that runs paralell to the power cord for the pump, and serves to aerate the reservoir (connected to a small, un-pictured airpump). When the system floods, the pump in the reservoir pumps the nutrients from underneath the far right plantsite (top right of the photo). Along the front of the containers is tubing that connects the plant sites so that during a flood, all 3 plant sites are flooded, too:
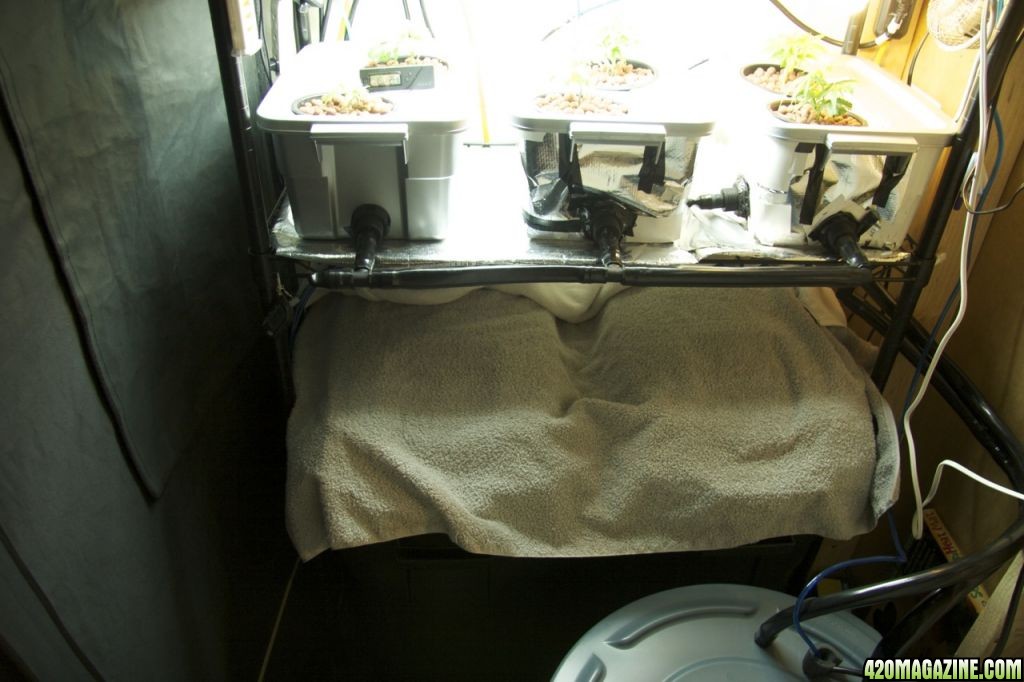
The far-right plantsite is the controller for the other plant sites, too. Inside are botanicare flood/drain fittings (available at most hydroponic stores). One of the fittings is for flooding and draining, and one is for overflow. When the system floods, it comes through one lower fitting, and will continue to flood until it reaches a level set by risers in the other fitting. While the system will flood as long as the timer runs, this second fitting is what keeps you from overflowing. I have it set to a height so that the netpots are thoroughly drenched, but not so high that it overflows. You can buy the fittings in a kit like this (google or check your hydro store). Notice that there are 2 different heights. The shorter one is for flooding and ultimately draining (once the flood cycle ends, the nutrients will drain back through the pump to the reservoir). The second, taller one has risers that allow you to set a max height for your flood before it simply drains back to the reservoir. Here's what I used for fittings (by botanicare):
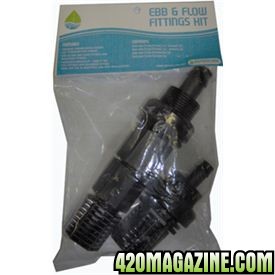
This is a picture from when I was building it. The lower fitting now has one riser piece to allow for a set level of nutrients to stay in each plant site vs. a full drain. THe top piece on these are a filter. So, they drain at the bottom of that piece. In this earlier picture, the lower fitting would drain flush to the bottom (completely). The overflow fitting has (3) of these "risers" and allows for the nutrient level to flood the entire bottom portion of the netpots. The fittings are easily installed by cutting a (I believe 1 1/2 inch hole) and then screwing them together top and bottom:
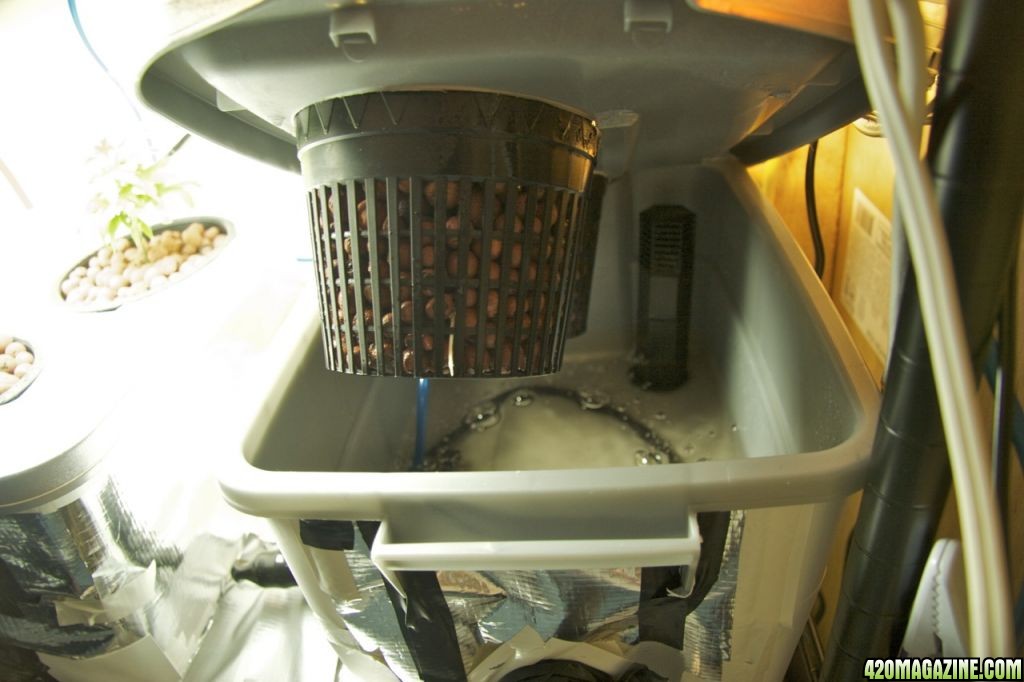
In this photo of the far-right plantsite/controller, you can see the overflow fitting that sets flood height. Unpictured is the lower drain/flood fitting, which isn't visible due to the front of the container. Notice I'm starting to just starting to get roots showing through the bottom of the netpot. The floods should allow root development all along the netpot sides, while dwc only typically results in a mat of roots extending mostly from the bottom only.
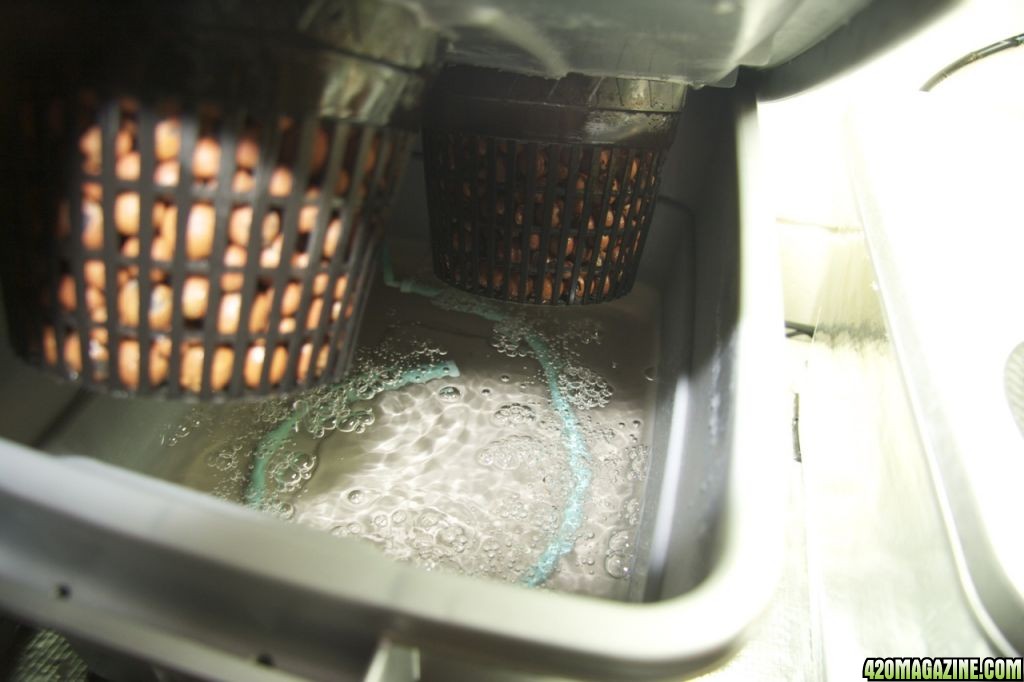
I tried to get a pic of the shorter flood fitting in the container, which can be seen to the right of the visible root in this photo. Normally, it would be fairly flush to the bottom, but I've installed a riser (available individually at my hydro store) so that after a flood, a pre-determined amount of nutrients are left in each plant site, which are aerated to perform in a DWC manner. When not flooded, the nutrients are about an inch, inch and a half below the netpots - fairly ideal for recirculated DWC I think. Without the extra riser and aeration, this would be essentially be a gravity assisted Flood/Drain unit. The riser and aeration in the plant sites allows it to be DWC when it's not flooding.
Here's one of the other plantsites. The nutrient level is controlled for it by the far right "controller" plant site, so aside from being connected in the front, they really just house the plants and contain an airstone (well, bubble bar or whatever you call this thing that acts like an airstone):
Really hope this helps -- let me know if I missed anything or if you have more questions!")
Xlr8;1586714 said:DIY hydro veg update:
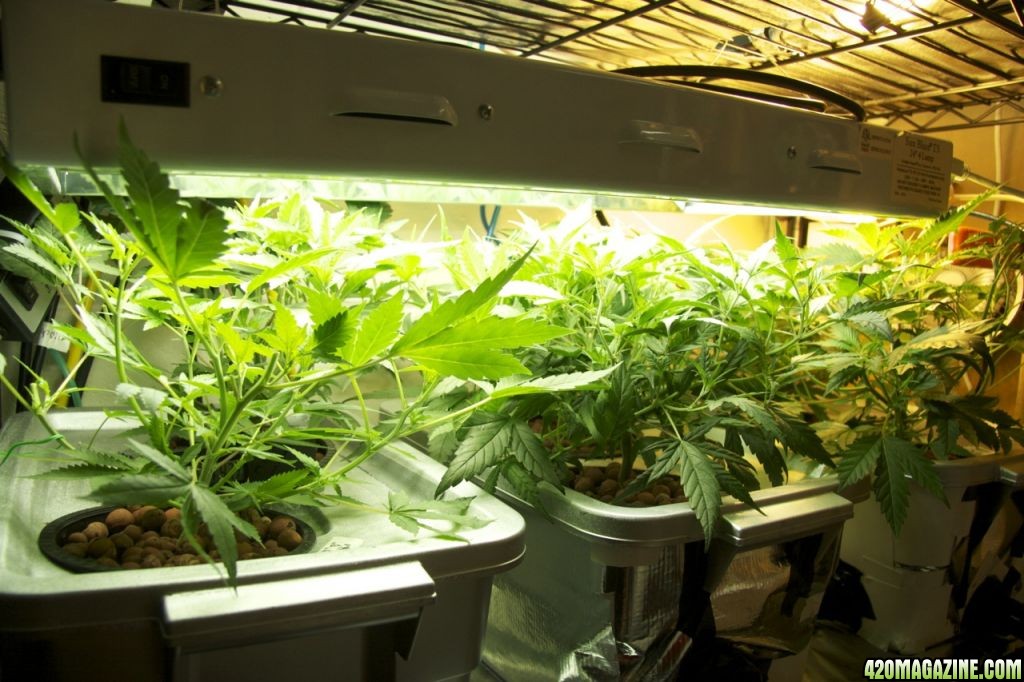
Thought I'd show you all how things are going with my DIY hydro system for my little veg space. As mentioned before, I got sick of hand watering moms and pre-mixing nutrients for the task. Although I really like how well coco coir works for a medium, it was taking up about 90% of my time with the plants, and I really needed to do something different given my health and limitations. So, I made the DIY hydro tubs that are a combo of DWC and Ebb n Grow/flood styles. Basically, DWC with periodic floods that drench the root zone in oxygen rich nutrients. The floods also serve one other important purpose, which is to recirculate the nutrients with the larger remote reservoir, below the plant sites.
How's this working? Unbelievably well so far. The biggest problem I have right now, is that they are growing so fast that I literally need to trim them every day. Honestly, this was my fear of doing the hydro veg/moms to begin with, but I still don't mind the trimming as much as the constant hand-watering, and I've got so much less time invested in the veg portion of my growing. So - huge success so far.
There are 6 plants in my DIY veg units total - 2 unique phenos of Pineapple Express (one more indica-like, one more sativa-like in appearance), 2 unique phenos of my Deadhead Ripper (clones of the plants in flower), an OG Ripper clone, and a Chocolope:
For fun, I took a picture of the rootzone on one of the plant-sites. They all look about like this, and are very white and healthy overall. These are a Chocolope (front) OG Ripper (rear):
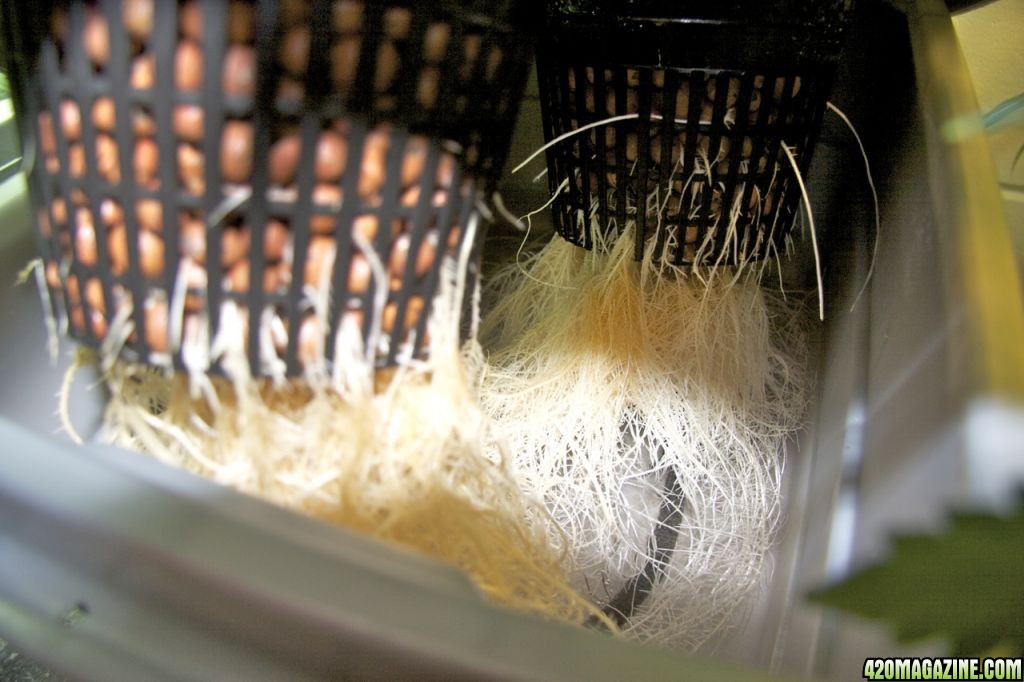
I know roots aren't too exciting, but I wanted to show how well I think it's working so far. I'm very pleased.
Xlr8's Psychedelic Bloom Party Extravaganza
- Author iSmokes
- Create date
")
Blog entry information
More entries in Member Blogs
-
 Best Temp to Vape Weed: Optimize Your Vaping HighCannabis consumption methods have evolved since legalization. Suppliers offer various ways to...
 -
The Best Temperature for Vaping THC & CBD Carts?If you’re new to THC or CBD cart vaping, one of the most crucial things to understand is the...
-
What’s the Best Temp for Cannabis Dabs?Amid the rising demand for cannabis upon its legalization, consumers seek various ways to...
-
Best Temp for Live Rosin Dabbing: Achieving Optimal Flavor and EffectsProper dabbing temperatures for solventless concentrates like rosin are crucial for enhancing...
-
Why Temperature Matters in Live Resin Extraction & Vaping?The rising demand for cannabis has sparked intense competition among suppliers to produce the...